Added the final layer, by my count, the way the layer have been placed, the top and bottom of the forend have 4 layers each, sides, grip and butt have 3 layers each that over lap on the bottom. It also has 4 layer running the length of the stock laminated between the 3 layers of foam, 2 layers of cf between each layer of foam. I can't believe how solid it feels for the weight. The thinnest part of the stock, behind the grip has the 12mm carbon tube between the four layers running the length of the stock and the three outer layers on each side for a total of 10 layers plus the 12mm carbon tube.
The first photo is off the carbon fabric cut to shape with some relief cuts that may be hard to see.
Edit: not sure why this photo is corrupt, will try to figure out and repost. Fixed
View attachment 1029559
Below is the stock brushed with a very thin layer of epoxy, waiting for it to tack up, took about and an hour and twenty minutes to get tacky where if touched, finger prints are left but the epoxy does not transfer to your gloves. Forgot to take a photo of the dry carbon wrapped around it before wetting out but I took my time lining up the diagonal relief cut where the grip/forend meets and working from there forward and back "sticking" the carbon down to the stock. At this stage the epoxy is tacky enough to hold the carbon in place once pushed down, a roller would be awesome for this but I can't find mine currently. Once the carbon is positioned and tacked down, I wet it out generously with west systems 209 extra slow hardner. Wrapped the Peel ply and breather up around it, placed the clay blocks and placed it in the bag. Not sure I mentioned it previously or if it makes a difference but I roll a rag up and place it from the valve to the breather cloth as a path for air to travel to the valve.
View attachment 1029547
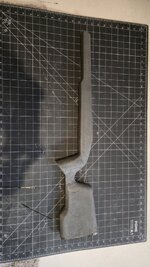
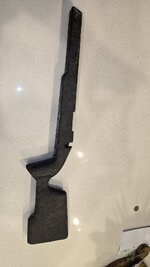
Cat's in the bag, let it sit under vac at room temp for two hours and then placed it in my "oven", old ten tray food dehydrator at 120°F for 4 hours before getting impatient and yanking it out.
View attachment 1029548
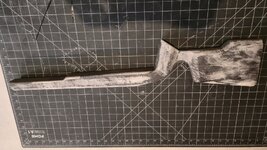
Cat's outta the bag, best pull yet minus the lack of peel ply coverage at the back of the grip area. This pull will probably take 5-10 minutes of sanding to clean up. Next to no wrinkles.
Weighs 20.63 Oz/585 grams.
Time for a barrel channel/inletting and a boat load of steps backward!
View attachment 1029549