Rifle stock build progress thread

survivalistd

Lil-Rokslider
Joined
Mar 1, 2023
Messages
188
As someone that has done hardwood flooring for most my life you have done a wonderful job on that. Something to be very proud of..

Sent from my SM-N986U using Tapatalk
 

coletonf

FNG
Joined
Feb 27, 2023
Messages
14
Really awesome read beginning to (almost) end! Beautiful craftsmanship, looking forward to seeing the final product!


Sent from my iPhone using Tapatalk
 

Lwarner03

FNG
Joined
Oct 5, 2022
Messages
47
Beautiful! I’m inspired. My dad would love something like this and I’d enjoy the challenge. 200+ hours is daunting though and I don’t think I’d do it any quicker than you could!!!
 
OP
Decker9

Decker9

WKR
Joined
Apr 10, 2015
Messages
1,017
Location
BC goat mountains
Beautiful! I’m inspired. My dad would love something like this and I’d enjoy the challenge. 200+ hours is daunting though and I don’t think I’d do it any quicker than you could!!!

Thanks!!

I often wonder what my grandad would think, he was an amazing stock maker back in the day and has been my biggest inspiration to jump into stock making.

Of those 200 hours, so many were spent just looking and thinking of my next move. Each one is getting a little quicker though :)
 
OP
Decker9

Decker9

WKR
Joined
Apr 10, 2015
Messages
1,017
Location
BC goat mountains
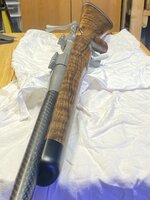
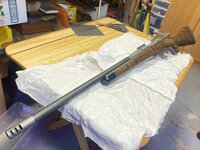
4th cost went on yesterday, wet sanded in again. From close inspection with my not so good eyes, it looks like all the pores are filled now.

It really took on a glow this time, the grain and mineral lines are really starting to show. I think I will add one more coat buffed in, possibly 2.

Iv stocked up with 150 ADG 7 saum brass, 3 boxes of 160gr AB’s, 2 boxes of Berger vld 180’s and 10lbs of H1000. I should be smelling gun powder in the next week here!!

CA3FCA52-398B-4D30-8774-F7CDE1C62620.jpeg72790A85-F9A5-4F54-A3F3-449016E60A7F.jpeg635D09DD-B336-495E-B1FD-7C639769C761.jpeg45ACAD79-7F03-49FD-93A9-E3F68E963C80.jpeg
 

Macintosh

WKR
Joined
Feb 17, 2018
Messages
2,760
Earlier, you were worried you had made the wood too dark. With a couple more coats on, it looks perfect to me. What do you think?
 
OP
Decker9

Decker9

WKR
Joined
Apr 10, 2015
Messages
1,017
Location
BC goat mountains
Earlier, you were worried you had made the wood too dark. With a couple more coats on, it looks perfect to me. What do you think?

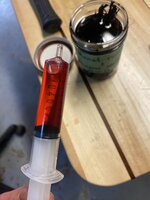
I was pretty concerned at first, but with using the straight Danish oil after that first coat, it’s really brought out the colours and depth. I’m very pleased with how it turned out :). I do think there’s a little more in there that will come out with another coat or two as well.

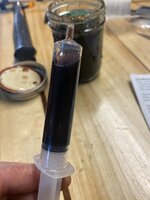
If I ever use the Alkanet mixture again, I will definitely have to dilute it I think. My Alkanet mixtures didn’t turn out as I hoped really, I guess I was looking for more of a red oil, my mixtures have both turned out super dark.
2D5E0EB1-7564-4647-9378-F93898F46AF9.jpeg

The mineral sprit mix does have a nice red to it though. I use spirits to dilute tung oil when I use it, so i am curious to try that with this mixed with straight tung oil from the can (not pure tung).

8CB5846B-2270-496B-9B93-749D761FB80E.jpeg

Iv read good and bad about Danish oil and moisture though. I’m curious to see how it holds up with some rain. If it does blemish though, it should be easy to touch up.

Also looking forward to your checkering posts! (Put that little devil emoji here somewhere!)
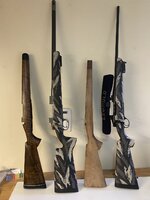
I’m a bit torn right now between starting on checkering learning, or jumping into my other stock I have half finished here. There’s a fellow here in Canada that does outstanding checkering, he’s had my Brno 22 stock for 3-4 months now, im not sure I want to send this one to him right away, I might wait and send it to him next winter during the slow shooting time.

I dug out the other stock for the saum, kinda like wearing work pants vs dress pants lol. I’m curious to see the poi change when switching between wood and carbon. On the right is my sheep rifle in 6.5 prc, it’s walnut looks plain, but man o man is there some flame in it. I used Mexican kingwood for an end cap on it, I thought about using it on the grip cap as well, but the figure in the grip is to nice to cover I think. It would be a perfect fit for this skeleton grip cap, but I really should practice with it a few times before diving into a real stock I think.
929D01F1-9DBE-4A52-BADC-984C831E68FF.jpeg
5B10278E-B21A-4B2F-B52D-D5544906416C.jpeg
 
Joined
May 26, 2022
Messages
304
I loaded 12 rounds with H1000 and 160gr AB’s last night. 3 for sight in and 3 groups of 3. -15c today and a wicked wind, I didn’t spend to much time at the range. I’m happy with the rifles results so far though.

View attachment 526626

As beautiful as that sock is, I have to say there is something absolutely hypnotic about how that helical bolt flows into the carbon weave. Nice job man.
 
OP
Decker9

Decker9

WKR
Joined
Apr 10, 2015
Messages
1,017
Location
BC goat mountains
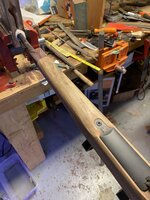
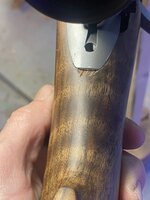
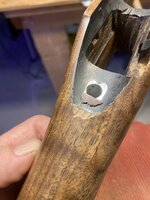
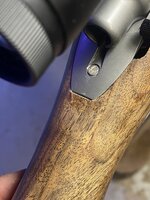
Something I’m trying to wrap my head around, and I’m open to suggestions, is the rear tang. On Remington 700’s, the back edge of the tang seems to always sit, on the wood. I personally prefer, in the wood. I know about the cracking behind the tangs of rifles that don’t have a little clearance, but I’m curious if I’m ok with sinking the tang level with the wood, rather then on the wood…? If anyone has any insight to this, I’d be happy to hear.

View attachment 474691
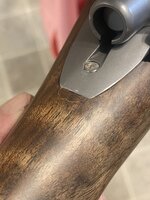

I guess I didn’t have the clearance it wanted. A learning I thought I’d share.

66A49BF0-8046-4AA0-A85D-FB7B88223004.jpeg

Working on an old project now (my soon to be mountain rifle), I think I will expose the rest of the tang on this one.
F487A245-1C5F-45AD-8946-281564649F7A.jpeg
 

nanuk

FNG
Joined
Jan 22, 2023
Messages
12
I look forward to seeing what your mountain gun stock comes out to be. The others you made are awesome
 
OP
Decker9

Decker9

WKR
Joined
Apr 10, 2015
Messages
1,017
Location
BC goat mountains
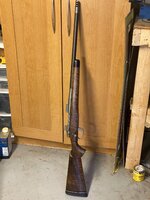
Thanks nanuk. It’s well on its way, just shaping up the forend now and adding a shnabbel, I think within the month it should be ready for finish.

F146D5DF-991A-4EE9-BF4A-E8CDBDCCDCB4.jpeg

Glad I didn’t loose the broken piece altogether. If it does chip out again, I still can relieve the back side of the tang and make it look ok.

I popped it out and glued it back in yesterday, also relieved behind the tang a hair. I’ll sand it a little then add some finish to the spot, I think I can make it disappear.

07AA5B9A-436B-44C4-8FC8-ECE72343827B.jpegCD8176FF-2C77-4603-AF49-7723F2419C6F.jpeg4B7BE6CE-5371-4F6C-B88D-9561FB557DF7.jpeg
 

9.1

WKR
Joined
May 27, 2021
Messages
447
Beautiful work! That chip is a real bummer, but thanks for sharing what happened. That will be good to keep in mind for some of my future projects.
 
Top