Navigation
Install the app
How to install the app on iOS
Follow along with the video below to see how to install our site as a web app on your home screen.
Note: This feature may not be available in some browsers.
More options
Style variation
You are using an out of date browser. It may not display this or other websites correctly.
You should upgrade or use an alternative browser.
You should upgrade or use an alternative browser.
New walnut for an old classic
- Thread starter Decker9
- Start date
eLightfoot
WKR
That makes a lot more senseI will be adding a cheek piece on this stock, so I shift my centreline to give the extra wood needed on the “thicker” side of the stock.
Decker9
WKR
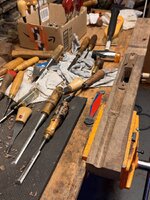
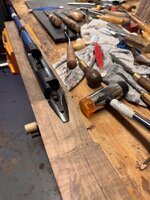
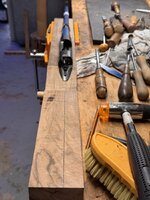
Been pounding away off and on. Iv cut myself close on my initial cuts with my layout, if I end up with much over a sheet of paper of a gap around the action, I should have enough meat left I can take 1/32 - 1/8 inch off the top in hopes of tightening things up. But that’ll leave me with no room for error on the under side.
It’s been countless in and outs scraping and chiseling away, paying close attention not to screw up the flow of the free float around the barrel screw swell (whatever a guy wants to call it lol), the radiuses are challenging, but that’s part of why I do it I think. Little things like that is what stands out in a nice stock imo.
I already went and started inletting the screw nut that was on the barrel, not thinking to tap it out since we’re not using it. So there will be a dimple in the inlet once finished, but nobody will know! Right?


Decker9
WKR
Looks good. Are you setting it up for scope only, or irons and scope? Any cast to it, or straight?
Jeremy
Thanks Jeremy, the owner has a set of talley mounts on the way for it, it will wear a scope the majority of the time I suspect.
We haven’t talked about cast or toe, but something I should ask him. A few threads ago I built a stock for a Brno 22, I added cast and toe to it purely for learning sake, though there’s no recoil to see if it was super effective, I must say it’s the best shouldering rifle I own as I sculpted it to my southpaw fit.
Honestly it would be cool if he did want a little in it, I’d like that challenge again.
I asked because I was looking at your layout lines and didn't see any adjustments to the centerline.Thanks Jeremy, the owner has a set of talley mounts on the way for it, it will wear a scope the majority of the time I suspect.
We haven’t talked about cast or toe, but something I should ask him. A few threads ago I built a stock for a Brno 22, I added cast and toe to it purely for learning sake, though there’s no recoil to see if it was super effective, I must say it’s the best shouldering rifle I own as I sculpted it to my southpaw fit.
Honestly it would be cool if he did want a little in it, I’d like that challenge again.
That said, I think you are offset too much to add cast off at this point. Nice work on the inletting.
Jeremy
Decker9
WKR
I asked because I was looking at your layout lines and didn't see any adjustments to the centerline.
That said, I think you are offset too much to add cast off at this point. Nice work on the inletting.
Jeremy
Click! You’re 100% right, brain fart on my end lol, definitely won’t be enough room for cast being im crowding that side of the blank.
UnckleBob
WKR
- Joined
- Aug 21, 2022
- Messages
- 1,647
Any modern touches like QD cups instead of sling swivels? (I hate rear studs)
Decker9
WKR
Any modern touches like QD cups instead of sling swivels? (I hate rear studs)
I agree! Studs do the job but I find them a real pain sometimes, either coming loose, stripping out, or just catching on stuff. We will be adding the super grade style of mounts on this one, I’m excited to tie into those as Iv never inlayed anything before.
I believe it will have a gunsmith adaptor up front for a spartan bipod too, least it was in the plans.
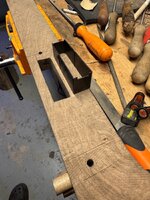
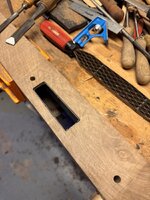
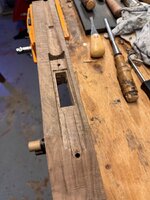
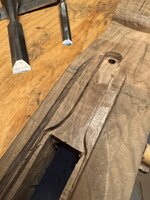
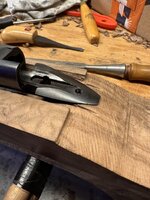
It may not look like much change since the last photos, but is about 30 hours worth. I still have a gap along the ejection port, I think I can tighten it up though with sinking the metal into the wood a little more. I have about 3/16-1/4” spare wood on top and bottom luckily to help with my screw up.
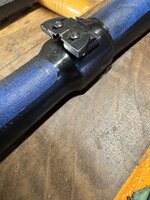
One of the many places bad work can and will show up. To keep this swell as symmetrically free floated exactly the same on both sides, any difference in the radiuses around the swell will stand out like sore thumbs.
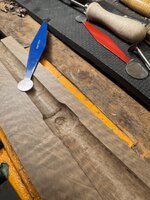
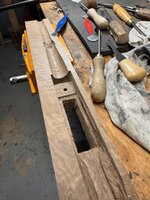
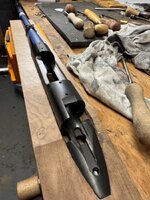
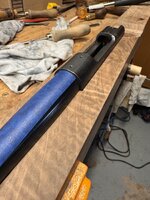
My big screw up here!
Part of stock making (ok a huge part) is being able to fix screw up’s so nobody knows they were there. You guys will know because I showed you lol! But I hope once it’s done you won’t be able to tell…
In all honestly though, if this gap doesn’t go away, this blank may turn into firewood and I’ll replace it and learn that lesson the hard way. This is my road to self learning stock making, where gaps and fugly lines are not allowed!!
@Decker9 really, firewood? Ive refused payment for stuff that I wasnt happy with 100%, but even if I ended up remaking it guess I wouldn't go the firewood route. You have the perfect situation for an invisible fix—worst case a sliver of wood from the same blank glued in place there, bedded underneath, would be all but invisible, ZERO loss of function, and test those “no one will ever know” skills.
Decker9
WKR
@Decker9 really, firewood? Ive refused payment for stuff that I wasnt happy with 100%, but even if I ended up remaking it guess I wouldn't go the firewood route. You have the perfect situation for an invisible fix—worst case a sliver of wood from the same blank glued in place there, bedded underneath, would be all but invisible, ZERO loss of function, and test those “no one will ever know” skills.
I think there are a lot of those slivers glued in out there that nobody even knows about eh haha. Firewood is only a figure of speech, only meaning I wouldn’t be happy with it, so I’d replace it and use the wood elsewhere.
Defiantly a learning lesson here though, I will now always leave that extra hair of wood in my layout.
I still think that gap will disappear in time here though
Decker9
WKR
It’s not the first time Mac’s given me good advice, I’m sure it won’t be the last.
I thought I’d give the sliver a try, before getting to angry over the gap. Anyone who builds or takes pride knows what it’s like causing such a boo I’m sure.
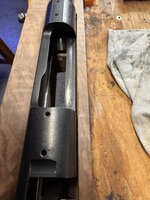
I found the slab from the top of the blank, and cut a piece that would have been directly above the inlet. Sharpened grandpas 1/2” chisel, then sharpened it more and whittled away at the inlet. I used sticky 220 grit on the edge of a flat file to sand along the top edge of the inlet to get it crisp, then sanded the sliver to the same.
Test fitting was like fitting the metal into the wood, lots of trial before sticking it with acraglas. I let the sliver about 1/64 proud and clamped and wedged it tight.
12 hours later I filed and sanded it down pretty much to flush, so far I think it’s looking good. I tried to keep it all flat down where the ejector port cut will be in hopes for no viable line, once finish is on. I’m pretty sure the only ones who will know are who read this thread , and the owner of course.
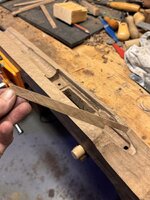
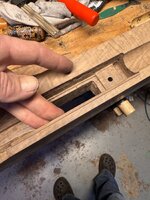
I’m a little nervous about the corner showing up, I went with a rounder joint vs a 90 degree joint to tryn hide that.
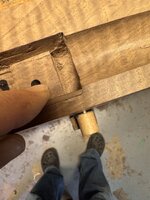
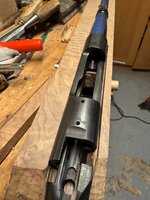
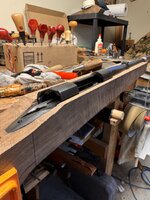
fingers crossed….

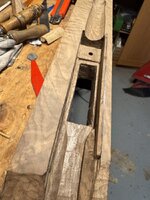
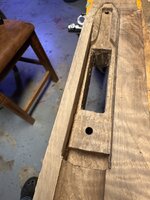
I thought I’d give the sliver a try, before getting to angry over the gap. Anyone who builds or takes pride knows what it’s like causing such a boo I’m sure.
I found the slab from the top of the blank, and cut a piece that would have been directly above the inlet. Sharpened grandpas 1/2” chisel, then sharpened it more and whittled away at the inlet. I used sticky 220 grit on the edge of a flat file to sand along the top edge of the inlet to get it crisp, then sanded the sliver to the same.
Test fitting was like fitting the metal into the wood, lots of trial before sticking it with acraglas. I let the sliver about 1/64 proud and clamped and wedged it tight.
12 hours later I filed and sanded it down pretty much to flush, so far I think it’s looking good. I tried to keep it all flat down where the ejector port cut will be in hopes for no viable line, once finish is on. I’m pretty sure the only ones who will know are who read this thread


I’m a little nervous about the corner showing up, I went with a rounder joint vs a 90 degree joint to tryn hide that.


fingers crossed….


Attachments
Mtnmilsurp
WKR
That’ll be a secret between you and the internet. Nobody else will ever notice. If they do they’ll simply admire the ingenuity.
I've seen more than a couple of the best stock makers out there do the same thing to fix a variety of issues from inletting mishaps to internal drying checks to fitting a perfect plug for a loose knot.
That is a nice tight repair. After final shaping, it will be sound and invisible.
Jeremy
That is a nice tight repair. After final shaping, it will be sound and invisible.
Jeremy
Wyobohunter
WKR
- Joined
- Dec 23, 2021
- Messages
- 1,748
That is one beautiful slab of wood, can’t wait to see the finished product.
Decker9
WKR
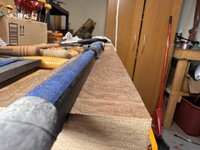
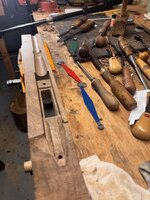
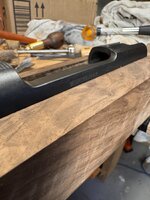
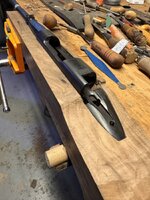
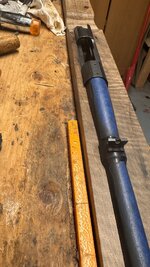
Getting the metal back in there, just a tad more in the barrel channel then the top should be about done for now. Really trying to keep the barrel channel inlet tight, I’d like to have a perfect even free float gap on each side when done. Around that swell has been the key focus still keeping those radiuses good. That brain fart I had with leaving the forward screw lug in at first, that hole is nearly erased now with the barrel sunken in. I will also get the trigger mortise in soon, I should have marked it out and drilled to close at the start.



SCHUNTER73
WKR
- Joined
- Aug 25, 2021
- Messages
- 370
Love it. Very impressive, thanks for keeping us updated.
Decker9
WKR
Choupique
WKR
- Joined
- Oct 2, 2022
- Messages
- 1,197
Very much enjoying the updates
Billogna
WKR
Another GREAT build!! Love the progress so far!!
Similar threads
- Replies
- 206
- Views
- 28K
- Replies
- 185
- Views
- 27K
Featured Video
Latest Articles
- Killing a Timber Giant
- Titanium Suppressor Shootout
- Best Gear of 2025
- Swarovski AT Balance Review
- YETI Outdoor Kitchen Expansion
- The Art of Shed Hunting
- TT#72 Conquering the Super 10: Mike Kentner’s Hunting Journey
- Spring Black Bears with Joe Kondelis
- TT#71 Trail Goods Company – Partnering with Hunters for Epic Adventures
- Wyoming Elk with Biologist Lee Knox

