Modifying Tikka stock to a youth RokStok style.

Marbles

WKR
Classified Approved
Joined
May 16, 2020
Messages
4,562
Location
AK
Taking inspiration from @Kenny Hart and @ResearchinStuff I decided to modify a Spare Tikka stock I have on hand to make a youth stock for my daughter.

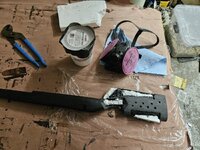
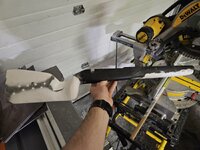
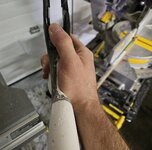
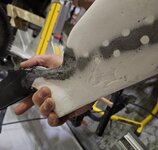
My plan is to use syntactic foam (micro-balloons and epoxy) to build up structure that I can shape and then overlay with carbon fiber. I started by cutting the but to size, trimming the toe, and trying to minimize weight as the factory stock material is heavy compared to synthetic foam.

I used a peice of arrow shaft to set what will be the flat bottom.20241101_204143.jpg
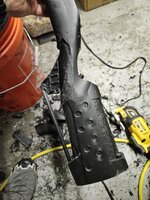
I removed a significant amount from the neck of the right side as this will be w right handed only stock.20241101_204139.jpg
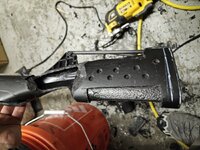
The back of the bottom metal inlet was going to be an issue as it is formed by the grip.
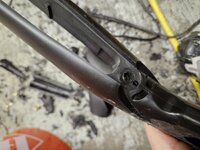
20241101_183748.jpg

So I decided to cut the end off the removable grip and glue it in.
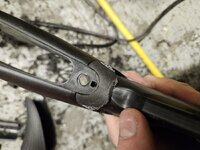
20241101_184005.jpg

I also removed material from the forend as it will all need to be built up anyway.
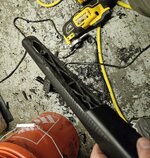
20241101_204150.jpg

I will be using West System epoxy, I have the resin, but need some 206 hardener. So, until that arrives I am stuck.


The two threads that inspired me.


bigbuckdj

WKR
Joined
Jul 29, 2019
Messages
732
In for this. I’ve done a little fiberglass on boats with west systems products and I always thought it wouldn’t be too difficult to do what you are doing. Can’t wait to see your updates.
 

Mojave

WKR
Joined
Jun 13, 2019
Messages
2,420
You should just build this in plastic and bondo then mold a new one out of carbon fiber.

There are hundreds of tutorials on YouTube on how to do just that.

Some are rifle stocks, but most are just random items.
 
Joined
Sep 29, 2021
Messages
308
Off to a good start! I have a couple of stocks I want to do this to. It seems like a good way to get familiar with some of these materials before trying a full carbon fiber build from scratch. Also it avoids inletting which is the part that seems the most complicated.
 
OP
Marbles

Marbles

WKR
Classified Approved
Joined
May 16, 2020
Messages
4,562
Location
AK
You should just build this in plastic and bondo then mold a new one out of carbon fiber.

There are hundreds of tutorials on YouTube on how to do just that.

Some are rifle stocks, but most are just random items.
This way I don't have to worry about the inlet, which I find quite intimidating.

I also get added structural stiffness from the factory stock forming the backbone, and reduce risk of breaking or cracking. Even with cutting off the bottom there is very little flex in the forend. I'm thinking one layer of carbon fiber over the syntactic foam will be all I need, so hoping to save weight. I may sand away more of the factory stock too.

Also it avoids inletting which is the part that seems the most complicated.
This!
 
OP
Marbles

Marbles

WKR
Classified Approved
Joined
May 16, 2020
Messages
4,562
Location
AK
The 206 hardener came in today.

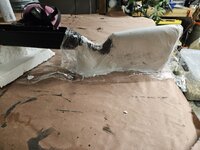
I used some styrofoam to fill in some space both to save weight and cut down on the amount of syntactic foam needed.20241108_192246.jpg
On a side note, if working with micro-balloons, use a P100 respirator. They are tiny glass spheres that float through the air very well and as glass doesn't break down, once in your lungs they tend to stay and can cause silicosis.

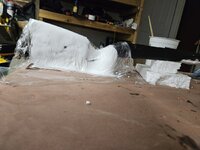
20241108_202642.jpg20241108_202655.jpg

The cling wrap lets you push it around, otherwise it sticks to your gloves and you don't achieve much. It is mixed to a touch thicker than peanut butter, but still flows until it starts to set, so I had to keep pushing it back into shape for 30 or so minutes. This time could be cut down with the fast hardener, but I preffered the extra work time.

I slapped the leftover on the forend, it will need more, but it is easier to build it up in layers than all at once like I just did as doing so leads to the sagging that must be tended.

I will be sanding it to shape, then possible adding a touch more if needed, then sanding again.
 
OP
Marbles

Marbles

WKR
Classified Approved
Joined
May 16, 2020
Messages
4,562
Location
AK
Got an update? Looks fun.
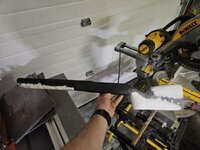
Not much. Got some sanding done using a palm sander and a band file. Need to mix up another batch and finish building up the forend and do a skim coat on the butt before putting carbon fiber over it.

The syntactic foam is pretty structurally sound on its own though.
20241203_212705.jpg20241203_212713.jpg

I'm largely going for just slightly smaller than fits my hand well.20241203_212755.jpg

If I had it to do over I would make the grip a touch longer. I might build it up when I do the skim coat.
20241203_212809.jpg

I have some other projects and work is a bit malignant on the work life balance at the moment, so this will likely be a slow project to finish.
 

Gobber

FNG
Joined
Aug 8, 2023
Messages
47
Excellent project! Using an existing spare stock as a skeleton for a custom build is such a great project.
For anyone wanting to do one- go for it! Not much to loose and you learn so much from the process.

A few thoughts- Filler only needs to be rigid enough to support the outer CF shell. Smooth-On makes an outstanding line of 2 part expandable foam that is stiff enough to not compress under vacuum and sands very well. Not to stiff, not too soft, just right.

They also make an epoxy dough that is a lighter version of resin + micro balloons. Slow work time, lightweight and sands very smooth. After about 30min it holds its shape well and can be shaped easily by spraying water on surface like potters clay to eliminate stickiness. BTW- love the idea of a thin plastic layer over the epoxy/balloon layer- going to use that one.

Both can be had in small sample sizes from Amazon and the shelf life is good for a few years.

For this project, you can cut away a lot of the original plastic stock to cut weight, but will need some mechanical hard points for the CF to lock on to. Running a few CF arrow shafts through the stock & forearm is an idea.

Have you tested the West Resin’s adhesion to the synthetic stock original components? If you are doing a full shell, not an issue. If it bonds to the stocks base components that is outstanding. If not, the CF will bond to your filler so you just have to deal with any joining lines.

I highly recommend doing the CF shell one layer at a time. The first layer can then be smoothed and shaped to form. Take your time between layers to get just the right contour you want, especially for the grip and cheek weld area. I typically shoot with a stock fro a few weeks before laying on the final layer.

Should be a neat result that someone will really enjoy and appreciate- for years. My daughter used several of my stock projects over the years and just let me know that she wanted me to make here a CF keepsake box. I am enjoying the process of making something unique for her that really isn’t available anywhere else I can find.

Fun stuff!
 
Last edited:
OP
Marbles

Marbles

WKR
Classified Approved
Joined
May 16, 2020
Messages
4,562
Location
AK
Have you tested the West Resin’s adhesion to the synthetic stock original components?
I have been sanding the factory stock stock with 80 grit and doing that it bonds decently with sanding, it doesn't really bond to the original smooth surface well.
 

Gobber

FNG
Joined
Aug 8, 2023
Messages
47
I have been sanding the factory stock stock with 80 grit and doing that it bonds decently with sanding, it doesn't really bond to the original smooth surface well.
I have found the same lack of surface adhesion between resin & synthetic (plastic) stock material. The rough sanding does give it some ‘tooth’ to bind to, so the rougher / deeper the serrations, the better. I’ve even gone with dremel wheel cuts that leave triangular angled walls to mechanically lock the resin in place.

Another thought on the grip area- to find the right shape, I start with an ideal trigger finger engagement with the pad of the finger split on the trigger blade and then bend at the second index knuckle to a right angle. Where the remainder of the hand comes to rest on the grip area is where the filler goes. This is where the beauty of an epoxy dough comes in. I simply glove up and squash the dough (or resin/micro balloon mixture) into place. You can get as good a fit as you want and then later sand away what is not needed taking into account whatever thickness of CF will be added later.

On my latest stock build, I actually left the grip area unsealed so I can re-shape the grip by simply sanding away the old material and re-applying another fitted layer. Looks rough as a cob, but functions really well. This is an old pic of initially trying spray on bed liner. Worked well for a few months, but eventually peeled. Once I settle on a shape profile, I will either coat it with something or skin it with CF.


As to applying your outer layer of CF, will you be vacuum bagging or stretch wrapping it?

Doing the outer shell in sections really simplifies the process- divide and conquer rather than an all-in-one shot approach makes it muuuuch easier in the end. The forearm section and stock section probably won’t need a lot of reinforcement, but the grip area probably will. Recommend the grip area last so you can make it as stiff as needed. And multiple layers with sanding and filling in between will give much better results. Since you will be potentially adding rigid layers of CF, you can sand away significant portions of the underlying host stock if you like.

BTW- what part of AK? I was in Kodiak back in the 90’s for a few years and these type gun projects are sanity savers in the dark days of winter.
 
Last edited:
Top