DIY Rokstok Modification

kylem

Lil-Rokslider
Joined
Oct 30, 2016
Messages
159
Location
North Idaho
After seeing stock modifications others like @ResearchinStuff and @PathFinder have done to make their guns more shootable and easier to spot their own impacts, I had decided that I was going to try it myself. Then with the Rokstok being built, I used that as a template to modify my original Sauer stock.

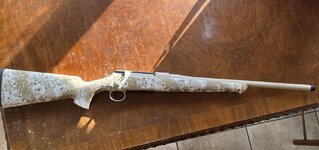
Sauer 100 in 6.5 prc
4AB7015A-7B35-489B-B9C8-04503D99FD1F.jpeg

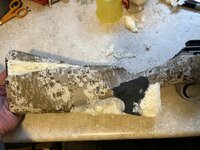
The first cut was the hardest to do mentally especially since the gun was already a shooter, but once I started it was pretty straightforward and I really enjoyed it.
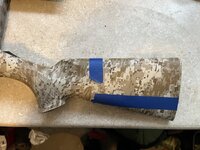
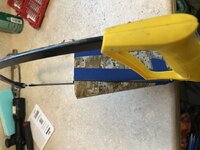
021A43E1-BD43-4649-96ED-49E3E1AFA7BB.jpeg
BAC1310A-231A-439B-A4AC-9A62045DAABB.jpeg

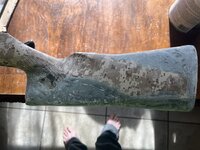
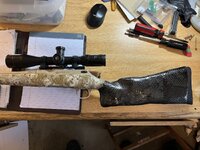
I drilled holes and epoxied cut arrow shafts to flatten out the bottom of the stock and shorten the trigger reach. I then used spray foam and bondo to fill gaps and shape it before wrapping it in carbon fiber.
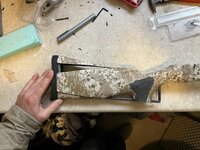
5213AF86-5885-4FCA-ACEF-E9C3B3F20A2F.jpeg
7CD6EC6C-BC38-4550-AA7A-F82D309F379A.jpeg
7FA592F9-4B0E-4E97-A49A-6BD0C3095041.jpeg
9AA5171D-3122-44F7-A12F-AFC5BD5BCD4A.jpeg

I’m pretty happy with the final results. The grip came out a little bulkier than I wanted, but other than that I’m loving it! I’ve shot it in some weird, awkward positions and I’m staying in the scope and seeing impacts better than I could with the original stock. I should’ve weighed it before, but I believe it was around 9lbs with a loaded magazine and now it’s up to 9.5lbs. Not light, but I’ll gladly carry a little more weight for a rifle I’m super confident with.
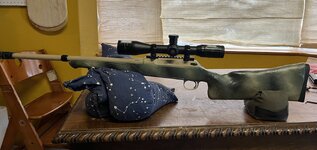
5FC163A5-6940-45B5-B105-3526EBA96277.jpeg
 
Last edited:
OP
kylem

kylem

Lil-Rokslider
Joined
Oct 30, 2016
Messages
159
Location
North Idaho
How is your cheek weld/line of site down the scope?
I was a little bit worried about this but it's working well for me. I did have low talley lightweight rings before and those might've been a little on the low side for me, but now with the rail and low warne mountain tech rings, I'm lined up about perfectly.
 

dyland

FNG
Joined
Sep 20, 2021
Messages
14
Did you have to use a vacuum seal to layup that carbon fiber or just paint on epoxy?
 
OP
kylem

kylem

Lil-Rokslider
Joined
Oct 30, 2016
Messages
159
Location
North Idaho
Did you have to use a vacuum seal to layup that carbon fiber or just paint on epoxy?
I painted epoxy on, put the carbon fiber on, added a little more epoxy, and worked it into the carbon the best I could. I did this twice so I have two layers of carbon fiber. Next I sanded it a little and put on one final coat of epoxy to smooth things out before painting it. I’m sure it would’ve turned out a little better if I vacuumed it, but from a functional standpoint I think what I did will be just fine.
 

Darryle

WKR
Joined
Nov 25, 2016
Messages
546
Location
Fort Worth, Texas
You can sandwich carbon between two layers of parchment paper and wet out the carbon with epoxy remove one layer of parchment and use the other to transfer to the substrate. Low heat will accelerate the wicking process, but don't go so far as to cause an exothermic reaction.

Secondly, you can find high yield lightweight fillers that are epoxy based and add very little weight. Do your "body work and test fit as you go and once satisfied, then wrap it in carbon fiber weave.

I think you are going to have flex and cracking/sheer issues with that setup and possibly end up hurt.

But, don't let me stop you from you doing you.
 

Nevwild

FNG
Classified Approved
Joined
Oct 1, 2020
Messages
12
You can sandwich carbon between two layers of parchment paper and wet out the carbon with epoxy remove one layer of parchment and use the other to transfer to the substrate. Low heat will accelerate the wicking process, but don't go so far as to cause an exothermic reaction.

Secondly, you can find high yield lightweight fillers that are epoxy based and add very little weight. Do your "body work and test fit as you go and once satisfied, then wrap it in carbon fiber weave.

I think you are going to have flex and cracking/sheer issues with that setup and possibly end up hurt.

But, don't let me stop you from you doing you.
Do you have a preferred high yield lightweight filler?
 

Darryle

WKR
Joined
Nov 25, 2016
Messages
546
Location
Fort Worth, Texas
Yes, but it's proprietary and not retail licensed. A liquid 28oz by volume cup weighs approximately 170 grams, less than 6 oz of the 2 two part epoxy.

I have used several commercially available epoxy based fillers that worked well, Tamco being one, but they can be cost prohibitive.

There are structural wood epoxy fillers that are cost effective, WoodEpox being one. Kits come in various sizes and are easily workable.

I use raw carbon fiber and fiberglass almost daily and I do work with cured in some fashion daily.

You are using dissimilar materials that have different deflection characteristics, their thermal expansions are different and their lateral and linear strengths are different, think of them as different types of wood, say pine versus oak/birch. While they will work short term, you will see issues over the long haul.

The entire reasoning behind, synthetic, fiberglass, carbon and even laminate stocks are stability and weather resistance. You trade up in properties, synthetic is more weather resistant but somewhat flexible, the others offer the weather resistance but are more rigid and therefore more stable, you shed weight with carbon.

I understand the thought process and trying to save a buck, been there and going thru it right now with a 5th wheel remodel. You are gaining valuable knowledge and your next effort will be far improved.
 
Last edited:
Top