Custom Carbon Fiber Stock Round 2

RepeatPete

Lil-Rokslider
Joined
Aug 13, 2023
Messages
104
Time for round 2. Last year I decided to build my own stock and really enjoyed the process. I’m happy with the outcome for a first build, but wanted to try again to tweak some things and build for a different application. The first stock is documented here:

https://rokslide.com/forums/threads/custom-carbon-fiber-stock.322053/

With a good deal on a Kimber from @kad11 and tons of advice and support on all things carbon fiber/stock making from @Gobber I was ready to go again.

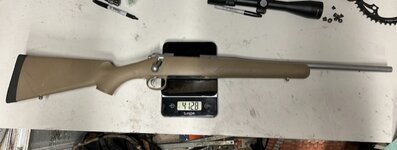
This is the starting point: a Kimber Hunter in 6.5 Creedmoor with an 18” barrel. My goal is the perfect eastern US whitetail rifle. I have three main aspects for the stock build.
0DCD289D-E91D-4AA2-81D1-31D9586BBF15.jpeg
  1. Shootable design: This means more vertical grip, negatively sloping comb, the top of the recoil pad above the bore line, and a forend that is parallel to the bore. This rifle will rarely, if ever, be shot with a rear bag, so I chose to keep the bottom of the buttstock on a more traditional slope.
  2. Lightweight: This will be carried pretty much exclusively in my hand, so a lightweight, great balancing rifle is a high priority. The factory Kimber stock, as I bought it with the gel removed, is just at a pound and a half, which is already very lightweight and will be hard to beat. If I end up at that weight or even lighter I’ll be stoked.
  3. Classic appearance: I appreciate the Rokstok for all its functionality, especially using a rear bag for more long range work, but think it’s pretty ugly. I want to make this stock very functional and easy to shoot, but also want it to look a bit more traditional. I’m envisioning something that looks like a Winchester M70 featherweight, but is lighter and has better ergonomics.
This won’t be a quick documentation, as I have only just started the foam mold, but will hopefully be complete to have sufficient trigger time before November 2024.
 
OP
R

RepeatPete

Lil-Rokslider
Joined
Aug 13, 2023
Messages
104
Diving a little more into the design:

I knew I wanted a negatively sloping comb to reduce the perceived recoil. When the comb slopes down towards the action, on recoil, the stock moves away from the shooters face. It’s only a 6.5 Creedmoor, but will hopefully be very lightweight (I’m aiming for scoped with sling and 3 rounds under 6 pounds), so the recoil may be a bit snappy. I settled on the top of the recoil pad about 1/4”-3/8” above the bore axis. This worked out well for placing my cheek where it needs to be for a consistent but light cheek weld. With my crude measuring this works out to about a 7 degree comb slope. For comparison, the Rokstock is 12 degrees and 1/2” above the bore line.


For the grip, I wanted more vertical than a traditional sporter stock. I really like the feel of the wide, tightly curved trigger of the Kimber, but with the sporter stock the trigger feels awkward. The pull angle is too much diagonal up and back, instead of straight back along the axis of the rifle. A more vertical grip will help this feel better, and make the trigger pull more consistent. The grip-to-trigger distance is shorter than most stocks, matching my previous build and the Rokstok at 1.7”.


This rifle will almost exclusively be used on game at 150 yards or less, and on a steel plate for practice out to 400 yards. Because of this, i decided to keep the bottom angle of the butt at a more traditional slope (for aesthetics and weight savings) than a stock designed for longe range use with a flat toe. However, because the forend will be rested on a backpack, branch, or shooting rest often, the bottom of the forend will be parallel to the bore. On recoil, the rifle will move straight back, whereas with the tapering forend of the Kimber stock, the rifle would move back and down on recoil, making spotting shots difficult.
 
Last edited:
OP
R

RepeatPete

Lil-Rokslider
Joined
Aug 13, 2023
Messages
104
Construction:

This will be a foam core with carbon fiber layered over the core, like my previous stock. I’ll be using plain carbon fiber sheet, as the braided sleeve didn’t conform as desired last build.

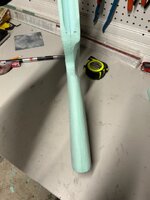
For the grip, I am planning to shape it thin, skin it with one layer of CF and then use lightweight epoxy dough to build back up a custom fit grip. The epoxy filler has a long working time and is easy to shape/sand so I can add a small palm swell and fine tune the angle and thickness. Then, I’ll probably skin it again over the hardened filler. I shaped a few sample grips out of the foam to see what works and feels best.

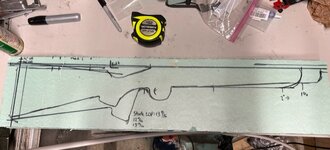
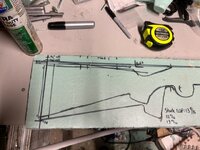
Two 1” layers of the green insulation board from Lowe’s were glued together with 3M spray adhesive. Then, the Kimber 84M stock profile was traced on and I played with angles to make the changes I wanted. I shortened the forend by 1 3/4” to save a little weight and correct the proportions with the 18” barrel. As mentioned earlier, the top of the recoil pad is around 1/4” - 3/8” above the bore line, and the comb slopes roughly 7 degrees towards the action.

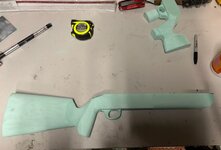
I left the trigger guard section in the foam to approximate where the trigger lies. Once I’m happy with the shaping and contours, this will just be trimmed off. The top section of the grip is ~ 1 3/4” from the trigger to keep my tigger finger at a 90 degree angle.

Here’s where I’m at currently:
4E00B817-AB20-4AD9-B195-5BDDC2508A89.jpeg
9C9455E5-7660-426A-BB31-39DE53572322.jpeg
7A5A0005-501C-47AA-8B3A-BC188E57BF5E.jpeg
174C4EA3-E26F-4D2D-A191-3B4C5B808FEA.jpeg
 
OP
R

RepeatPete

Lil-Rokslider
Joined
Aug 13, 2023
Messages
104
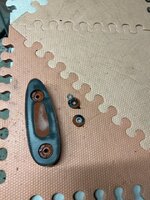
Small update for the recoil pad:

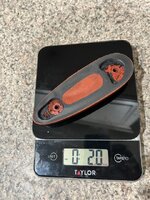
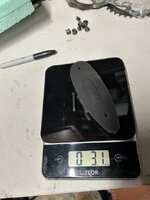
I used a Microcell recoil pad on my last stock and had no complaints, so I got the 7/8” thick, extra soft version. And because I’m shooting for classic looks, I chose the “leather effect” in red. It’s listed at 2.5 oz., though I did not weigh it before modification. The website states that there are metal washers at the screw holes, so I used a spade bit to drill out some of the plastic backing pad and remove the washers underneath. I’m planning on gluing this one on anyway. Then, a bit more removal of the backing pad with a Dremel and I ended up at 2.0 oz.

Not bad for a wider and longer than stock full recoil pad at flip-flop pad weight.

F09D23AA-02E7-4B8E-BD29-264862110C33.jpeg
962201A7-9A0A-4681-BCA2-DBECC328A085.jpeg
63FD59A6-AF8B-4FB1-B245-01A5F502AF11.jpeg
 

Gobber

FNG
Joined
Aug 8, 2023
Messages
39
Nice looking foam core to apply the carbon fiber fabric. This one should be really cool to watch come together.

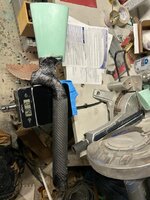
As mentioned in other posts, a good vacuum source is a salvaged refrigerator pump. Been using the same one for close to 10 years and it does a really good job for CF bagging. One items that really helps getting the vacuum bag positioned correctly is the use of a Low volume pump. The extra time it takes to begin to pull the Stretchlon tight allows for adjustments of wrinkles & repositioning of layers inside the bag.

Here is my ole faithful rig that runs like the Energizer Bunny. It will easily pull 27-28+ inHg (Full vacuum = 29.92 inHg) which makes for a very tight pull to squeeze out excess resin for a really nice CF to resin ratio. I have imploded a few projects with it which were good lessons learned.


I made the carrier out of extra 3/8 plywood and salvaged the power cord and rubber mounts from the original unit.

The black part between the gauge and pin valve with wires coming out is a variable vacuum shutoff switch. It can be dialed in to a 5 inHg range and will cut the pump on and off to maintain that specific vacuum. Turns out it's not needed with this pump as the unit can easily run 100% of the time for a 24+ hours.

What is needed for the plumbing is the gauge, pin valve, and filter to keep any possible crud or resin droplets from getting into the pump. The brass fittings and tubing are from Home Depot.

The pin valve is what I use to control the vacuum level. Simply use it to introduce a controlled leak in the system and it holds steady for as long as the cure time takes.

Good thing about a vacuum setup is that the pressure is negative, meaning it pulls the fittings and surfaces inward. Much easier to patch and seal than a positive pressure setup.

If you want to set one of these up, I highly recommend finding a pump unit from an older fridge that is as big of a unit as you can find. Smaller fridge pumps will work, but don't have the constant run time capability as the older ones. Smaller units will also shut off after running for a few hours straight due to a thermal shutoff in the small black control box to the side. PRO-TIP: A small shot of canned air held upside down will put liquid propellant on the control switch to get it running again. These vacuum rigs are used extensively in the RC Glider community with excellent results. That is one ingenious and thrifty group!
 
Last edited:
OP
R

RepeatPete

Lil-Rokslider
Joined
Aug 13, 2023
Messages
104
Great question - I think deflection will be very minimal due to the final strength of the CF over foam core construction.
However, as I’ve been tweaking the grip shape and the relief behind the grip I found that the shape I like comes right up to the centerline, but doesn’t cross over. So, I’m going to mirror the scallop on the other side so my lefty brother can shoot it occasionally too. If there is any deflection/bending it should be uniform side-to-side.
 
OP
R

RepeatPete

Lil-Rokslider
Joined
Aug 13, 2023
Messages
104
Inletting:
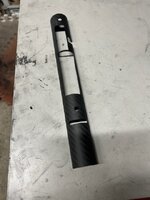
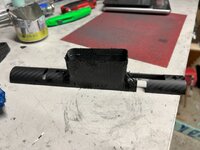
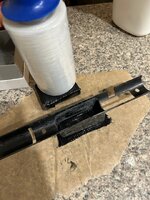
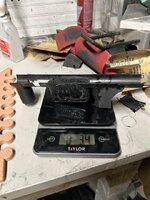
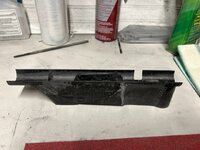
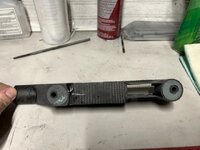
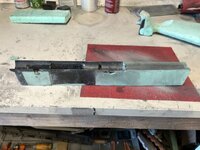
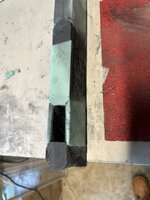
Because the Kimber action has a round bottom, I’m using a carbon fiber tube as the foundation for the inletting section of the stock. The Kimber action is 1.14” in diameter, which is 28.956 mm. 29mm ID/32mm OD carbon fiber tube is readily available, so I ordered some from Amazon.

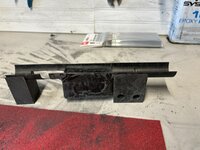
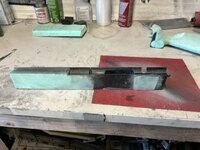
After cutting to length, cutting in half lengthwise, drilling holes for the action screws, and filing slots for the recoil slot and trigger:

2156ACC7-0A65-4356-9B51-CD35B0FB4693.jpeg
1533686B-9517-44F1-8739-5903EB1DE4BB.jpeg
B1A05F67-E02D-4613-9C8B-41E1F543538F.jpeg
85CEC944-1D1B-4D85-B410-891AE8849DA7.jpeg

Next, I ordered a blind magazine box, spring, and follower from Kimber. Easy transaction, no Montana or Mountain Ascent serial number needed. I extended the magazine with a piece of foam and wrapped with three layers of thick, rubberized tape to create clearance, then wrapped with carbon fiber. After curing, I sanded a radius in the top and mated it to the CF tube.

4DA603DD-DA5B-427A-BC2D-AF095D56D657.jpeg13C436CD-EDDA-46F1-8EFA-04924D5DFC21.jpeg

Then a final CF iteration to make a floor for the magazine well.

9395389B-B6D2-4500-93B4-9F15D9E8D5FE.jpeg
BBCD934D-8AE5-4528-A07B-04885C6A55F4.jpeg

The CF tube fit on the action is perfect. I left it big to accommodate for final sanding, currently at a little over half of the tube diameter, so it snaps into place beautifully on the receiver. The magwell has enough room for the magazine to float a little and, while the CF layup isn’t pretty, it is plenty rigid while remaining lightweight. Pretty happy with it at this point, and creating the exact dimensions and mating surfaces needed was way easier than I expected. I got a decent set of needle files to slowly and precisely take away material, and just broke it down in simple steps.
 
Joined
Mar 29, 2021
Messages
16
This thread (and the other build one) absolutely blew my mind. I have never once even considered the possibility of something like think. Great work 👍
 
OP
R

RepeatPete

Lil-Rokslider
Joined
Aug 13, 2023
Messages
104
Inletting 2:

When thinking through how to construct the inletting structure, my original idea was to use squared off carbon fiber blocks as “pillars” because the square sides would give plenty of surface area to bond the inletting structure to the stock skin. This is what I what I was picturing (with the start of some speed holes to reduce weight):

3ADA8C81-E234-4D1C-9829-092C69497F37.jpeg

However, the solid carbon fiber was simply too heavy.
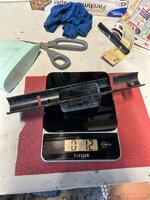
So, I used more of the same CF tube as the receiver section, and shaped some of the solid CF to capture the recoil lug.

140D8BF3-F9E8-440D-8968-07FBAA1A5504.jpeg

Then, I made a simple foam plug for the trigger assembly and laid 2 layers of carbon on either side. Not structural, but will seal off the foam core. I don’t want wet weather to expose the foam core to water/moisture and potentially degrade the foam.

A6157EB1-18ED-4E7C-A965-6CA6111A7345.jpeg

Next, I put a small diameter CF tube in the center of the pillar, and capped off the bottom with a ~3/16” thick section of the solid CF. The center small tube serves to create the action screw through-hole, and the plate at the bottom allows me to have enough material to countersink for the action screws and not blow through into the foam core of the pillars.

7FE7067B-8F9D-4316-96BD-E6E8D8B0CA7C.jpeg

Then, using the 3M spray adhesive, I glued pieces of foam to square up the recesses on the receiver section and attach the forend. I want to design the forend parallel to the bore so the recoil impulse comes straight back, and doesn’t drop the barrel like in normal tapered forends. I squared up the sides also, but it’s too thin and slab-sided so I’ll have to build it up with some foam.

E8A00F6C-4983-4B22-AD0F-9DF2B9AF1CE5.jpeg
8A464BAF-635E-49D0-88D8-2CD87C533B33.jpeg7655DD5C-8E5A-4C8D-B189-101280C13010.jpeg

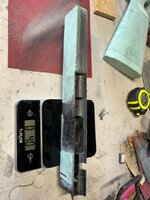
On my last stock, the inletting section that I cut out of the factory polymer stock (from recoil lug to rear action screw) was just under 5 ounces, so this design is definitely lighter, but the difference is not quite as much as I expected.

CBCD359F-F03B-4BE4-8219-E3FE75C76569.jpeg
 
OP
R

RepeatPete

Lil-Rokslider
Joined
Aug 13, 2023
Messages
104
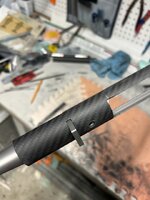
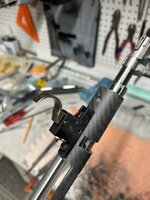
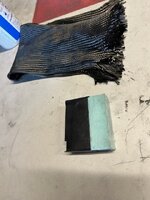
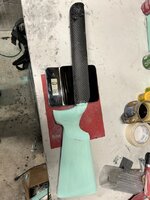
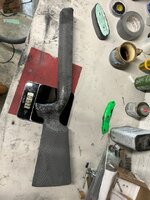
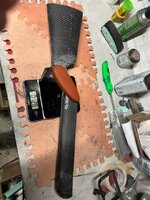
After getting the inletting dialed, I went on to sculpting the foam core around it. I filed/sanded down, built back up, broke off, reattached, and kept shaping more times than I’d care to admit. But got it to where I was happy, and then started to wrap small sections in carbon fiber. Doing it in small sections allows the carbon to conform to the foam core better, allows me more working time before the epoxy starts to gel, and is much more forgiving for positioning the peel ply and breather without wrinkles.

0C4287C3-2404-4661-AD01-4BD1B91CA50E.jpeg
CDC4DD3C-C715-4ECE-8E64-FC2D6EE1FFCC.jpeg
C152997F-2596-41B9-AFE3-ADADB42B172C.jpeg
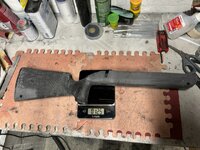
Side note: this stock at 10.7 oz (without recoil pad)was more than stiff enough to hunt with. With the action bolted in, the forend flexed a little, but still less than a factory polymer stock. I am going to add more layers because I can still make my weight target and want to make it super durable, but could have left it like this and been totally happy. Maybe a truly ultralight stock is next…
363B4901-72E2-4917-989C-F70FCF614D3D.jpeg

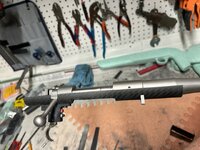
So far I used one of the vacuum bags from Harbor Freight for the first layer of carbon on the forend. Every other application section I’ve used electrical tape to provide the conforming pressure. It’s cheap, easy, much, much more forgiving (for my low and relatively inexperienced skill set), and seems to provide a great result. For the flat/straight sections I use a layer of peel ply and breather over the carbon and then wrap the electrical tape over the breather.
For the curves of the grip and forend tip I’ve used the stretchy packing wrap that comes in a roll over the carbon with the tape on top. There are definitely wrinkles though, so I’m still working on getting the curves right.

Second layer of carbon on the forend and butt with the electrical tape method:
5571B828-F5E8-43B0-9179-283B39826814.jpeg
 

SloppyJ

WKR
Joined
Feb 24, 2023
Messages
1,005
Man this is a sick project. Props to you for a hell of a DIY. Following along to learn a few things.
 

6.5x284

WKR
Joined
May 7, 2015
Messages
977
Location
NW MT
Man I thought I was rad when I sewed a new material into the lumbar of my pack! This is awesome. Well done. Cool how you did the tubing to build your action inlet portion. Makes me want to tour a big stock facility to see how stuff is made! Following along with excited insterest.
 
OP
R

RepeatPete

Lil-Rokslider
Joined
Aug 13, 2023
Messages
104
Man I thought I was rad when I sewed a new material into the lumbar of my pack! This is awesome. Well done. Cool how you did the tubing to build your action inlet portion. Makes me want to tour a big stock facility to see how stuff is made! Following along with excited insterest.
That is rad! I look occasionally for a used industrial sewing machine- I’d like to learn some of that stuff next.
 
OP
R

RepeatPete

Lil-Rokslider
Joined
Aug 13, 2023
Messages
104
Action Screws:
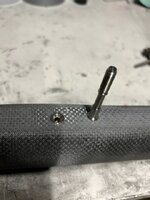
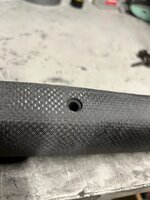
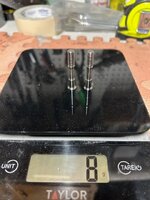
The factory action screws were too short with the new stock, so I went looking for some longer and lighter ones. I called Snowy Mountain rifles and they graciously measured every little dimension of their screw set over the phone with me. Their set is for Remington 700’s, but the Kimbers use the same 1/4-28 pitch. I ended up ordering two of their longer titanium screws, not the usual set of one shorter and one longer. Props to them, fantastic customer service!
Then I got lucky - my larger Harbor Freight step bit cut the counterbore and countersink angle perfectly in one step. After 15 minutes with a file to take about 1/4” off of each screw and some fine sandpaper to clean up the face and leading bevel, here’s what I ended up with:

37F3F34A-D0B8-4797-A16C-515543F60776.jpeg
1791229F-FD1D-4774-A7AF-C3DDCF86959C.jpeg
3A28E3F0-6F3A-446A-99EE-864EA074D157.jpeg
 
OP
R

RepeatPete

Lil-Rokslider
Joined
Aug 13, 2023
Messages
104
Sling:

The purpose of making this rifle lightweight is because I want it to be in my hand almost all the time, not strapped to my pack or over my shoulder. However, after killing an animal or on a long hike in/out I do want a sling to be an option.

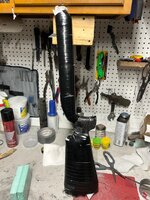
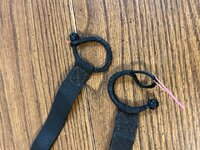
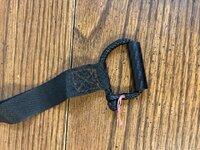
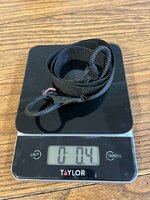
I bonded in a short section of carbon fiber tube crosswise to the stock at the forend and the butt. Then I picked up some ultralight webbing from an online lightweight hiking store, and some small soft shackles from my local West Marine. Both are made from ultra high molecular weight polyethylene (UHMWPE) so they are very strong and super light. A few rough hand-sewn bar tacks and it’s done, all for ~$35 and less than half of an ounce. I’ll keep the sling in a small pocket in my pack and it goes on just as quick as normal sling hardware.

Current state of the stock with tubes installed:

9ED548C2-1550-41C2-B5CA-E3E35D15809E.jpeg

The shackles work by pulling the red string to open the closure loop, and then pulling the shackle tighter to close the closure loop.

258F9639-99E5-485A-AE1E-70EFE24E61A1.jpeg
0A7FDAC6-7F97-4B8A-B833-E46F1EEA88BB.jpeg
F90F8AD9-28B1-4BF7-A801-83CCAFABD954.jpeg
 

Gobber

FNG
Joined
Aug 8, 2023
Messages
39
RPete - Wow - what a build!

Your technique improved by an order of magnitude on this second round. I am loving your inlet section build - using CF tube is really good in a lot of ways. It contours nicely to your rifles action and the arc of the tube adds a lot of extra strength. The multi-directional fiber orientation adds even more. Plus CF tube is relatively cheap and best of all - you don't have to fabricate it - win win.

Do you plan to leave the exterior CF surface 'raw' or seal it with something? One option that has worked really well for me is automotive clear coat applied with a Preval spray bottle. If done, make sure it has UV protection additive. Easy to apply, seals in all the stray fibers and cures rock hard.

Don't see any mention of bedding the action. Are you planning to do any? The action on my little Izhmash 7-2 .22lr is designed with bedding ridges cut into the steel of the receiver, so it's a given for my application. A bit of a apples to oranges comparison, but similar in a few ways. One main advantage I have found is bedding gives you some adjustment capability to set the barreled action dead center of the forearm slot. Doesn't really impact functionality, but it's visually nice to have the barrel dead center of the groove.

That sling looks really cool. Initially curious of the integrity of that loop over the monkey's fist closure staying put but a great ultralight + tough solution.

Designing and building from the inside (inlet box, recoil lug, sling & bipod mounts) out is the way to address such a project. Get the internals properly addressed and it's much easier to layer the outer skin around them. Dude - your weave alignment on that forearm is outstanding!

Pretty amazing how the second (and subsequent 😉) builds come together after some lessons learned. Biggest step is starting the first one,

Love your use of varied compression methods - haven't tried electrical tape as I thought it would leave winding lines in the cured CF, but yours looks great. Another option is window film shrink plastic from HD. Cut in long strips, wrap item and hit with blow dryer level heat to increase the compression strength. Stuff has surprising tensile strength and pulls down nicely. As you have shown, these are very doable without a vacuum setup.

You really have me thinking about a new build.
 
Last edited:
Top