Custom Carbon Fiber Stock

OP
R

RepeatPete

Lil-Rokslider
Joined
Aug 13, 2023
Messages
164
I’ve done similar marine Tex grip attempts and they came out smooth
I just added a thicker layer then stippled it with a Dremel and viola grip


Sent from my iPhone using Tapatalk
Perfect, I was considering that as the next step - thanks for the input!
 
Joined
Dec 13, 2017
Messages
671
Location
SE AZ
JB Marine Weld held good peaks for grip when I textured by Stocky's carbon fiber stock. I plan on it using it again soon on another cf stock.
 
OP
R

RepeatPete

Lil-Rokslider
Joined
Aug 13, 2023
Messages
164
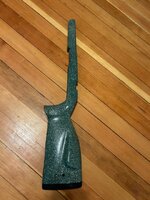
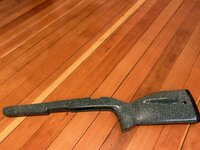
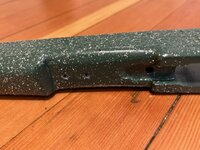
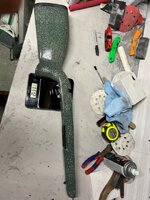
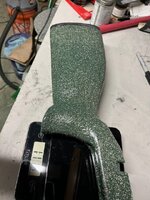
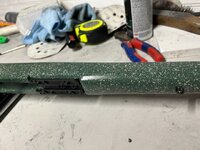
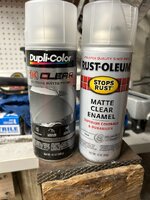
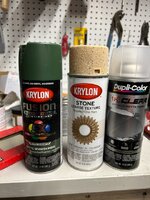
I did some more sanding and took advantage of a low humidity day to paint. I really liked the way that @BigWoods and @ChrisAU stocks came out, so I copied their recipe, with some improvisation as Rustoleum no longer makes Stone spray paint. Here’s the secret sauce:
14361835-2992-443D-AE6B-214C233130B4.jpeg
I did two layers of a different green that I didn’t end up liking, two layers of the olive green, 1 layer of the stone, and 3 layers of the matte clear.
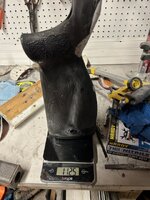
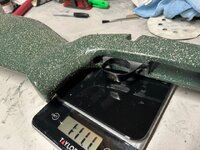
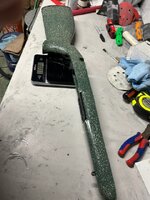
Final weight before paint is 1 lb, 12.5 oz.
25CF8C51-F3B0-4AE2-9CF0-D7C563A3CDD6.jpeg
The first green was a bit too bright, so I went to Lowe’s halfway through to switch. The olive one that I settled on is a little lighter than I’d like, but it will work.
082014FF-D820-4BA5-9362-64BCA74F28AD.jpeg
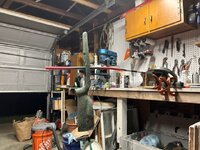
And here’s the makeshift setup:
BB119AB0-FB0C-45A6-BD32-248ED1023DA0.jpeg
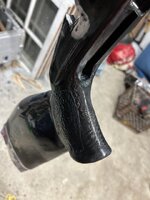
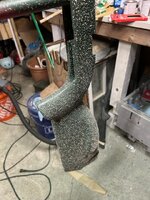
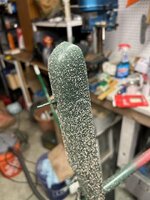
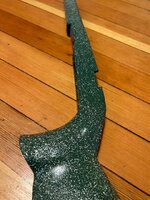
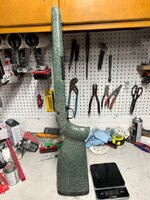
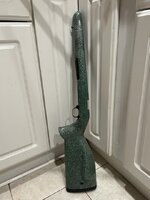
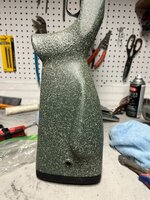
Here’s right after I laid down the stone texture paint. The texture isn’t sharp like it looks, but I think it will be enough to be non-slip in wet conditions.
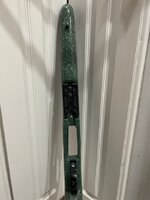
179B7C0C-CBC4-4AA6-9D25-B4245883E0B9.jpeg
CC200662-0431-4F2B-83D6-9D2A1D29ABD0.jpeg

0AC5366F-637B-4256-A550-EB6036CCF787.jpeg
8C8DCC73-55AB-4A5A-B228-2752A130689C.jpeg
7E19C8B2-1875-4CEE-9655-E8E0066FF6EC.jpeg
D8FC4AC8-6083-4E2F-A981-8E6566DDBC66.jpeg
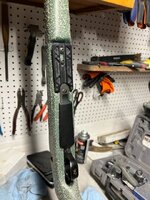
Once the clear fully dries I’ll bolt on the Arca rail and screw in the swivel stud and get a final weight.
 
OP
R

RepeatPete

Lil-Rokslider
Joined
Aug 13, 2023
Messages
164
Here’s a few more. I think my scale is suspect as it’s now an ounce lighter after paint and hardware installed. Either way, I believe I’m lighter than the even 2 lbs that the original stock was, with a better fit and more functionality.
B59BB377-64A5-407F-B05A-7EB46D89894C.jpeg
4AA48FD5-4D35-45B1-988F-79518245174E.jpeg
7A4C5779-B78B-4F07-8F46-FAD77750F034.jpeg
4449FA96-9F4A-40DC-941D-EA8BC4C9403B.jpeg
C25C919C-A6D0-4A66-97B1-1D9AED0461BE.jpeg
EDBC7389-EA2F-44E6-9229-2D49BBBF6F2B.jpeg
AE3043C3-46BF-4C99-B114-C3A6CB9C2A19.jpeg
DA735668-F211-4D4C-9624-0A5B45364413.jpeg
9211B09C-1F18-4CD6-A243-AE18DDCA9E52.jpeg
907E604B-DE52-4D6E-B490-68AFA52C8A7F.jpeg
 
Joined
Nov 16, 2019
Messages
347
Location
NorCal
A job well done.

For marine tex texturing, you need to wait a bit for it to start setting up before hitting it with the popsicle stick. It will form and hold sharp peaks this way. Devcon is a bit easier to work with for texturing if you have some.
 

TaperPin

WKR
Joined
Jul 12, 2023
Messages
3,242
Nice job - it looks great.

For heavy texture I’ve had really good luck with polyester resin with or without a thickener added, because it sets up relatively quickly and you can work it with a coarse mini roller, stick, a hand applied flexible mold, or whatever. It should be possible to do the same with epoxy - it just takes way more patience than I’m capable of.
 

BigWoods

WKR
Joined
Jan 28, 2017
Messages
395
Location
NH
I did some more sanding and took advantage of a low humidity day to paint. I really liked the way that @BigWoods and @ChrisAU stocks came out, so I copied their recipe, with some improvisation as Rustoleum no longer makes Stone spray paint. Here’s the secret sauce:
View attachment 601597
I did two layers of a different green that I didn’t end up liking, two layers of the olive green, 1 layer of the stone, and 3 layers of the matte clear.
Final weight before paint is 1 lb, 12.5 oz.
View attachment 601606
The first green was a bit too bright, so I went to Lowe’s halfway through to switch. The olive one that I settled on is a little lighter than I’d like, but it will work.
View attachment 601605
And here’s the makeshift setup:
View attachment 601598
Here’s right after I laid down the stone texture paint. The texture isn’t sharp like it looks, but I think it will be enough to be non-slip in wet conditions.
View attachment 601604
View attachment 601603

View attachment 601599
View attachment 601600
View attachment 601601
View attachment 601602
Once the clear fully dries I’ll bolt on the Arca rail and screw in the swivel stud and get a final weight.
Just seeing this thread now after you tagged me in it. What an awesome project; incredible work! Glad I could provide a bit of inspiration for the paint design along the way.

I'm excited to see the completed project bolted to your rifle!
 

Gobber

FNG
Joined
Aug 8, 2023
Messages
45
Well folks- that’s how it’s done! Start off with a bit of insulation foam and sand paper, then resin and CF fabric. Add in a lot of thought and motivation with some other bits along the way. That’s the way to get ’er done- my hat is off to you. (y)
 

Gobber

FNG
Joined
Aug 8, 2023
Messages
45
As we wait for RPete to post a range report (how's that for getting put on the spot), here is a quick summary of another approach for using carbon fiber in a gun stock project. This is just meant to show that you really can do some pretty cool stuff in your garage just using basic tools.

SUMMARY
Platform - Izhmash 7-2 Basic Biathlon .22LR suppressed.
Desires - Adjustable cheek & butt stock, keep stock below 2 lbs, use a CF 'spine' reinforcement method for strength while slimming areas down as much as practicable, use walnut because it looks nice.
Approach - Use two halves of walnut with a reinforced spine as well as an additional 4mm reinforcement plate at the narrow neck below the grip.

Started with a board of strait grained 5/4" walnut board that's wide enough to cut the 2 halves out with minimal waste.


Cut out the blanks from the template of a previous build.


Route out the void for the trigger & mag well.
Drill the channels for the action screws.
Cut in a recess for the 4mm reinforcement plate.


Use a simple frame jig help route out areas and begin slimming down the profile.


Route out a very large channel in the forearm to cut down the weight.
The barrel is completely free floated and will set above the cutout.


Use a foam masking method to keep the wet CF layup of the central spine from folding over on the edges of the stock.
The two CF tubes are for the mounting screws and give additional reinforcement to the grip.


The spine layup consisted of 5 layers of 12K fabric.


Always wet out the roughed up wood sections to ensure a good bind.


Doing a simple clamped layup to press out the excess resin.


After removing the clamps, this foam masking method does really well to keep the edges of the CF layer sticking out horizontally to make trimming easier.
Might not look it, but that CF is basically a "metalized" layer.
Trimming with a Portaband metal blade worked really well.


The real savior tool in trimming away the excess was an oscillating tool with a carbide blade.


Some further sanding and shaping gives a good rough blank.


Next was epoxy bedding of the receiver.


Next was embedding the cheek and butt hardware.


Then a bit of beveling for further weight reduction & just to see if it would look good. Bearing in mind that the CF inner layer was the main load bearing element. Added a QD flush mount.


More to follow...
 
Last edited:

Gobber

FNG
Joined
Aug 8, 2023
Messages
45
The radical forearm cut out left it a bit fragile for adding a bipod mount, so did a CF lining to strengthen the area.


After a bit of trimming & sanding, the CF layer is quite stout.
In fact, next time will use 2 layers of fabric vs 4.
And I really jacked up the weave line of the fabric figuring out how to properly compress the channel, but this is just a prototype with all sorts of errors.
But that's what makes it fun, learn to not to fixate on the hickies, just move on with the build. Pretty comes later.


Another issue was the trigger guard. Looked at all types of options in both the firearm and airgun world, but never found anything that could be adapted to work. So went with KISS approach. Simple solution - measure the inside dimensions of the mag well and form it out of CF.
Cut a form (or tool as they say) long enough for a couple of trigger guards.


A bit of trimming & smoothing out.


Braced it where it needs to go and anchored it in with a fillet of thickened resin.


Next morning, it's basically welded into place. Done this method before and it makes for a great guard. Easy to shape, very light weight and tough as nails.
Additionally, this photo shows all sorts of errors, but none of which actually impact the performance of the stock.
-Burned through the action screw tube
-Laid down the CF spine layer off to one side
-Let resin creep out onto the edge of the stock
Meh - who cares. So long as it works.


A rough fit of the action shows the general outline of the stock.
Since recoil is not an issue, I can make the radical cut behind the grip.
This is needed for working the toggle bolt to give the heel of strong hand room to work the toggle handle back & forth.
Additionally, the grip area is cut way down because the last step will be to create a customized grip profile using light weight epoxy dough.
Simply glob it on and give it a squeeze... Well, maybe a bit more involved, but you get the idea.


Profile shows just how skinny I'm going on the back area.


Next aspect is adding some contour to all the flat areas of the stock.
 
Last edited:

TaperPin

WKR
Joined
Jul 12, 2023
Messages
3,242
The radical forearm cut out left it a bit fragile for adding a bipod mount, so did a CF lining to strengthen the area.


After a bit of trimming & sanding, the CF layer is quite stout.
In fact, next time will use 2 layers of fabric vs 4.
And I really jacked up the weave line of the fabric figuring out how to properly compress the channel, but this is just a prototype with all sorts of errors.
But that's what makes it fun, learn to not to fixate on the hickies, just move on with the build. Pretty comes later.


Another issue was the trigger guard. Looked at all types of options in both the firearm and airgun world, but never found anything that could be adapted to work. So went with KISS approach. Simple solution - measure the inside dimensions of the mag well and form it out of CF.
Cut a form (or tool as they say) long enough for a couple of trigger guards.


A bit of trimming & smoothing out.


Braced it where it needs to go and anchored it in with a fillet of thickened resin.


Next morning, it's basically welded into place. Done this method before and it makes for a great guard. Easy to shape, very light weight and tough as nails.
Additionally, this photo shows all sorts of errors, but none of which actually impact the performance of the stock.
-Burned through the action screw tube
-Laid down the CF spine layer off to one side
-Let resin creep out onto the edge of the stock
Meh - who cares. So long as it works.


A rough fit of the action shows the general outline of the stock.
Since recoil is not an issue, I can make the radical cut behind the grip.
This is needed for working the toggle bolt to give the heel of strong hand room to work the toggle handle back & forth.
Additionally, the grip area is cut way down because the last step will be to create a customized grip profile using light weight epoxy dough.
Simply glob it on and give it a squeeze... Well, maybe a bit more involved, but you get the idea.


Profile shows just how skinny I'm going on the back area.


Next aspect is adding some contour to all the flat areas of the stock.
Every time that rifle action grabs my attention - very unique.
Its nice to see how you formed all the bits and pieced it together. That design actually makes a good looking hybrid stock if you left the wood exposed! 🙂
 
OP
R

RepeatPete

Lil-Rokslider
Joined
Aug 13, 2023
Messages
164
The radical forearm cut out left it a bit fragile for adding a bipod mount, so did a CF lining to strengthen the area.


After a bit of trimming & sanding, the CF layer is quite stout.
In fact, next time will use 2 layers of fabric vs 4.
And I really jacked up the weave line of the fabric figuring out how to properly compress the channel, but this is just a prototype with all sorts of errors.
But that's what makes it fun, learn to not to fixate on the hickies, just move on with the build. Pretty comes later.


Another issue was the trigger guard. Looked at all types of options in both the firearm and airgun world, but never found anything that could be adapted to work. So went with KISS approach. Simple solution - measure the inside dimensions of the mag well and form it out of CF.
Cut a form (or tool as they say) long enough for a couple of trigger guards.


A bit of trimming & smoothing out.


Braced it where it needs to go and anchored it in with a fillet of thickened resin.


Next morning, it's basically welded into place. Done this method before and it makes for a great guard. Easy to shape, very light weight and tough as nails.
Additionally, this photo shows all sorts of errors, but none of which actually impact the performance of the stock.
-Burned through the action screw tube
-Laid down the CF spine layer off to one side
-Let resin creep out onto the edge of the stock
Meh - who cares. So long as it works.


A rough fit of the action shows the general outline of the stock.
Since recoil is not an issue, I can make the radical cut behind the grip.
This is needed for working the toggle bolt to give the heel of strong hand room to work the toggle handle back & forth.
Additionally, the grip area is cut way down because the last step will be to create a customized grip profile using light weight epoxy dough.
Simply glob it on and give it a squeeze... Well, maybe a bit more involved, but you get the idea.


Profile shows just how skinny I'm going on the back area.


Next aspect is adding some contour to all the flat areas of the stock.
That thing has given me so many ideas for a really lightweight, yet classic looking wood stock - great job!

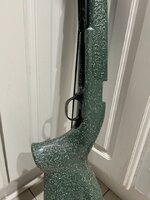
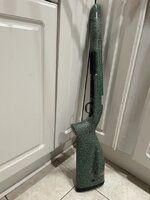
I don’t know what Duplicolor was smoking when labeling cans, but the “Extreme Matte” I got was semi-gloss at best, probably gloss. Rustoleum has always been good to me, so another round of the stone paint for texture, and then Rustoleum matte clear enamel to finish it off. The pictures don’t show it well, but it’s much more matte now with no glossy reflections. Use the right, and not the left.
628C1F5B-AEFB-4E29-B97F-4A8D5421C54F.jpeg
06F726F0-E318-4E6A-859E-0EA5D7A5EC3F.jpeg
I also got the bottom metal fit. The benefit of using a piece of the the original stock for inletting is that other than grinding a few resin and paint drips off, everything fits perfectly.
209B47A2-0F4E-46E9-862F-FEDF8528027B.jpeg
 

Gobber

FNG
Joined
Aug 8, 2023
Messages
45
Every time that rifle action grabs my attention - very unique.
Its nice to see how you formed all the bits and pieced it together. That design actually makes a good looking hybrid stock if you left the wood exposed! 🙂
Thanks TP! And the plan all along was to finish it with a clear coat. First thing I've ever done in walnut, so definitely want to see the grain.
I do love the toggle action - quick and simple.

A bit more progress...

Put on a few coats of poly and I think the wood finish looks pretty good for a prototype.
Also added some CF inlets to either side to break up the plain flat area and just to see how it would look.


One of the final items on this build is a way to add a customized grip that is easy to shape and easy to redo if desired. For this, I cut down the grip area to a minimal profile so it can be fitted with an epoxy dough section that fits the contours of the hand.


Kneaded a measure of Free Form Air Epoxy Dough for the grip build up.


'Keyed' the area with an aggressive wood burr to give a good rough surface.
Also added a bit of black resin pigment to the dough and rolled it out so it did not go exothermic.
Looks pretty disgusting laying there.


Applied the dough to the grip area and worked it into place so it bonded well to the roughed up surface of the wood.
At this early point in the dough's work time, it is quite sticky and adheres very well to a keyed surface.
It also holds detail well enough to show the creases in the palm.


Next is the part where patience pays off.
The dough has a nice work time of about 30-45 minutes as it begins to firm up.
Using a bit of water on the surface allows it to be worked into a more detailed shape.


After an overnight cure, the dough was hard enough to work and sand.
As cool as the 'glove fit' grip may look, it is simply not functional for this rifle.
The toggle action requires movement in the palm area to cycle the bolt and such a tight fit hinders the cycling.
Additionally, this grip is designed for two positions. One is for rapid cycling where the thumb rests vertically just below the back of the action which allows for quick cycling of the bolt. The other position is the classic 'reach around' grip where the thumb rests on the left side of the grip for more controlled deliberate shots.
A bit of sanding and shaping yields a more functional profile.


Next I added a base plate to the grip area for protection and to give some lower purchase to the grip.
Also did a quick patch job on the front of the grip area where I previously burned through when sanding it down.


Next up was to coat the area with some Plastic Dip to give it a more 'grippy' texture while retaining a flat surface to allow working of the toggle bolt. Never used it before, so we'll see how it works.


At this point I will use the rifle for a bit to fine tune the shape of the bottom plate and the contour of the grip.
One of the objectives in this build was a grip area that could be fairly easily re-worked if needed.
Not bad looking so far.


Might have an idea or two for personalizing it a bit more, but for now it will be good to see how it performs.
Other items on the list are an improved cheek rest with a built in slot to hold an extra 10 round mag & another shoulder fitting that is a bit more contoured.
And then there are some thoughts on how to embed light weight threaded inserts into a foam core stock to allow an adjustable cheek rest.

More to follow...
 
Last edited:
OP
R

RepeatPete

Lil-Rokslider
Joined
Aug 13, 2023
Messages
164
I wanted to do a project summary while I’m waiting to get the barreled action bolted up.

Overall, I would say this is not a beginner project, but only barely into intermediate territory. Take your time, pay attention to details, and it’s very straightforward. With very basic hand tools, good quality fabric and resin, and patience a carbon fiber stock is easily in reach.

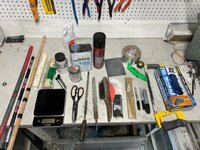
Here are the main tools I used:
5D12E6CD-7FBD-48F1-9C9C-041928EC755F.jpeg
From L to R:
- some dowels and PEX/PVC/metal pipe: used for aligning my bedding blocks when bonding into the stock skin. Also used as round sanding blocks for the barrel channel
- baking scale: (borrowed from my wife): both the epoxy resin and Marine Tex stated to mix by volume, but I mixed by weight and didn’t see any problems
- woods shims work great for mixing epoxy and applying Marine Tex
- acid brushes: just the cheap ones work great for applying epoxy resin
- Marine Tex: I bough the larger kit and used almost all of it during my few iterations of bedding blocks. It’s thicker than resin which can be helpful, and dries very tough but can still be shaped with files/sandpaper. Nice to have because if you make a mistake and cut/gouge/sand too deep, you can always build it back up with this stuff.
- epoxy resin: I used West System 105 resin with 206 slow hardener. I didn’t bother with the calibrated dispensing pumps because they only work with the larger container of hardener. I’ll have to look and see if I can get a slower hardener, as more time really would have helped. I got this stuff because it was (relatively) inexpensive and readily available from my local West Marine, and it worked great.
- scissors: use good ones on CF/fiberglass and not the cheap/dull ones shown, although they did work
- spray adhesive: I used 3M super 77 to join the foam sheet pieces together. It didn’t work great on the rougher white foam, but on the smooth-surfaced green sheets, it was strong and never delaminated
- assorted files: I shaped the majority of the foam form with just these two files. If I had a half-round file I think I would have shaped the entire foam plug with files. They work well on the foam; rigid to keep everything straight and not too aggressive
- wire brush: used as a file card to keep the files clean from the resin build-up
- sandpaper: I used sandpaper wrapped around a skinny and a fat sharpie to shape the rounded sections of the foam plug and pretty much all shaping between CF layers and the final surface finish
- utility knife with sharp blades: works well for cutting thin areas of foam, trimming the razor sharp edges of cured CF fabric, and many miscellaneous jobs
- tape: mainly for masking, but also holding forms during basic layups. I used insulation foil tape for the sole reason of it is what I had near my workbench. Electrical tape also works nice as it has some stretch
-hacksaw: works phenomenal for cutting foam; even on gentle curves
- gloves: need lots of gloves for working with CF and epoxy resin

I used a few power tools, and only briefly:
- a drill press to drill the action screw and Arca mounting holes perpendicular
- a small drill burr tip to shape a few corners of the CF inletting
- a Worksharp knife sharpener as a small belt sander to contour the grip area, but the hand tools just worked better

Lessons Learned:
- like @Gobber stated before I started: go 1 layer at a time. It will yield a much better product with much less frustration. I tried 2 layers at a time and with the epoxy working time, more than 1 layer laid well wasn’t realistic for my skills
- I wish I would have given more thought to the design of my stock in regards to laying up the CF. Some of the curves are aesthetic only, and the layup could have been much easier and cleaner if omitted
- I wouldn’t use CF sleeve material - the sleeve didn’t conform well to compound curves
- the sandpaper I used was discs for an oscillating sander. The holes in the discs would catch and tear the foam when wrapped around a round sanding block. Just use plain sandpaper sheets
- in my first foam core I laminated pieces of construction paper between the two center sheets of foam to serve as an easy-to-see centerline. I didn’t do it with the green core, but the printed lettering on the foam sheet was visible at the joint for a centerline

Overall, this was a super fun project. I’m happy (although not 100% satisfied) with the finished product, and already want to make another!
 

TaperPin

WKR
Joined
Jul 12, 2023
Messages
3,242
That turned out fantastic! The carbon fiber spine with exterior wood is such a new idea for me it’s still simmering and marinating - some of the custom f class and benchrest stocks that are built that way are gorgeous, but I’ve only seen them from a distance. Seeing your build has my mind going.
 

Gobber

FNG
Joined
Aug 8, 2023
Messages
45
Every time that rifle action grabs my attention - very unique.
Not to get too far off topic, but took the Carbon Walnut out for some plinking.
Here's the toggle bolt in action.


It's the other end of the spectrum from bench rest, but sure is fun ;)
 
Last edited:

TaperPin

WKR
Joined
Jul 12, 2023
Messages
3,242
Not to get too far off topic, but took the Carbon Walnut out for some plinking.
Here's the toggle bolt in action.


It's the other end of the spectrum from bench rest, but sure is fun ;)
That stock is definitely my favorite on that gun - the contrast between black and walnut, combined with the shape just makes the whole thing work.
 

Tartan

WKR
Joined
Jun 27, 2016
Messages
343
Location
Argyle, Tx
@Gobber

How durable is the Free Form Air Epoxy Dough without a layer of glass/cf over top?

I’ve got a stock I’d like to give more of a vertical grip.
 

Gobber

FNG
Joined
Aug 8, 2023
Messages
45
Density/weight is close to light-weight bondo body filler, but it has much longer work time and doesn’t stink to high heaven. Durability/toughness is a bit less as it does not have fibers in the mix. The ease of shaping with the longer work time is the key.

This is the first time I’ve used it without an outer CF layer, but in this prototype application I’m not expecting serious impact resistance. It’s protected by the bottom plate and tucked up behind the mag well. I‘m using it ‘unshelled’ because it would make it quite easy to sand down & reshape if needed.

If you are looking to add some shaped build-up of the grip area of a standard hunting rifle that would be exposed to some banging about, one approach would be to use the dough as a base layer to obtain an optimized profile for your various shooting positions. Once you are really satisfied with a final profile, doing an outer protective layer of Devcon, automotive clear coat or a thin layer of CF+resin are all options that would be dictated by how much abuse you’d want it to take. An outer layer of Devcon would allow some grip texturing to be added in.

That may sound a bit involved, but getting that base grip shape just right is made easy with the epoxy dough. As shown in the above post, just mold your hand into the layer of dough. Then sand away what’s not needed. If needed later, just add some back in order to get the imprint just right. The ’skinning’ it over with a protective layer is actually easier than you might think with the proper technique. DM me if you’d like to discuss details.
 

Gobber

FNG
Joined
Aug 8, 2023
Messages
45
I wanted to do a project summary while I’m waiting to get the barreled action bolted up.

Overall, I would say this is not a beginner project, but only barely into intermediate territory. Take your time, pay attention to details, and it’s very straightforward. With very basic hand tools, good quality fabric and resin, and patience a carbon fiber stock is easily in reach.

Here are the main tools I used:
View attachment 608911
From L to R:
- some dowels and PEX/PVC/metal pipe: used for aligning my bedding blocks when bonding into the stock skin. Also used as round sanding blocks for the barrel channel
- baking scale: (borrowed from my wife): both the epoxy resin and Marine Tex stated to mix by volume, but I mixed by weight and didn’t see any problems
- woods shims work great for mixing epoxy and applying Marine Tex
- acid brushes: just the cheap ones work great for applying epoxy resin
- Marine Tex: I bough the larger kit and used almost all of it during my few iterations of bedding blocks. It’s thicker than resin which can be helpful, and dries very tough but can still be shaped with files/sandpaper. Nice to have because if you make a mistake and cut/gouge/sand too deep, you can always build it back up with this stuff.
- epoxy resin: I used West System 105 resin with 206 slow hardener. I didn’t bother with the calibrated dispensing pumps because they only work with the larger container of hardener. I’ll have to look and see if I can get a slower hardener, as more time really would have helped. I got this stuff because it was (relatively) inexpensive and readily available from my local West Marine, and it worked great.
- scissors: use good ones on CF/fiberglass and not the cheap/dull ones shown, although they did work
- spray adhesive: I used 3M super 77 to join the foam sheet pieces together. It didn’t work great on the rougher white foam, but on the smooth-surfaced green sheets, it was strong and never delaminated
- assorted files: I shaped the majority of the foam form with just these two files. If I had a half-round file I think I would have shaped the entire foam plug with files. They work well on the foam; rigid to keep everything straight and not too aggressive
- wire brush: used as a file card to keep the files clean from the resin build-up
- sandpaper: I used sandpaper wrapped around a skinny and a fat sharpie to shape the rounded sections of the foam plug and pretty much all shaping between CF layers and the final surface finish
- utility knife with sharp blades: works well for cutting thin areas of foam, trimming the razor sharp edges of cured CF fabric, and many miscellaneous jobs
- tape: mainly for masking, but also holding forms during basic layups. I used insulation foil tape for the sole reason of it is what I had near my workbench. Electrical tape also works nice as it has some stretch
-hacksaw: works phenomenal for cutting foam; even on gentle curves
- gloves: need lots of gloves for working with CF and epoxy resin

I used a few power tools, and only briefly:
- a drill press to drill the action screw and Arca mounting holes perpendicular
- a small drill burr tip to shape a few corners of the CF inletting
- a Worksharp knife sharpener as a small belt sander to contour the grip area, but the hand tools just worked better

Lessons Learned:
- like @Gobber stated before I started: go 1 layer at a time. It will yield a much better product with much less frustration. I tried 2 layers at a time and with the epoxy working time, more than 1 layer laid well wasn’t realistic for my skills
- I wish I would have given more thought to the design of my stock in regards to laying up the CF. Some of the curves are aesthetic only, and the layup could have been much easier and cleaner if omitted
- I wouldn’t use CF sleeve material - the sleeve didn’t conform well to compound curves
- the sandpaper I used was discs for an oscillating sander. The holes in the discs would catch and tear the foam when wrapped around a round sanding block. Just use plain sandpaper sheets
- in my first foam core I laminated pieces of construction paper between the two center sheets of foam to serve as an easy-to-see centerline. I didn’t do it with the green core, but the printed lettering on the foam sheet was visible at the joint for a centerline

Overall, this was a super fun project. I’m happy (although not 100% satisfied) with the finished product, and already want to make another!

It really is impressive what can be done with pretty standard tools found in one's garage.
RPete did a great job demonstrating this on the first time out! (y)

One thing about cutting and shaping CF plate is that you can't really cut it using a shearing action (think drill bit into wood). By it's nature, the CF strands are too tough and will fray & split. It has to be cut using abrasive action. Diamond crusted wheels & bits work best, carbide bits are very good, zirconium belts work well and aluminum oxide sanding belts do OK, but wear down fairly quick.

PROTIP - Wood Bits - Don't use good quality wood working bits on CF! They won't be good quality for long.

Here are some items to add that make working with CF much easier-

Dremel type tool - I have a preference to the Proxxon brand of rotary tool, but have a Dremel as well. Absolutely indispensable in my projects.

Diamond Cutoff Wheels - A set on Amazon is less than $20 and they last a long time so long as you don't cut 'green' uncured CF where the resin adheres to the surface - BTDT

Diamond Hole Bits - Again, a small set from Amazon is >$10 and work very well. Take time cutting holes - a lot of heat builds up and melts the resin onto the surface of the bit, gumming them up. Just know it can take several minutes to cut one hole in a thicker plate of CF.

Diamond Rock Shaping Bit Set - The pointy ones are great for starting holes. The others make relieving surfaces, doing undercuts and such much easier.

Diamond File Set - A small diamond file set is very helpful as well and the cheap ones work just fine.

Shop-Vac - Have one running whenever cutting or sanding CF as well as masking up. You want that fountain of dust coming off the cut going right down the hose.

Gloves - Concur with RPete on gloves and I have added disposable veterinarian sleeves to cut down on the 'itchies' on my arms. They work ok. The itchies of CF usually go away after about a day or so.

Router Work - In doing the Carbon Walnut stock I used a router for all the big cuts in the wood using wood bits. To cut away the CF sections, used a metal-working end mill bit. It held up well to the CF layer and made for a clean cut. Probably not an issue if doing a foam core stock.

Vacuum Bagging - Really does help to be able to compress the CF layup using a vacuum. This may seem intimidating until the first time you do it. The vacuum source can be anything from a shop-vac to an HVAC vacuum pump ($$). As mentioned before, I use a salvaged household refrigerator pump repurposed. It works perfect for CF work, was free and has all the power needed for CF work. Made the frame from scrap plywood and did spent a few $$ on plumbing fittings, vacuum gauge & other bits. It can pull down to 27-28 inHg which has actually partially crushed a few layups. That's what the little brass nub fitting is that's dead center - a cheap pin valve that allows me to introduce a controlled leak that will lessen the vacuum as needed. Actually works very well.


Bagging Material - Stretchlon is my goto as it is purpose built. But you can use the Harbor Freight vac bags or even heavy duty garbage bags. My thought is this - if you are going to the all the work to lay up a stock, spend a few bucks and get the Strechlon. I typically like the thicker pink better than the thin green stuff as it can last for several baggings if taken care of. However, when doing a layup with finer detail, the thinner green film gets down into the recesses without as much vacuum force needed.

Peel Ply & Breather - Absolutely vital when bagging as it's what makes the process work.
The peel ply is the key as it allows the excess resin to pass through and be wicked up into the breather cloth layer without bonding to the CF layer below.
This does a few things at once - it ensures the ideal 50/50 ratio of resin to CF fabric, removes the weight of excess resin & mashes everything flat to prevent voids in the layup.
CF is very stiff and likes to raise up.
Next day it takes some pull, but the peel ply separates cleanly leaving the cured CF item intact.
 
Last edited:
Top