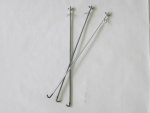
Thanks for posting up that picture of the angle brackets. Was in Lowe's and my helpful employee had never heard of them before but was able to look up the number and find them. Hillman #884486 picture worth a thousand words
Navigation
Install the app
How to install the app on iOS
Follow along with the video below to see how to install our site as a web app on your home screen.
Note: This feature may not be available in some browsers.
More options
Style variation
You are using an out of date browser. It may not display this or other websites correctly.
You should upgrade or use an alternative browser.
You should upgrade or use an alternative browser.
Another DIY Stove
- Thread starter bbrown
- Start date
bbrown
WKR
Sorry this took me a while to get around to updating - turns out a baby really does keep you pretty busy.
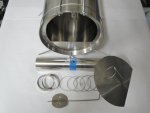
Here is the bend in the body supports to eliminate a washer and wing nut - make sure to heat up the all thread before trying to bend it or it will break.

Here is the legs - I do not know what they even call these but I found them at the local ACE Hardware in one of the hundreds of plastic little drawers. I have actually switched to the all steel version that looks slightly different than these - the all aluminum ones where prone to breaking.

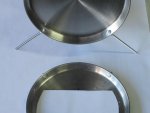
And here it the new door without hinges - just a bolt that the door slides over. The bolt here is too long and the hole drilled in the door is too small so it catches on the threads so keep that in mind.

Here is the bend in the body supports to eliminate a washer and wing nut - make sure to heat up the all thread before trying to bend it or it will break.
Here is the legs - I do not know what they even call these but I found them at the local ACE Hardware in one of the hundreds of plastic little drawers. I have actually switched to the all steel version that looks slightly different than these - the all aluminum ones where prone to breaking.
And here it the new door without hinges - just a bolt that the door slides over. The bolt here is too long and the hole drilled in the door is too small so it catches on the threads so keep that in mind.
Attachments
bbrown
WKR
Ya I finally gave in - really did not want but it has not been an issue.
A few years ago I made a similar stove using ti-foil I bought from Titanium Goat. I bought Ti dinner plates, I think from Snow Peak. Found them online and got a discount coupon from one of the outdoor stores. I made my rings from Stainless fishing leader material and used the commercial swedges the leader makers sell, which can be crimped with an ordinary pliers. To hold the endplates to the stove body I used aluminum turnbuckles hooked to the stainless leader material and cut slots in the edge of the plates. While that worked in the controlled environment of home, it did not work well in the field as the leader material, while strong in tension, cannot support any perpendicular loads very well. This is where the all-thread has an advantage---it can hold a pot without buckling. In my case, just the downward weight of the ti stove pipe was enough to buckle the top of the stove. I looked into ti all-thread but it is very expensive, so I then sought out ti bicycle spokes, which unfortunately, no longer appear to be made. I found a friend with two high end bike wheels with ti spokes that he gave me, and removed several spokes from the rims. I am still experimenting with the spokes to find the best configuration.
My stove originally was about 22" long, which I found to be too long to draft properly, so I have shortened it. Also, I did not come up with a satisfactory leg set-up, and initially set the stove on the ground. That was not good, as the stove body wants to roll one way of the other, which can lead to a pipe disconnect, which is not good in a closed shelter when you have a hot fire in the stove. I like your leg idea and will look for the connectors, although I do not relish drilling more holes in the Ti end plates because they do not like being drilled.
I'm still experimenting, but the biggest disappointment was the short burn time of the stove. These things eat wood and are good for warming up after returning to camp, but even with good hardwood, you are not going to get a 3-4 hour burn. A half hour is more like it.
Last edited:
Let's see some pictures of your setup if you have time rbinhood. Definitely interested in the idea of the SS leader material. Never even crossed my mind but that is a great idea. Not sure where you are located but all-thread shouldn't be that expensive unless you are looking for Ti all-thread?
These pics are of the original long version. I've cut it down since then.
here's a link: http://s1178.photobucket.com/user/rbinhood/media/04061536_2.jpg.html
http://s1178.photobucket.com/user/rbinhood/media/04061536a.jpg.html?sort=3&o=22
http://s1178.photobucket.com/user/rbinhood/media/04052015.jpg.html?sort=3&o=20
http://s1178.photobucket.com/user/rbinhood/media/04052016a.jpg.html?sort=3&o=18
Last edited:
The leader sleeves are from American Fishing Wire (AFW), and they come in different sizes, based on the diameter of the wire you are using. The wire package will actually say what size sleeve to use. If you google AFW leader sleeves, you'll find some fishing supply sites that sell them. They are relatively cheap, running a few bucks a package, and my package of #2s contains 36 sleeves.
bbrown
WKR
Thanks for the heads up on the leader material and crimps. Seem like a great option I am going to do some digging on those.
A few questions:
Where is the best place to position the seam on the stove body?
How much of an overlap is necessary on the stove body material?
How many wire rings are necessary for the stove pipe?
What holds the stove pipe in place?
Does your overall weight include the stove pipe?
On the stove body rings, are they the exact size as the end plate where it meets the stove body material?
I don't think it matters where the seam is because as it heats up and expands and seals that said I put mine on the bottom which is probably most common. The damper holds my pipe up from falling into the stove.
You need a ring every 12 or 18 inches or so plus one top and bottom to hold the foil to the pipe rings. The stove body rings basically hold the stove in shape so you can install the end plates which seal the stove body.
Mine is ss foil 8' pipe and is 2lbs 9oz with stuff stacks and spark arrestor. You can see it in my copycat thread but I followed bbrowns design
How tall did your pipe end up being?Mine is 2lbs 9oz with stuff stacks and spark arrestor. You can see it in my copycat thread but I followed bbrowns design
8 foot pipe
I should only need about 6' I think so should cut my weight a bit
bbrown
WKR
Realunlucky summed it up pretty well.
Keep in mind the 10" material only weighs 2oz per foot so the weight penalty to keep embers a bit further from your tent is not that much. The 7' pipe on my tent allows around 18" above the peak and I'm sure I could get away with less but I like knowing that extra foot gives those embers a better chance to cool before landing in the tent
Keep in mind the 10" material only weighs 2oz per foot so the weight penalty to keep embers a bit further from your tent is not that much. The 7' pipe on my tent allows around 18" above the peak and I'm sure I could get away with less but I like knowing that extra foot gives those embers a better chance to cool before landing in the tent
What did you guys use to get a clean hole for your pipe to come out of
What did you guys use to get a clean hole for your pipe to come out of
Let me tell ya, reading this comment without context had me wondering....
Similar threads
- Replies
- 2
- Views
- 343
- Replies
- 2
- Views
- 514
- Replies
- 0
- Views
- 255
Featured Video
Latest Articles
- Killing a Timber Giant
- Titanium Suppressor Shootout
- Best Gear of 2025
- Swarovski AT Balance Review
- YETI Outdoor Kitchen Expansion
- The Art of Shed Hunting
- TT#72 Conquering the Super 10: Mike Kentner’s Hunting Journey
- Spring Black Bears with Joe Kondelis
- TT#71 Trail Goods Company – Partnering with Hunters for Epic Adventures
- Wyoming Elk with Biologist Lee Knox


