Another diy carbon fibre stock

Ice-kub

Lil-Rokslider
Joined
Jan 9, 2022
Messages
253
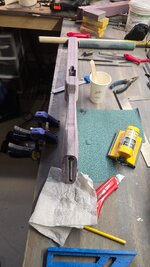
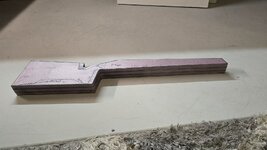
After seeing a couple of the diy carbon stock builds I decided to give this a shot. Thanks to roksliders @RepeatPete and @hpmr for the insperation and answering my questions.

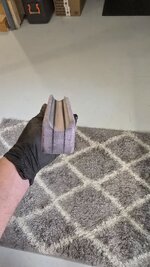
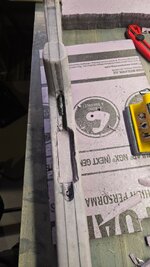
Started with 3 layers of xps foam from home depot. It's labels as 1/2" but it's slightly thicker.
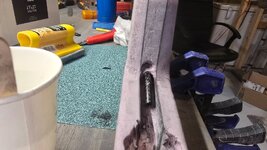
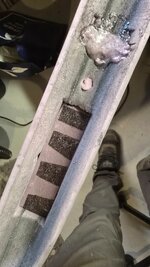
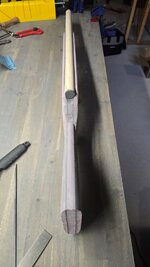
Laminated 3 layers together with 2 layers of carbon sandwiched between for a total of 4 layers of carbon. (cheap stuff from Amazon) trying to keep this build as cheap as possible.

Trying to take lots of photos in case anyone wants to give it a try as well.

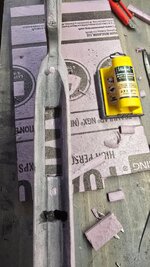
Tools are pretty basic so far.

Sand paper of various grit from 60-320

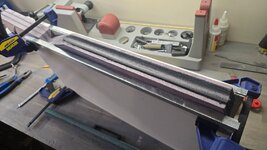
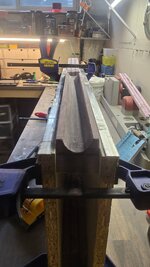
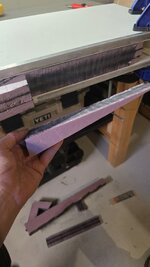
1-1/8 dowel for barrel channel with 60 grit paper glued to it and a drawer pull as a handle.

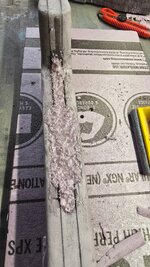
Jewellers wire coping saw

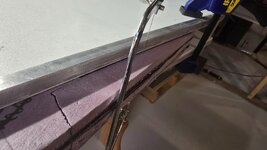
Two pieces of mdf with 1/2" angle aluminum used as a guide or fence for cutting with the jewelers saw(slow but quite precise with little to no tear out from the saw)

Assorted files and rasps

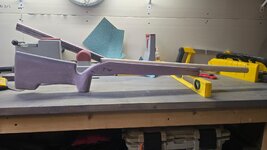
Some quick clamps and c clamps.

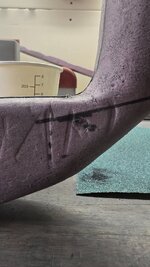
Waiting for the bedding block from stockys to arrive. Will be assaulting it with a grinder/Dremel because I'm left handed.

Will probably start carbon skinning the grip/action area to add rigidity as I started inletting for the bottom metal and I'm absolutely trash with a Dremel, as in I don't even want to post a photo of it haha.

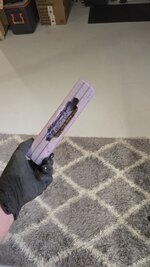
Current weight: 147 grams / 5.18oz

Edited to add weight

1000009377.jpg1000009402.jpg
 

Attachments

  • 20250412_103506.jpg
    20250412_103506.jpg
    181.1 KB · Views: 146
  • 20250412_103515.jpg
    20250412_103515.jpg
    185.5 KB · Views: 142
  • 20250412_152628.jpg
    20250412_152628.jpg
    160 KB · Views: 139
  • 20250412_114050.jpg
    20250412_114050.jpg
    184.2 KB · Views: 147
  • 20250408_200103.jpg
    20250408_200103.jpg
    183.6 KB · Views: 181
  • 20250412_152403.jpg
    20250412_152403.jpg
    156.1 KB · Views: 185
  • 20250408_185040.jpg
    20250408_185040.jpg
    136.1 KB · Views: 190
  • 20250408_184808.jpg
    20250408_184808.jpg
    194.7 KB · Views: 161
Drilled the action screws too soon and in the incorrect spots. So that will be filled back in before being covered in CF.

Was at the composite supply shot today and spoke with a guy that used to build stocks. He over heard me speaking to one of the employees and proceeded to let me know that carbon fibre is an awful material as it isn't strong enough to support the recoil of a rifle. He said good luck and to call him when I need a stock built.

Got me thinking about the recoil transferring through the bedding block, foam, carbon and then but pad.

I got home, drew a line on the side of the stock at about the only angle that was continuous from the butt to the rear action screw pillar. Measured a few inches longer and cut a 4mm 300 spine arrow, chucked it up in the drill and chamfered the outside of the end of the arrow to be "sharper", eye balled the vertical angle and followed the line, came out a few degrees off, glued some 60 grit paper around half or so of the circumfrance of the arrow and ovaled some of the hole to get a better angle. Still not perfect but it'll work. Planning to back it up with a strip of aluminum set vertically down the middle of the butt.

Anyone got any ideas if this was smart of not?
 

Attachments

  • 20250414_175126.jpg
    20250414_175126.jpg
    239.8 KB · Views: 112
  • 20250414_175202.jpg
    20250414_175202.jpg
    230.3 KB · Views: 115
  • 20250414_175139.jpg
    20250414_175139.jpg
    274.4 KB · Views: 114
Mixed up a good size batch of mistake filler epoxy and a bunch of foam Sanding bits/dust. Filled the bottom metal cut out and the recoil lug.

Also made a practice plug of the forend about 8-10 inches long to do a lay up of carbon on before attempting the full stock.
 

Attachments

  • 20250415_151606.jpg
    20250415_151606.jpg
    210.4 KB · Views: 92
  • 20250415_151601.jpg
    20250415_151601.jpg
    282.9 KB · Views: 91
  • 20250415_151435.jpg
    20250415_151435.jpg
    239.8 KB · Views: 89
  • 20250415_151417.jpg
    20250415_151417.jpg
    427.7 KB · Views: 89
  • 20250415_145941.jpg
    20250415_145941.jpg
    392.9 KB · Views: 89
  • 20250415_145923.jpg
    20250415_145923.jpg
    265.1 KB · Views: 95
Layed up the test plug a few days ago to get a feel for the process before attempting the full core. Used some plasticine wrapped in kitchen plastic wrap to push the cf into the "bottom metal inlet", didn't go quite according to plan but i understand the concept and will definitely do it that way when I unlet the bottom metal area on the full stock.


1000009573.jpg1000009574.jpg1000009575.jpg
 
Mounted up a scope to see how it would feel before covering in cf, feels pretty good so I decided to jump in and give it a go. It of course, did not go according to plan as I got cocky and tried to wrap the whole thing in one go, but it's the first layer so the ugly bits will end up being covered and probably a sponge paint job over anything ugly on the final layer. Going to try the braided sock next or do it in sections next time.
1000009584.jpg


1000009583.jpg
 
Wrapped it up last night, used west systems 105 with 209 extra slow hardner, took much longer to wrap carefully than expected. It came out better than I expected but not near as nice as I hoped. Measured incorrectly and didn't get it wrapped all the way around the butt and the round cut out at the comb presented some issues, pulled the weave apart trying to wrap that area. Next step is sand all the ugly/high spots and patch the areas not covered.

I feel it's stiff enough at this point to attempt vac bagging without crushing it.

1000009595.jpg1000009594.jpg1000009596.jpg
 
I wouldn’t even know where to start with this… well done! Looking forward to the final product.
 
I need to give a shout out to @Gobber, extremely knowledgeable and helpful in answering questions in extreme detail! Super helpful! Thanks again!
 
Decided the action was going to need something a little more robust than foam to deal with the recoil so I'm in the process of building a bedding block box that will be layed up into the shell of the stock to transfer the recoil from the action through the carbon fibre shell to the recoil pad instead of straight back into the foam core of the stock.

Used a 12" long piece of 1.5" aluminium square tubing with radius corners(couldn't find square sharp corners locally), rolled about 3.5ft of 12" wide carbon fibre around it. Came out to about 2.5mm or 0.100" thick. It's pretty beefy. The box is slightly oversize so that when it comes time to bed the block into the box there is play so the barrel and action ends up square if there is any poor workmanship on my end haha in theory.....

Box is still a work in progress, will be putting a flat end cap on at least the back end of the box and then at least two wraps around the whole box if I put a front cap on it or two horse shoe wraps around the back. If there's a next time I'd probably find some 1.5" square carbon tube and use that as long as the inner dimension is big enough to accommodate the bedding block.


1000009932.jpg1000009934.jpg1000009936.jpg1000009942.jpg1000009940.jpg1000009938.jpg
 
Basic box is done, end caps on, just need to shape the box to follow the height of the bedding block from front to back and cut away the areas for the bolt and safety.

Figured out the old dehydrator I have works great for curing epoxy layups very quickly. (don't use it for food anymore, trays disappeared)


1000009959.jpg


1000009960.jpg
 
Sanded the ever living heck out of the whole stock to hide my original pedestrian effort to skin the core.

Took some measurement and decided to cut the bottom of the bedding block box off and make make it part of the stock. Marked out the action screw holes and cut them over size to account for poor measurement skills. Cut out the trigger and mag wells and decided to bolt it together to see how she looks.

Mayhem ensued upon taking it apart. Maybe not mayhem...

1000009974.jpg1000009973.jpg1000009977.jpg1000009997.jpg1000010010.jpg
1000010011.jpg
 

Attachments

  • 1000010011.jpg
    1000010011.jpg
    353.1 KB · Views: 27
Cracked the very thin shell after taking it apart because it had been sanded so thin to get rid of all the glaring imperfections. Decided that the foam left had to go so it was time for "surgery".

Very carefully cut away the foam on either side of the mag well using a box cutter. Then used some carbon fibre chop I've been collecting and some foam-it epoxy dough mixed together and stuff it in there to hopefully stiffen that area up to be sanded and covered again.

Realizing now that the steps I'm taking are being completed in the incorrect order. Should have put at least one more layer of CF on before attempting to drill/cut holes in the thing.

1000010013.jpg1000010012.jpg1000010014.jpg1000010015.jpg
 
I appreciate you including all of the trial and error in the process. Pretty much every composites project I touch has a lot of "woops" moments. The foam epoxy dough looks really interesting.
 
I appreciate you including all of the trial and error in the process. Pretty much every composites project I touch has a lot of "woops" moments. The foam epoxy dough looks really interesting.

There's been quite a few already, the learning curve is decently steep but Im really enjoying this project!

We'll see how the dough stuff works. @Gobber used it in one of his projects he showed and it seems like a pretty slick product.
 
Back
Top