No issue with "the runs"? I had a couple dry spots the first couple times being conservative with the epoxy so no I give it a little extra for good measure.Just hand application.
Navigation
Install the app
How to install the app on iOS
Follow along with the video below to see how to install our site as a web app on your home screen.
Note: This feature may not be available in some browsers.
More options
Style variation
You are using an out of date browser. It may not display this or other websites correctly.
You should upgrade or use an alternative browser.
You should upgrade or use an alternative browser.
Another diy carbon fibre stock, Round 2!
- Thread starter Ice-kub
- Start date
Nov 23, 2025
It has been quite some time since an update. Decided I didn't like the aluminum bedding block and instead, filled the bedding box block full of free form air mixed with 1/4-1/2" carbon fibre chop. Used xps foam blocks as the negative space for the trigger/mag wells and filled it all in. Que lots of shaping/Sanding/adding more free form air... Repeat until mostly happy.
Expoxied some 3/8" aluminum tubes in as pillars, had tape wrapped around action screws to centre in pillars when torqing action into stock.
Filled in area around bottom metal with more FFA and carbon chop. Sprayed the bottom metal with almost enough release agent... Thought I was going to have to cut it out and start over. Put it in the deep freeze for a night and hit it with a dowel and hammer from the top side at the front and back of the mag well a couple times and it let go.
Shaved/sanded more out of the top side of the action inlet and decided to attempt to bed the action now that the pillars and bottom metal were sorted.
Sprayed a ridiculous amount of release agent on the action/lug/barrel and prayed to the epoxy gods. They were merciful this time and it came out way nicer than I thought it would. (if there is a next time, I would build a carbon box as I did previously, tape off the action and fill the box with an epoxy dough/carbon chop mix and build from the centre out.)
Drilled holes in the butt end and screwed the oversized grind to fit recoil pad to it.
Figured it was in a shootable state at this point so I took it out for a test drive. Fancy paint job to come. Torqued action screws to 60 inch pounds and put my nx8 on it.
Bore sited and put the first round 1/2" low at 100, ya ya, pics or it didn't happen lol it did.
Shot 30 rounds through it and it drives nice. No visable cracks or damage, no crunchy sounds when "flexing" it to look for cracks.
Will inspect further after taking it hunting this coming weekend.
You definitely have to plan for how to handle runs, but I almost feel like some thinner products might reduce risk of runs because you can apply a thinner coat. Each resin is probably a little unique in how it runsNo issue with "the runs"? I had a couple dry spots the first couple times being conservative with the epoxy so no I give it a little extra for good measure.
I've heard of guys mixing acetone into the resin in small percentages to achieve a thinner mix. Have you tried this?You definitely have to plan for how to handle runs, but I almost feel like some thinner products might reduce risk of runs because you can apply a thinner coat. Each resin is probably a little unique in how it runs
I haven’t. I would give it a try on a small test piece before committing to using in on a projectI've heard of guys mixing acetone into the resin in small percentages to achieve a thinner mix. Have you tried this?
ROUND 2!!!
The first stock was definitely a learning experience. Shout out to @RepeatPete and @hpmr for posting their builds with lots of photos and detailed explanations of the process. Also thanks to @Gobber for his expertise on the subject. All have been a wealth of knowledge.
Onto round two.
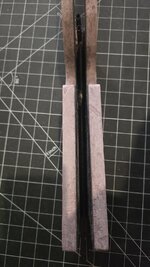
Decided I wanted a backbone for a pretty "aggressive" grip area. Backbone is a 12mm OD/10mm ID carbon tube with three 6mm OD/4mm ID carbon tubes to make a triangle. Made a mold from some extra foam and packed free form air/carbon chop around it. Dug out a ton of foam and epoxies the back bone in. Used the piece of foam for the mold and inserted it back into the stock on top of the back bone.
Cut out two 15mm x 15mm x about 8inch sections along the bottom of the forend, one on each side and filled with freeform air/cf chop to bridge the area where the recoil lug will be located to the grip where it meets with more freeform from installing the backbone and the two layers of cf running longitudinal down the stock.
After that, onto shaping and sanding.
1.75 inch trigger pull, 7° negative comb, toe is flat and parrell with the thin section of the forend, almost parallel with the mid section.
Currently weights 12 oz, may add a couple thin strips of aluminum in the forend and toe for hard points to drill/tap for sling studs or rails.

The first stock was definitely a learning experience. Shout out to @RepeatPete and @hpmr for posting their builds with lots of photos and detailed explanations of the process. Also thanks to @Gobber for his expertise on the subject. All have been a wealth of knowledge.
Onto round two.
Decided I wanted a backbone for a pretty "aggressive" grip area. Backbone is a 12mm OD/10mm ID carbon tube with three 6mm OD/4mm ID carbon tubes to make a triangle. Made a mold from some extra foam and packed free form air/carbon chop around it. Dug out a ton of foam and epoxies the back bone in. Used the piece of foam for the mold and inserted it back into the stock on top of the back bone.
Cut out two 15mm x 15mm x about 8inch sections along the bottom of the forend, one on each side and filled with freeform air/cf chop to bridge the area where the recoil lug will be located to the grip where it meets with more freeform from installing the backbone and the two layers of cf running longitudinal down the stock.
After that, onto shaping and sanding.
1.75 inch trigger pull, 7° negative comb, toe is flat and parrell with the thin section of the forend, almost parallel with the mid section.
Currently weights 12 oz, may add a couple thin strips of aluminum in the forend and toe for hard points to drill/tap for sling studs or rails.
Attachments
")
RepeatPete
Lil-Rokslider
- Joined
- Aug 13, 2023
- Messages
- 241
ROUND 2!!!
The first stock was definitely a learning experience. Shout out to @RepeatPete and @hpmr for posting their builds with lots of photos and detailed explanations of the process. Also thanks to @Gobber for his expertise on the subject. All have been a wealth of knowledge.
Onto round two.
Decided I wanted a backbone for a pretty "aggressive" grip area. Backbone is a 12mm OD/10mm ID carbon tube with three 6mm OD/4mm ID carbon tubes to make a triangle. Made a mold from some extra foam and packed free form air/carbon chop around it. Dug out a ton of foam and epoxies the back bone in. Used the piece of foam for the mold and inserted it back into the stock on top of the back bone.
Cut out two 15mm x 15mm x about 8inch sections along the bottom of the forend, one on each side and filled with freeform air/cf chop to bridge the area where the recoil lug will be located to the grip where it meets with more freeform from installing the backbone and the two layers of cf running longitudinal down the stock.
After that, onto shaping and sanding.
1.75 inch trigger pull, 7° negative comb, toe is flat and parrell with the thin section of the forend, almost parallel with the mid section.
Currently weights 12 oz, may add a couple thin strips of aluminum in the forend and toe for hard points to drill/tap for sling studs or rails.
View attachment 1022722
Looks great!
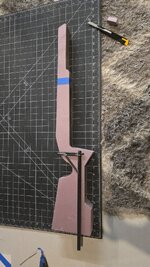
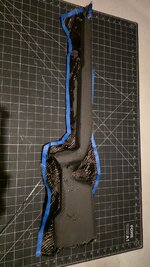
The Mk2 is coming along nicely, it's been extremely cold/lots of snow the last few days so progress is moving right along. The pink xps foam board is definitely very soft and will require some filler from wrapping the electrical tape tightly, it has created "ripples or waves" along the faces and corners.
Next step is to wrap from the grip back to give it some strength before hitting it with some filler to smooth the faces and edges.
It sure is ugly right now.


Next step is to wrap from the grip back to give it some strength before hitting it with some filler to smooth the faces and edges.
It sure is ugly right now.
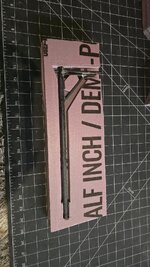
Added a fill of freeform on all opposing sides of the forend and clamped between mdf baseboard with a strip of red tuck tape sprayed with release agent. Flat sanded and recontoured edges. Happy with it now.
Put the first layer off CF on the back half over lapping at the grip area. Used plastic wrap to wrap the comb/toe area instead of electrical tape and it came out miles better. Not perfect but much less filling/Sanding. Used the electrical tape method for the thin part behind the grip and the grip.
Added a 2.5 inch piece of aluminium flat bar to drill/tap for slingstuds or rails.
Weighs 15 Oz currently.
Thinking of doing a flip flop recoil pad to keep the weight down.
tacks
Lil-Rokslider
- Joined
- Mar 21, 2025
- Messages
- 101
Will the bolt come out of your gun?
rookieforever33
WKR
- Joined
- Aug 23, 2024
- Messages
- 918
Tag to watch. Thanks for sharing.
Hmmmm.... I hope so. I will clamp it to another stock side by side and see. Good point though!Will the bolt come out of your gun?
Edit: it looks like I'll have plenty of room. New stock is clamped behind.


RepeatPete
Lil-Rokslider
- Joined
- Aug 13, 2023
- Messages
- 241
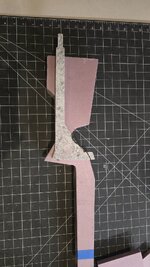
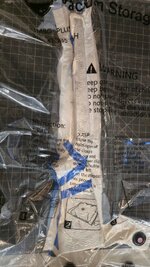
All the little divots have been filled and the entire stock sanded. No soft spots to deform for the next wrap hopefully. Going to try diy vac bagging with the amazon space saver vac bags, found some huge ones that are 40x30 inch I believe.
View attachment 1025523
Just a heads up on makeshift vacuum bagging: I tried the ones made for storage from Harbor freight and got a decent vacuum just by using my standard shop vac, but the bags were standard thick plastic and didn’t stretch at all. So, all the curves and corners had wrinkles from the bag. Not sure exactly what bags you’re using, but I’d encourage you to look around and see if you can find any where the bag material is a bit stretchy. If you can, I think it’ll work great!
Just a heads up on makeshift vacuum bagging: I tried the ones made for storage from Harbor freight and got a decent vacuum just by using my standard shop vac, but the bags were standard thick plastic and didn’t stretch at all. So, all the curves and corners had wrinkles from the bag. Not sure exactly what bags you’re using, but I’d encourage you to look around and see if you can find any where the bag material is a bit stretchy. If you can, I think it’ll work great!
I have seen that issue mentioned previously. I do have a couple of ideas I'm going to try with the bags. One is molding clay pieces pre molded wrapped in plastic wrap on top of the breather cloth in those curves and corners. As well as the bag itself being ridiculously large so hoping I will be able to pull and move wrinkles away from the stock before really pulling it under vac.
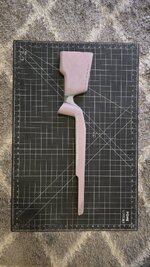
Had a go at vac bagging, for a complete rookie I think it turned out pretty good. Only a couple of very minor wrinkles and poor measurement skills on my part. Turned out much better than I imagined it would. The preformed clay blocks worked great.
Will need to trim it all up and sand a couple small spots, flip it over and put another layer on.
Will need to trim it all up and sand a couple small spots, flip it over and put another layer on.
Attachments
tacks
Lil-Rokslider
- Joined
- Mar 21, 2025
- Messages
- 101
Looks good. So did you do just the side showing?
Yes sir, going to over lap top and bottom each time thinking it would be easier to get a better surface finish that way.Looks good. So did you do just the side showing?
RepeatPete
Lil-Rokslider
- Joined
- Aug 13, 2023
- Messages
- 241
Had a go at vac bagging, for a complete rookie I think it turned out pretty good. Only a couple of very minor wrinkles and poor measurement skills on my part. Turned out much better than I imagined it would. The preformed clay blocks worked great.
Will need to trim it all up and sand a couple small spots, flip it over and put another layer on.
That looks great!
Similar threads
- Replies
- 22
- Views
- 3K
- Replies
- 42
- Views
- 4K
- Replies
- 11
- Views
- 2K

Featured Video
Latest Articles
- Kifaru Enters the Hunting Apparel Space: Review
- From Big Bucks to Bear Hunts: Catching Up with Jordan Budd
- Mule Deer Days Wildlife Conservation Mashup
- A Hidden Gem: Hunting Washington with Kari Thomas
- Prime Divide Bow Review
- Knowledge From Storms: Surviving and Thriving in the Backcountry with John Barklow
- DIY Wyoming Pronghorn Hunt
- Unlock Precision Shooting: Master Your Hunting Game with Competitive Insights
- Topo Topper Rincon Review
- Tony Trietch on Big Mule Deer, Desert Bulls & Western Hunting Evolution