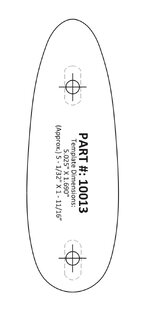
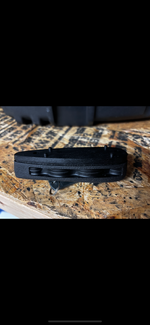
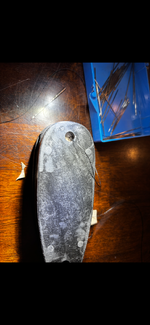
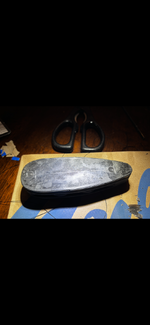
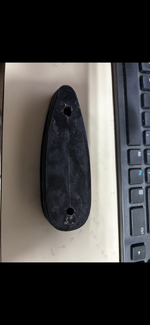
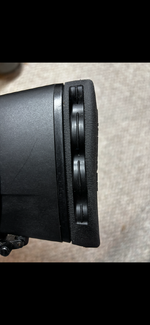
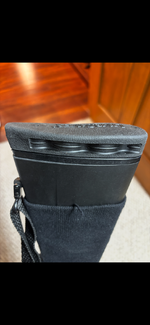
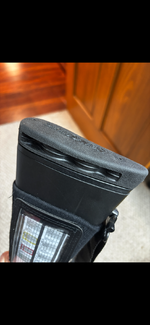
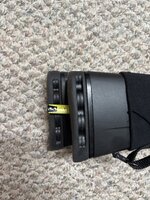
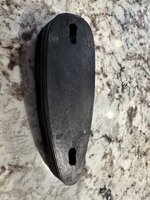
Thank you for posting this, I've been trying to figure this out for my T3x Lite Compact. Can you please explain what you mean by "drilling a second hole and connecting the two holes"? I'm trying to understand how you were able to relocate the holes in the Limbsaver Pad to make them align properly with the stock.I know this is an old thread, but I was just trying to figure this out and I had pretty good luck with Limbsaver pad #10824 for a Ruger American Compact. It had four posts on the back plate that I used a utility knife to remove and then moved both screw holes down by drilling a second hole and connecting the two holes. Made for about a 12.75” to 13” length of pull. View attachment 767089View attachment 767090View attachment 767091View attachment 767092
Navigation
Install the app
How to install the app on iOS
Follow along with the video below to see how to install our site as a web app on your home screen.
Note: This feature may not be available in some browsers.
More options
Style variation
You are using an out of date browser. It may not display this or other websites correctly.
You should upgrade or use an alternative browser.
You should upgrade or use an alternative browser.
Tikka T3X Compact recoil pad?
- Thread starter SDRuger21
- Start date
Maverick1
WKR
- Joined
- Jun 1, 2013
- Messages
- 2,637
@XR357 - can you provide some insight to the answer to this question?Thank you for posting this, I've been trying to figure this out for my T3x Lite Compact. Can you please explain what you mean by "drilling a second hole and connecting the two holes"? I'm trying to understand how you were able to relocate the holes in the Limbsaver Pad to make them align properly with the stock.
Last edited:
I missed the notification on this. I’ll try and take a picture when I’m home of the recoil pad. But I’ll try and explain more. If you look at the recoil pad backer plate with the pad sitting top to bottom you need to add/drill a second mounting hole directly below the factory screw holes. Both top and bottom. Be careful as you drill these as the drill bit will grab the rubber recoil pad and catch. This needs to be done so you have more room to slide the pad upwards or higher on the tikka stock. After drilling these two new holes I used a razor knife to connect the factory hole with the new hole I drilled directly below it both top and bottom. Does that make sense?
Sent from my iPhone using Tapatalk
Sent from my iPhone using Tapatalk
Maverick1
WKR
- Joined
- Jun 1, 2013
- Messages
- 2,637
For those that are interested, I managed to put a Limbsaver pad #10824 for a Ruger American Compact on the Tikka compact stock. Of note, it was not a direct "plug and play" - took a little bit of work but turned out really well. Thanks to @XR357 !
As mentioned by @XR357 the hole patterns on the Tikka compact stock and the limbsaver Ruger American pad do not align. (As a tip, the spacing between the holes on the Tikka compact stock is 80mm. The spacing on the Ruger American pad is different.)
To make this work, what I did was:
1. Order the Ruger compact limbsaver pad from limbsaver.
2. Remove the four plastic nubs on the back of the new recoil pad.
3. Probably not required, but I filled in the existing/factory/stock holes on the Ruger limbsaver pad with JB weld. I used the same technique as one would use to repair a hole in drywall. (Pushed a piece of cardboard down through the hole, and tied to a sewing string held taught, to keep the JB weld from going everywhere or down into the recoil pad too much.) Again, probably overkill, but it worked.
4. I re-drilled the top hole. (Used a 7/32" drill bit.). This went fairly smoothly as plenty of clearance existed from the factory / stock hole to the new hole required to make everything fit. [When I say 'top' hole I am referring to the hole near the top of the recoil pad, if one were to hold it as if it was mounted on the rifle.] As mentioned above, one has to be careful drilling as the drill bit poke through the hard plastic outer shell, then will grab onto the rubber recoil pad and catch. (Kind of like drilling through drywall and into the insulation behind the wall.)
5. I re-drilled the bottom hole. This is where things got a little messy. Because the two holes ended up being so close to one another, the JB weld ended up pulling out. Ended up with kind of a warbled out hole, but it was not that big of a deal.
6. Tightened the top screw through the limbsaver recoil pad and into the stock. This screw was at a bit of an angle, just went slow and made sure to align everything.
7. Tightened the bottom screw.
Note, I did not drill any holes into the soft side of the recoil pad. Only the hard plastic side that butts directly up to the rifle stock.
As you can see from the pictures, the final product turned out alright.
I prefer the limbsaver Airtech precision fit recoil pads over the stock Tikka recoil pads.
This DIY ends up with a limbsaver pad on a compact Tikka stock.
Last edited:
Maverick1
WKR
- Joined
- Jun 1, 2013
- Messages
- 2,637
Maverick1
WKR
- Joined
- Jun 1, 2013
- Messages
- 2,637
Maverick1
WKR
- Joined
- Jun 1, 2013
- Messages
- 2,637
bigsky_hunter
Lil-Rokslider
From your final picture it looks like finished LOP is 12.75”. Is this correct?
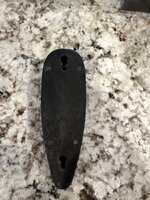
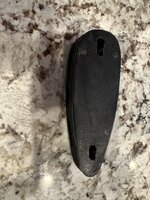

Mine is right at about 12.75” depending on where you measure.
Here is also a couple of pics of the recoil pad I modified. @Maverick1 did a nicer job, but mine works and is simple.
Attachments
buckslayer5676
Lil-Rokslider
- Joined
- Dec 3, 2019
- Messages
- 219
Thanks for the write-up...I see you mentioned that you did not drill the soft side. So if the hard sided holes did not match up, how did you screw the butt pad on from the soft side?For those that are interested, I managed to put a Limbsaver pad #10824 for a Ruger American Compact on the Tikka compact stock. Of note, it was not a direct "plug and play" - took a little bit of work but turned out really well. Thanks to @XR357 !
As mentioned by @XR357 the hole patterns on the Tikka compact stock and the limbsaver Ruger American pad do not align. (As a tip, the spacing between the holes on the Tikka compact stock is 80mm. The spacing on the Ruger American pad is different.)
To make this work, what I did was:
1. Order the Ruger compact limbsaver pad from limbsaver.
2. Remove the four plastic nubs on the back of the new recoil pad.
3. Probably not required, but I filled in the existing/factory/stock holes on the Ruger limbsaver pad with JB weld. I used the same technique as one would use to repair a hole in drywall. (Pushed a piece of cardboard down through the hole, and tied to a sewing string held taught, to keep the JB weld from going everywhere or down into the recoil pad too much.) Again, probably overkill, but it worked.
4. I re-drilled the top hole. (Used a 7/32" drill bit.). This went fairly smoothly as plenty of clearance existed from the factory / stock hole to the new hole required to make everything fit. [When I say 'top' hole I am referring to the hole near the top of the recoil pad, if one were to hold it as if it was mounted on the rifle.] As mentioned above, one has to be careful drilling as the drill bit poke through the hard plastic outer shell, then will grab onto the rubber recoil pad and catch. (Kind of like drilling through drywall and into the insulation behind the wall.)
5. I re-drilled the bottom hole. This is where things got a little messy. Because the two holes ended up being so close to one another, the JB weld ended up pulling out. Ended up with kind of a warbled out hole, but it was not that big of a deal.
6. Tightened the top screw through the limbsaver recoil pad and into the stock. This screw was at a bit of an angle, just went slow and made sure to align everything.
7. Tightened the bottom screw.
Note, I did not drill any holes into the soft side of the recoil pad. Only the hard plastic side that butts directly up to the rifle stock.
As you can see from the pictures, the final product turned out alright.
I prefer the limbsaver Airtech precision fit recoil pads over the stock Tikka recoil pads.
This DIY ends up with a limbsaver pad on a compact Tikka stock.
Maverick1
WKR
- Joined
- Jun 1, 2013
- Messages
- 2,637
Good question. I will do my best to accurately describe; admittedly it may be a bit challenging to do so. You will probably end up more confused with my description, though!Thanks for the write-up...I see you mentioned that you did not drill the soft side. So if the hard sided holes did not match up, how did you screw the butt pad on from the soft side?
The short answer is you can push the screw through the outer shell of the soft side of the recoil pad, push the screw sideways once inside the recoil pad to make it align with the hard side of the pad and then the holes in the rifle stock. Your screwdriver can also push the recoil pad sideways to screw in the screws. (See, that was clear as mud!)
The holes on the hard side of the recoil pad need to align with the holes into the rifle stock. This can be done with either approach used by myself (fill in the holes and then drill new holes to align the new holes directly with the holes in the Tikka compact stock) or by @XR357 (slot the existing holes to make them bigger and thus achieving the alignment).
On the soft side of the recoil pad do NOT need to align with the holes on the rifle stock. Why? Because the material is - well, soft!
The bottom holes on the recoil pad align fairly well. (Between the hard surface and the soft surface)
The top holes holes on the recoil pad do not align particularly well. (Between the hard surface and the soft surface). This is why step #6 above is to screw in the top screw first, and then the bottom screw.
The words above are probably more confusing than helpful, I realize. I suppose the main takeaway would be that the Ruger compact recoil pad matches up very well with the Tikka youth/compact stock. If you buy the recoil pad, it will work. Most of the steps are laid out above.
buckslayer5676
Lil-Rokslider
- Joined
- Dec 3, 2019
- Messages
- 219
Thanks! Actually, it makes perfect sense and you described it perfectly, so thanks again! Basically, the outer soft shell is soft enough to manipulate the screws into the hard side and can be moved enough to get access to the screw heads to drive them in/out. I'm definitely going to try this on my compacts. Thanks!Good question. I will do my best to accurately describe; admittedly it may be a bit challenging to do so. You will probably end up more confused with my description, though!
The short answer is you can push the screw through the outer shell of the soft side of the recoil pad, push the screw sideways once inside the recoil pad to make it align with the hard side of the pad and then the holes in the rifle stock. Your screwdriver can also push the recoil pad sideways to screw in the screws. (See, that was clear as mud!)
The holes on the hard side of the recoil pad need to align with the holes into the rifle stock. This can be done with either approach used by myself (fill in the holes and then drill new holes to align the new holes directly with the holes in the Tikka compact stock) or by @XR357 (slot the existing holes to make them bigger and thus achieving the alignment).
On the soft side of the recoil pad do NOT need to align with the holes on the rifle stock. Why? Because the material is - well, soft!
The bottom holes on the recoil pad align fairly well. (Between the hard surface and the soft surface)
The top holes holes on the recoil pad do not align particularly well. (Between the hard surface and the soft surface). This is why step #6 above is to screw in the top screw first, and then the bottom screw.
The words above are probably more confusing than helpful, I realize. I suppose the main takeaway would be that the Ruger compact recoil pad matches up very well with the Tikka youth/compact stock. If you buy the recoil pad, it will work. Most of the steps are laid out above.
Maverick1
WKR
- Joined
- Jun 1, 2013
- Messages
- 2,637
@buckslayer5676
Yes, you’ve got it. The limbsaver recoil pad is stretchy. See marked up picture below. Not to scale.
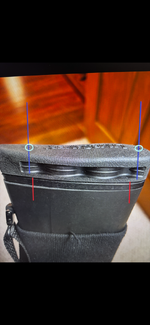
Yes, you’ve got it. The limbsaver recoil pad is stretchy. See marked up picture below. Not to scale.

Maverick1
WKR
- Joined
- Jun 1, 2013
- Messages
- 2,637
@SDRuger21 @Mike D Texas @sierracharlie338 @Bezamaelee @tyco - if you are still on the hunt for a solution to the Tikka youth compact recoil pad, some additional information added to this thread.
Good question. I will do my best to accurately describe; admittedly it may be a bit challenging to do so. You will probably end up more confused with my description, though!
The short answer is you can push the screw through the outer shell of the soft side of the recoil pad, push the screw sideways once inside the recoil pad to make it align with the hard side of the pad and then the holes in the rifle stock. Your screwdriver can also push the recoil pad sideways to screw in the screws. (See, that was clear as mud!)
The holes on the hard side of the recoil pad need to align with the holes into the rifle stock. This can be done with either approach used by myself (fill in the holes and then drill new holes to align the new holes directly with the holes in the Tikka compact stock) or by @XR357 (slot the existing holes to make them bigger and thus achieving the alignment).
On the soft side of the recoil pad do NOT need to align with the holes on the rifle stock. Why? Because the material is - well, soft!
The bottom holes on the recoil pad align fairly well. (Between the hard surface and the soft surface)
The top holes holes on the recoil pad do not align particularly well. (Between the hard surface and the soft surface). This is why step #6 above is to screw in the top screw first, and then the bottom screw.
The words above are probably more confusing than helpful, I realize. I suppose the main takeaway would be that the Ruger compact recoil pad matches up very well with the Tikka youth/compact stock. If you buy the recoil pad, it will work. Most of the steps are laid out above.
You nailed it…or in this case screwed it


I also like to put a very light coat of dish soap (just a small drop) on the shaft of the screwdriver and that keeps it from grabbing the soft limbsavers material as your tighten the screws that are slightly misaligned with the outer small hole in the soft material.
Sent from my iPhone using Tapatalk
Maverick1
WKR
- Joined
- Jun 1, 2013
- Messages
- 2,637
A couple of references here:Has anyone ever taken a regular T3x stock and cut it to the same length as a compact?
I’m tempted to try it as I have several regulars laying around but compacts seem to bring a premium.
Tikka/Question on Shortening Stock
My daughter is in need of a rifle, and we have a very limited choice in that she is a leftie and needs a ~12" LOP (11 yo, 4'6"). The guns shop's recommendation is a Tikka w/ a wood stock to make it easier to cut down. Does anyone have a sense of whether the synthetic stock is fairly easy to...
 rokslide.com
Shortening a Tikka T3-x lite (synthetic) stock?
I have a regular Tikka T3x Lite and I would like to shorten it by ~3/4“. Has anyone done this? Can I just whack it off the back and screw the butt pad back on? Thank you! Unaltered stock.
 rokslide.com
Anyone alter Tikka factory stock?
Just bought my first Tikka! T3x lite stainless steel .308. I put on the vertical pistol grip and the larger forend. Ordered a limbsaver, but the original LOP is already a bit too much. I am 5’6” and need a 13 inch LOP. Has anyone shortened the LOP on the tikka factory plastic stock? My...
 rokslide.com
Similar threads
- Replies
- 58
- Views
- 2K
Featured Video
Latest Articles
- TT#64 Josh Boyd Elk Hunting Strategies for Every Season
- Aaron Davidson of Gunwerks
- TT#63 Dirk Durham’s Art of Elk Calling
- BIG Buck Stories with the Dirty Giants Podcast
- TT#62 Brian Barney Hunting Bulls without Calling
- Hoyt Alpha AX-2 SD Review
- Kuiu Kenai vs Outdoor Vitals Vario Hooded Jacket Review
- Hoyt RX-9 Ultra Review
- Hunting Vampire Bucks & Building an Optics Kit
- Darton Sequel ST2 35 Review

