sabotloader
WKR
I have one! A new 2013 model Vision… Actually it is Grouse’s, he just had some minor back surgery done and is pretty much disqualified from doing much right now. I assume most of you saw his initial post about his outing with the gun and the table that was posted that showed the items that have been changed in the rifle. All of these changes were made to make the rifle more reliable and to provide a smoother operating gun.
Grouse has already expressed his thoughts on the price of the rifle that surely makes it very competitive with the lower end of other makes and models. But the big question is – is it as good as one could hope for a $300 American made rifle?
I do have a problem with it, right of the top; I am not a break open fan at all when it comes to rifles. They are OK when it comes to shotguns, do nothing for me for big game hunting. So remember that if I get critical of something one of you might like.
The gun and scope arrived last week and yesterday was really the first time I got time to really look at it. Not going to say much about the new Redfield Revenge Accra-Ranger scope at this time save that for later when mine gets here.
When I unpacked the rifle and had it in my hands it really showed me nothing different than the original Vision that I had in 2009. I looked mostly the same except for the new scope rail that Knight has added to the line.
In 2009 I really was expecting a fairly light weight and inexpensively built rifle, not totally what I got. Then and today the rifle with its 24” Green Mountain barrel weighs about 7lbs 9oz, it is hefty but because if the slim line stock and the balance of the rifle it really feels to me like an easy packing rifle. It certainly is not a Featherweight or an Ultra-Light but I think it would be a very good mountain rifle or pack rifle. Weight… there is no aluminum in the working mechanism that I can find, it is all steel.
Since I had the time yesterday, I decided I wanted to take this new rifle down and see what it was all about. At the time I really did not know what it would take to take it apart.
The first thing I removed was the Trigger Assembly. Simple… remove two screws on the right side of the receiver lift up and back on the trigger guard and you have the snug fitting trigger assembly out in your hand. Really makes it a simple cleaning process.
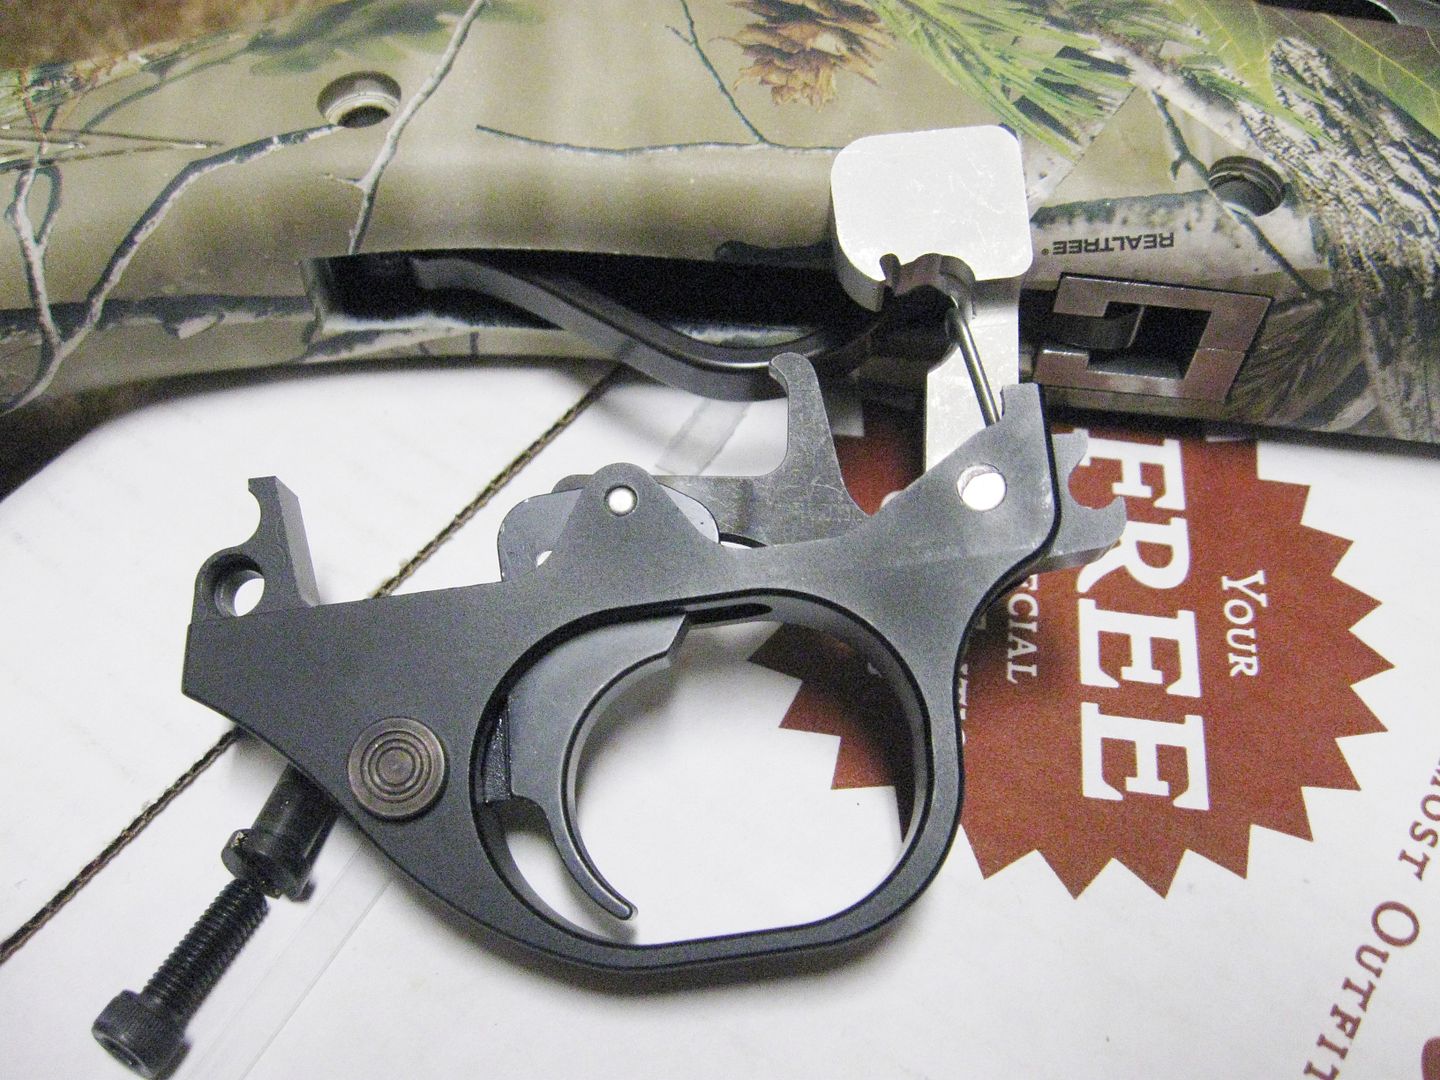
I really like how clean the assembly is and how simple the whole is. The new machined parts are very smooth and fit together very well. Two spring a hammer spring and trigger/sear spring work the system. I am a bit disappointed in the strength of the trigger/sear spring but more about that later.
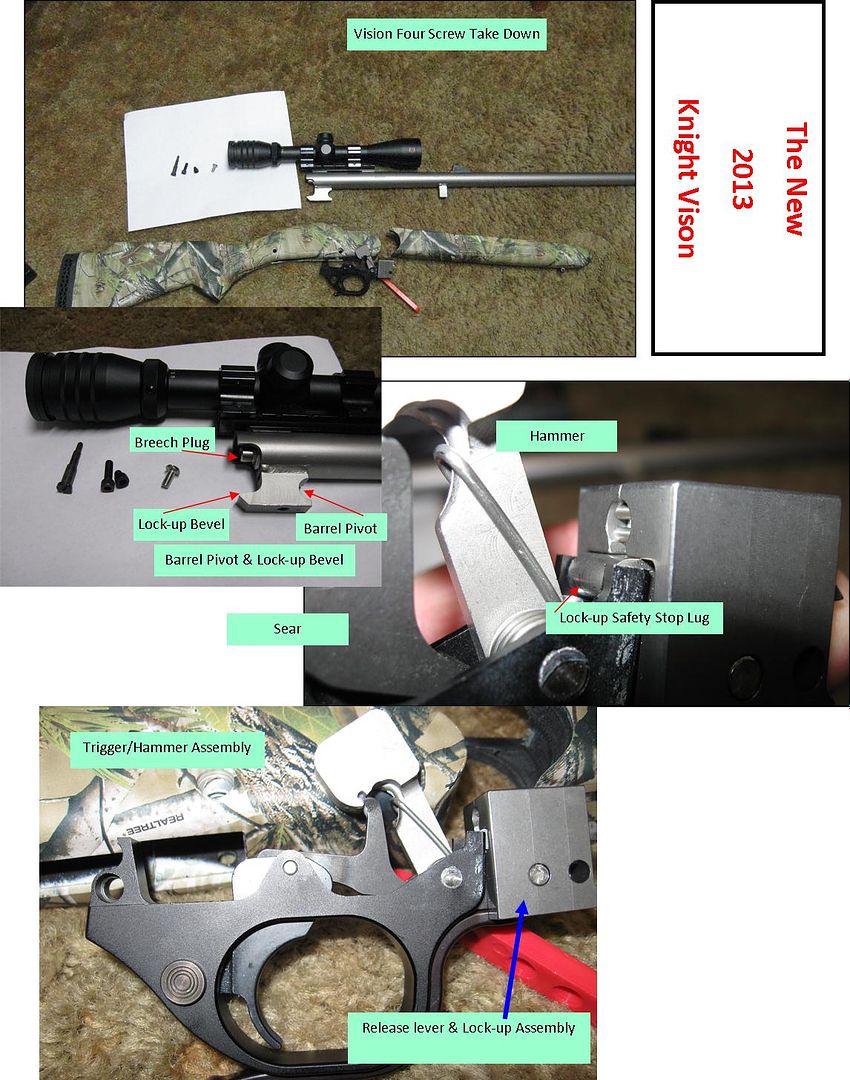
Next I took the one screw on the left side of the receiver out and removed the barrel locking assembly. It also fit very snugly inside the receiver. Not much movement at all. This assembly has the barrel opening lever and latch assembly neatly tucked in a small space. Again machined parts the fit very well and operated very smooth. This assembly also blocks the hammer from reaching the firing pin if the rifle is not locked up tight and safe. And of course there is a solid trigger bar safety.

So that is three screws and the majority of the receiver group is out in my hands, easily accessible and easily cleaned.
There is one other screw holding the firing pin mechanism in place. The Allen head screw located in the face of the receiver hold the firing pin bushing in place and the internal parts of the hammer.

The next screw was in the forearm, remove that screw and lift the forearm off, well like pry it off, the forearm socket is bedded to the barrel lug very tightly with no excess movement.
With the forearm off break the rifle open and apart. That’s it!!! Five screw take down! It is an incredibly simple working rife.
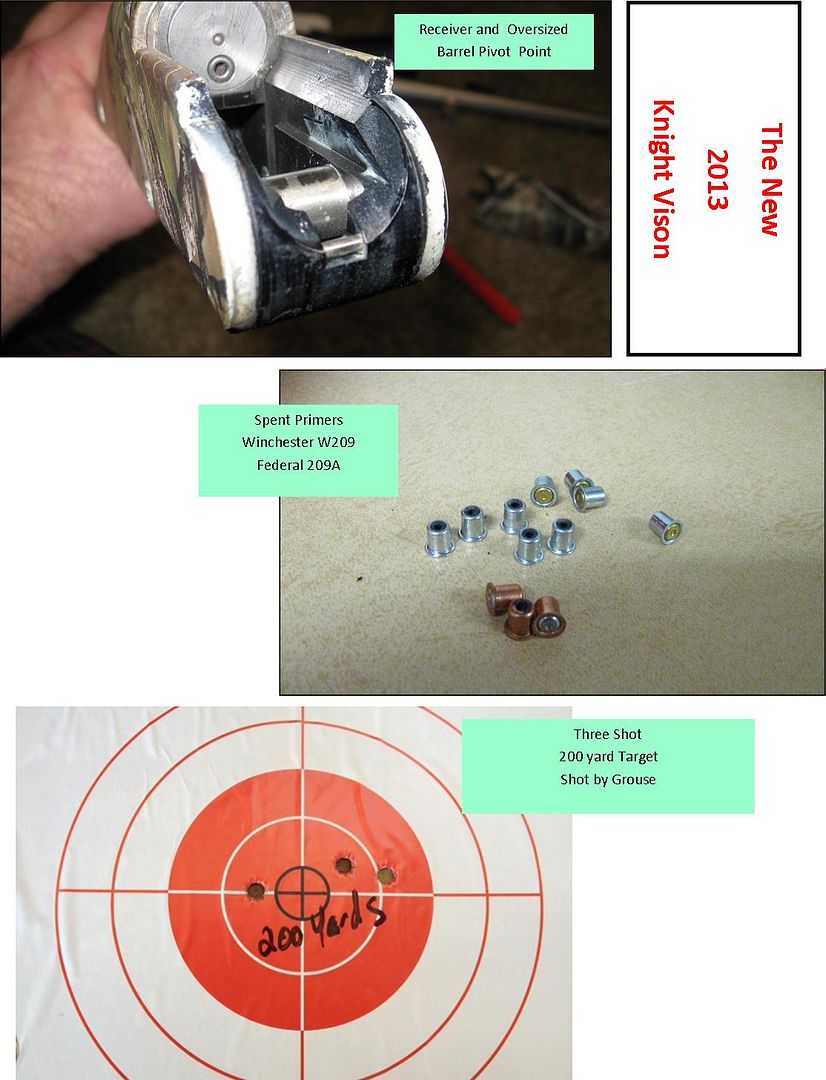
One thing that I like but hate since it is a break open… in the pictures below look at the mass of the barrel pivot lug and the pivot column in the receiver of the barrel. I know they wear every time you open and close them but good luck wearing this combination out in your life time. I lubed the all the appropriate surfaces and working joints and put the rifle back together. It went back together as easily as it came apart.
I could not or did not have time to go shoot it today but I did grab a handful of W209 primers and headed to the garage. I wanted to see how much blow back I might get up the sides of the primer. I pulled the trigger on 4 primers – not one of them came out dirty. So I went and got some more and repeated the process. Only this time I paid more attention to the muzzle of the rifle as the discharge occurred… Like the 4th of July the W209 primer was sealed so well in the BP all the heat and flame was being directed through the BP and out the muzzle, nice fire column.
I wanted to try one more thing to prove that I could get dirty primers out of that standard BP… I went in and got some shorty Federal 209A’s and gave them a go. Now they really did give a Fourth of July show in a dimly lit garage – lots of fire! But, no dirty primers, just as clean as the Winchesters.
OK! You know it had to be coming… A negative – a non-adjustable trigger pull. The mechanism does have a little bit of take-up or creep in the trigger and it is a heavy pull bt most standards. A heavy pull for me anyway as I am use to a 2 ½ to 3# adjustable pull. With my two-bit scale I measured the pull at 4lbs 11oz. Hunting I would probably never feel it. Target shooting I definitely would feel it. So next I broke the rifle open and measured just the trigger/sear spring strength. The scale measured 3lbs 8oz. So without reworking that spring I was not going to get the pull down to 3lbs…
These pictures are sort of composite of all the things I saw. The last picture shows how well the gun can shoot. Got to give Grouse the credit for shooting the target.
Grouse has already expressed his thoughts on the price of the rifle that surely makes it very competitive with the lower end of other makes and models. But the big question is – is it as good as one could hope for a $300 American made rifle?
I do have a problem with it, right of the top; I am not a break open fan at all when it comes to rifles. They are OK when it comes to shotguns, do nothing for me for big game hunting. So remember that if I get critical of something one of you might like.
The gun and scope arrived last week and yesterday was really the first time I got time to really look at it. Not going to say much about the new Redfield Revenge Accra-Ranger scope at this time save that for later when mine gets here.
When I unpacked the rifle and had it in my hands it really showed me nothing different than the original Vision that I had in 2009. I looked mostly the same except for the new scope rail that Knight has added to the line.
In 2009 I really was expecting a fairly light weight and inexpensively built rifle, not totally what I got. Then and today the rifle with its 24” Green Mountain barrel weighs about 7lbs 9oz, it is hefty but because if the slim line stock and the balance of the rifle it really feels to me like an easy packing rifle. It certainly is not a Featherweight or an Ultra-Light but I think it would be a very good mountain rifle or pack rifle. Weight… there is no aluminum in the working mechanism that I can find, it is all steel.
Since I had the time yesterday, I decided I wanted to take this new rifle down and see what it was all about. At the time I really did not know what it would take to take it apart.
The first thing I removed was the Trigger Assembly. Simple… remove two screws on the right side of the receiver lift up and back on the trigger guard and you have the snug fitting trigger assembly out in your hand. Really makes it a simple cleaning process.
I really like how clean the assembly is and how simple the whole is. The new machined parts are very smooth and fit together very well. Two spring a hammer spring and trigger/sear spring work the system. I am a bit disappointed in the strength of the trigger/sear spring but more about that later.
Next I took the one screw on the left side of the receiver out and removed the barrel locking assembly. It also fit very snugly inside the receiver. Not much movement at all. This assembly has the barrel opening lever and latch assembly neatly tucked in a small space. Again machined parts the fit very well and operated very smooth. This assembly also blocks the hammer from reaching the firing pin if the rifle is not locked up tight and safe. And of course there is a solid trigger bar safety.
So that is three screws and the majority of the receiver group is out in my hands, easily accessible and easily cleaned.
There is one other screw holding the firing pin mechanism in place. The Allen head screw located in the face of the receiver hold the firing pin bushing in place and the internal parts of the hammer.
The next screw was in the forearm, remove that screw and lift the forearm off, well like pry it off, the forearm socket is bedded to the barrel lug very tightly with no excess movement.
With the forearm off break the rifle open and apart. That’s it!!! Five screw take down! It is an incredibly simple working rife.
One thing that I like but hate since it is a break open… in the pictures below look at the mass of the barrel pivot lug and the pivot column in the receiver of the barrel. I know they wear every time you open and close them but good luck wearing this combination out in your life time. I lubed the all the appropriate surfaces and working joints and put the rifle back together. It went back together as easily as it came apart.
I could not or did not have time to go shoot it today but I did grab a handful of W209 primers and headed to the garage. I wanted to see how much blow back I might get up the sides of the primer. I pulled the trigger on 4 primers – not one of them came out dirty. So I went and got some more and repeated the process. Only this time I paid more attention to the muzzle of the rifle as the discharge occurred… Like the 4th of July the W209 primer was sealed so well in the BP all the heat and flame was being directed through the BP and out the muzzle, nice fire column.
I wanted to try one more thing to prove that I could get dirty primers out of that standard BP… I went in and got some shorty Federal 209A’s and gave them a go. Now they really did give a Fourth of July show in a dimly lit garage – lots of fire! But, no dirty primers, just as clean as the Winchesters.
OK! You know it had to be coming… A negative – a non-adjustable trigger pull. The mechanism does have a little bit of take-up or creep in the trigger and it is a heavy pull bt most standards. A heavy pull for me anyway as I am use to a 2 ½ to 3# adjustable pull. With my two-bit scale I measured the pull at 4lbs 11oz. Hunting I would probably never feel it. Target shooting I definitely would feel it. So next I broke the rifle open and measured just the trigger/sear spring strength. The scale measured 3lbs 8oz. So without reworking that spring I was not going to get the pull down to 3lbs…
These pictures are sort of composite of all the things I saw. The last picture shows how well the gun can shoot. Got to give Grouse the credit for shooting the target.
Last edited: