How I Modify My Tikka Factory Stocks

Reddish

Lil-Rokslider
Joined
Apr 1, 2023
Messages
233
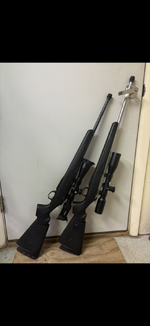
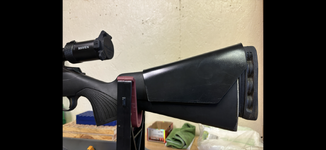
Step 4: fixing the stock geometry. This is where what I do differs significantly from what I've seen anyone else try. The objective is to achieve negative drop at the heel, negative comb angle, keep the factory butt pad, and be able to remove the bolt with the action fully torqued.

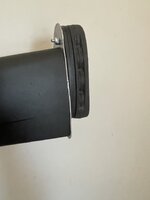
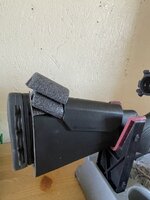
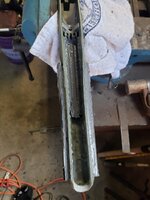
First, mark the location where the bolt is furthest back when removing or reinstalling it from the action. Mess this up and you're in for a lot of sanding, or you have to remove screws to remove the bolt. I used tape and cardboard:
View attachment 587137

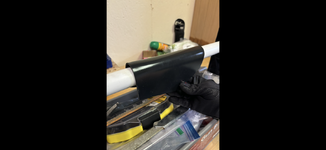
Now, remove the action and find something you can reference off the nice bedding job you did to that same point. This big nail and a few wraps of electrical tape worked for me.
View attachment 587138

Now that we know what has to stay clear, it's time to cut.

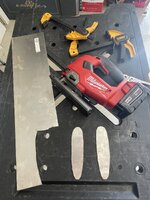
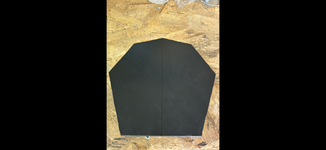
First cut, mitre saw at 0 degrees. You might want to go a bit further back than I did here, depends on how much you value a continuous top angle vs really wanting the flattest possible bottom.
View attachment 587139

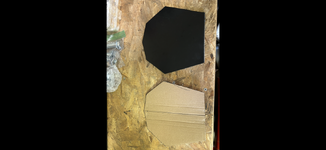
After that, set a slight angle on the saw, set aside the butt pad piece, and cut again, with the cut starting from the bottom edge of the first cut. I used 5 degrees.
View attachment 587141
View attachment 587140

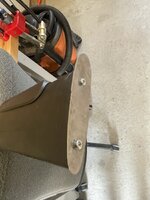
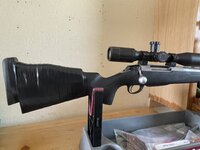
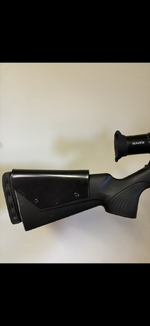
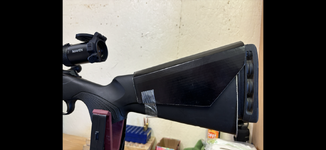
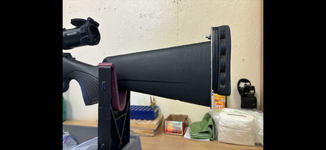
After making the cuts, it's time to start fitting stuff back together, making sure to leave room for the bolt to be removed, while achieving a negative drop at the heel. That 5 degree angle already guaranteed negative comb angle. Using some tape can help you out, and the seems work well for making sure nothing is twisted.
View attachment 587142

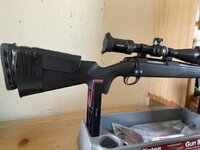
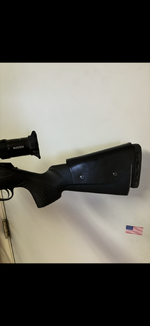
The last geometry fix is to flatten the bottom. Perfectly flat is best, but any amount flatter is an improvement. Pick out a stiff carbon arrow you don't like (250 spine rampage), and find a drill bit a smidge larger. Drill a divot forwards to make a pocket to hold the arrow piece at the bottom back of the pistol grip.
View attachment 587143

Then, at the vestigial sling stud screw hole, cut a notch with a Dremel cut off wheel, and make a channel so that arrow shaft can lay in flush.
Midway
View attachment 587148
Not quite
View attachment 587149

Good
View attachment 587150
At this point you should try flipping the stock upside down and then re-attaching. Flat bottom and negative comb. Just flip the recoil pad too. Be interesting to try anyway...
 

ztc92

Lil-Rokslider
Joined
May 8, 2022
Messages
275
I didn’t feel like messing with epoxy or cutting the stock but wanted to try and raise the recoil pad above bore and get more of a negative comb to see if this helped with recoil while awaiting a RokStok in the future.

I came across the video linked below thought it was a pretty clever idea so wanted to try it myself and see if I couldn’t add an element of negative comb in the process.


I went to the hardware store where I found a sheet of 1/4” aluminum and the necessary hardware to bolt everything together.

The aluminum was surprisingly tough to cut but eventually I was able to rough out two plates to fit the stocks for both my Tikkas using a jigsaw with a metal blade.

From there I started fitting things to the stock and like the video above, I had to make a few relief cuts so the hardware fit into the stock.

Once everything was dry fit I went ahead and assembled it and was actually pleasantly surprised with the result.

The last step was to create a negative comb and hide the exposed hardware from the recoil pad. On the first gun, I used a slightly modified CTR cheek riser and then filled the gaps with 3/4” pipe foam, then taped it all up with electrical tape (Not ideal but I have a ton of it from past job). On the second stock, I used a Victor cheek riser and gave it a negative slope using foam to make the rear higher than the front. Once again I filled the gap and taped it up tight.

I haven’t been able to shoot them yet but hope to soon. I think it will be a great upgrade based on shouldering the gun and trying different positions in the garage. If I like the fit, I’ll come up with something more permanent than electrical tape but it should work for now.
 

Attachments

  • IMG_8801.jpeg
    IMG_8801.jpeg
    201.6 KB · Views: 47
  • IMG_8794.jpeg
    IMG_8794.jpeg
    344.2 KB · Views: 42
  • IMG_8795.jpeg
    IMG_8795.jpeg
    304.3 KB · Views: 40
  • IMG_8800.jpeg
    IMG_8800.jpeg
    179.6 KB · Views: 39
  • IMG_8803.jpeg
    IMG_8803.jpeg
    318.1 KB · Views: 41
  • IMG_8804.jpeg
    IMG_8804.jpeg
    203.1 KB · Views: 42
  • IMG_8809.jpeg
    IMG_8809.jpeg
    286.5 KB · Views: 46
  • IMG_8810.jpeg
    IMG_8810.jpeg
    287.4 KB · Views: 47

ztc92

Lil-Rokslider
Joined
May 8, 2022
Messages
275
I didn’t feel like messing with epoxy or cutting the stock but wanted to try and raise the recoil pad above bore and get more of a negative comb to see if this helped with recoil while awaiting a RokStok in the future.

I came across the video linked below thought it was a pretty clever idea so wanted to try it myself and see if I couldn’t add an element of negative comb in the process.


I went to the hardware store where I found a sheet of 1/4” aluminum and the necessary hardware to bolt everything together.

The aluminum was surprisingly tough to cut but eventually I was able to rough out two plates to fit the stocks for both my Tikkas using a jigsaw with a metal blade.

From there I started fitting things to the stock and like the video above, I had to make a few relief cuts so the hardware fit into the stock.

Once everything was dry fit I went ahead and assembled it and was actually pleasantly surprised with the result.

The last step was to create a negative comb and hide the exposed hardware from the recoil pad. On the first gun, I used a slightly modified CTR cheek riser and then filled the gaps with 3/4” pipe foam, then taped it all up with electrical tape (Not ideal but I have a ton of it from past job). On the second stock, I used a Victor cheek riser and gave it a negative slope using foam to make the rear higher than the front. Once again I filled the gap and taped it up tight.

I haven’t been able to shoot them yet but hope to soon. I think it will be a great upgrade based on shouldering the gun and trying different positions in the garage. If I like the fit, I’ll come up with something more permanent than electrical tape but it should work for now.

Put these to use today and I’m quite pleased with my first attempt. The recoil impulse is much easier to manage with the elevated recoil pad and the stock fits me much better now. I used to get popped by the top corner of the recoil pad in my shoulder due to it sitting too low in my shoulder pocket and now I can square up much better and contact the entire recoil pad. The negative comb cheek riser doesn’t work as well as a rokstok but it’s a lot better than nothing. Now I need to figure out a better material than electrical tape as that became quite sticky in the heat today and is already starting to stretch and break down.
 

Big_wals

WKR
Joined
Mar 14, 2020
Messages
360
Location
W Texas
Great thread, I did something similar to my RAP last summer. Didn’t worry about negative comb since its just a 223, but wanted a vertical grip and a stiffer forend. Dremeled it out and epoxied arrow shafts in, covered everything with bondo. 20231104_160127_Original.jpeg

1000032784.jpeg


This is all the pics I could find of the process, guess I’ve lost some of them.
 

Attachments

  • 1000032782.jpeg
    1000032782.jpeg
    204.5 KB · Views: 12

Big_wals

WKR
Joined
Mar 14, 2020
Messages
360
Location
W Texas
I have been looking at the threads that @RepeatPete has about building carbon fiber stocks and now I’m wondering…. Could a guy combine your ideas? I’m a comple novice when it comes to carbon fiber, never messed with the stuff. But would it be feasible to carve a foam buttstock and marry it to where you cut the factory one off?
IMG_1141.png

I’m thinking at this stage, install the vertical grip, figure out a way to temporarily fasten the foam buttstock to where you cut the factory one off, and then wrap it all in carbon. Would it be strong enough, maybe wrap some around the vertical grip also? Might be able to get the geometry I would like on the butt and not have to do all the inletting on a full diy stock like Repeatpete, as cool as that would be. Looks a little to intimidating to me.
 
OP
ResearchinStuff
Joined
Jan 26, 2017
Messages
2,984
Location
PA
I don't know, I've never worked with carbon fiber. I did inlet a wood stock, one time. Never again lol.
 

RepeatPete

Lil-Rokslider
Joined
Aug 13, 2023
Messages
152
I have been looking at the threads that @RepeatPete has about building carbon fiber stocks and now I’m wondering…. Could a guy combine your ideas? I’m a comple novice when it comes to carbon fiber, never messed with the stuff. But would it be feasible to carve a foam buttstock and marry it to where you cut the factory one off?
View attachment 750060

I’m thinking at this stage, install the vertical grip, figure out a way to temporarily fasten the foam buttstock to where you cut the factory one off, and then wrap it all in carbon. Would it be strong enough, maybe wrap some around the vertical grip also? Might be able to get the geometry I would like on the butt and not have to do all the inletting on a full diy stock like Repeatpete, as cool as that would be. Looks a little to intimidating to me.
Absolutely! You could definitely just do the buttstock section, or just the butt and grip section, and mate it to the inletting and forend of a factory stock.

Polymer is not the easiest to bond to, but with a little planning I think you’ll be fine. I bonded in the inletting section from a factory polymer stock on my first stock build, and it worked great. I drilled some holes and made some shallow cuts in the polymer to give the epoxy some mechanical “tooth” to bond to, and then put some CF cross pins through the carbon and the polymer just for overkill. I think if you rough up the polymer and then wrap the carbon all the way around you should be fine.
 

Big_wals

WKR
Joined
Mar 14, 2020
Messages
360
Location
W Texas
Absolutely! You could definitely just do the buttstock section, or just the butt and grip section, and mate it to the inletting and forend of a factory stock.

Polymer is not the easiest to bond to, but with a little planning I think you’ll be fine. I bonded in the inletting section from a factory polymer stock on my first stock build, and it worked great. I drilled some holes and made some shallow cuts in the polymer to give the epoxy some mechanical “tooth” to bond to, and then put some CF cross pins through the carbon and the polymer just for overkill. I think if you rough up the polymer and then wrap the carbon all the way around you should be fine.
Thanks for the reply! You’ve got the wheels in my head turning now… I’ll have to see what I come up with. I love how your stocks have turned out, but I’m not that ambitious!
 
Top