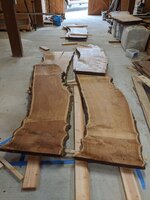
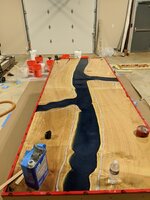
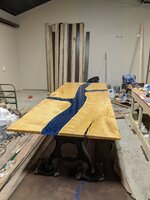
Hahaha I appreciate all the feedback and comments. I promise you I’m not normally this level headed. There were numerous times during this project that I had to walk away and leave that thing sitting for weeks before I could get back at it
Navigation
Install the app
How to install the app on iOS
Follow along with the video below to see how to install our site as a web app on your home screen.
Note: This feature may not be available in some browsers.
More options
Style variation
You are using an out of date browser. It may not display this or other websites correctly.
You should upgrade or use an alternative browser.
You should upgrade or use an alternative browser.
Epoxy River Table
- Thread starter Tremain4414
- Start date
Yeah I’m running off memory but I believe it was about 72 hours or so before it became tacky. If you’re looking at doing the river style table you definitely want to get the deep pour stuff. The regular epoxy gets way hotter and will discolor and crack if you try and deep pour it. I did use the regular epoxy stuff to seal the edges of the slabs before I poured though. This supposedly helps the epoxy bond to the slab and prevents the slab from releasing too much air during the curing process. No clue if it worked or not since this was my first try and air bubbles definitely escaped from the slabs, but I’m not sure how bad it would have been if I didn’t seal the edges. If you want I can send you the stuff I used, just shoot me a Pm10-4. 72 hours is a long time so I was curious if you used a deep pour epoxy or not. Looks like you did.
I'm taking notes for when I get around to my project.
Thanks!
Yeah I’m running off memory but I believe it was about 72 hours or so before it became tacky. If you’re looking at doing the river style table you definitely want to get the deep pour stuff. The regular epoxy gets way hotter and will discolor and crack if you try and deep pour it. I did use the regular epoxy stuff to seal the edges of the slabs before I poured though. This supposedly helps the epoxy bond to the slab and prevents the slab from releasing too much air during the curing process. No clue if it worked or not since this was my first try and air bubbles definitely escaped from the slabs, but I’m not sure how bad it would have been if I didn’t seal the edges. If you want I can send you the stuff I used, just shoot me a Pm
10-4. It'll be a bit as I've got some bookshelves to build first but I've been wanting to do an epoxy river coffee table for awhile. Looking forward to seeing how this finishes out.
Decker9
WKR
Super cool project and lookin good!! Hard lessons are sometimes the best lessons, they’ll make the next one a breeze! Looking forward to the rest of your build!!
LongWayAround
WKR
- Joined
- Aug 10, 2015
- Messages
- 3,659
Very cool. I look forward to seeing the finished product.
I've definitely spent a few hours binging the blacktail dude's videos. He makes some sweet tables and makes it look so easy.
I've definitely spent a few hours binging the blacktail dude's videos. He makes some sweet tables and makes it look so easy.
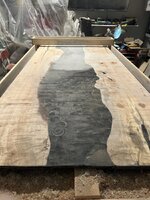
Table update. Got the top of the table completely routered and flattened. Overall it worked pretty well and I think it turned out alright. I flipped the table back over and found a crack. Damnit lol.
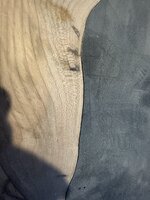
The crack is about 10” long and right along the edge of the epoxy/wood. Still haven’t quite figured out what I’m gonna do here. Thinking about just filling the crack with epoxy and seeing if it holds, second option is an epoxy/butterfly combo but I’m not sure how that would do on the epoxy. Anywho, just found the crack today so gonna take a day or two to research and see what the next step should be. To be continued…
johnnycake
WKR
Cracks like that are going to come and go as the wood shrinks and expands due to humidity changes. I'm not sure you can really avoid them in the long run
What are you going to finish it with? We have a live edge counter that was finish with a bar top gloss epoxy. The brand was System One or something like that. Looks like Wisebond has a gloss bar top epoxy, self leveling and same brand so shouldn't react adverse with what you have. After it hardens completely, a couple weeks at least, it is very hard and durable. I still am careful with hot things and use coasters. It can also be refinished easily, or wet sanded for a satin finish down the line if it gets abused.
- Joined
- Jan 31, 2024
- Messages
- 18
Looks good! Good to see fellow woodworkers’ handiwork.
ndlawrence
WKR
I picked up this Rubio Monocoat stuff after watching a bunch of pro videos and recommendations. I think I’ll start with that and see how it doesWhat are you going to finish it with? We have a live edge counter that was finish with a bar top gloss epoxy. The brand was System One or something like that. Looks like Wisebond has a gloss bar top epoxy, self leveling and same brand so shouldn't react adverse with what you have. After it hardens completely, a couple weeks at least, it is very hard and durable. I still am careful with hot things and use coasters. It can also be refinished easily, or wet sanded for a satin finish down the line if it gets abused.
Slim Jim
WKR
Looks good so far. I built one a few years ago. A LOT of hours sanding towards the end. I worked all the way up to 3,000 grit and finished with an Osmo oil rubbed and polished
Sent from my iPhone using Tapatalk
Sent from my iPhone using Tapatalk
Slim Jim
WKR

Sent from my iPhone using Tapatalk
Slim Jim
WKR

Sorry, this table had the Osmo finish on it. The epoxy table had a 1/1 epoxy pour finish. After a final 3,000 grit sand and polish, I sprayed a light lacquer over the top
Sent from my iPhone using Tapatalk
bpa556
Lil-Rokslider
- Joined
- Jul 25, 2021
- Messages
- 190

Sorry, this table had the Osmo finish on it. The epoxy table had a 1/1 epoxy pour finish. After a final 3,000 grit sand and polish, I sprayed a light lacquer over the top
Sent from my iPhone using Tapatalk
It’s a beautiful table.
3000 grit sandpaper is a waste of money. You can literally sand it to 800-1000 and then rub it with newspaper and get a better finish than sanding with 3000.
3000 grit sandpaper is only manufactured because people buy it, not because it’s useful.
Sent from my iPhone using Tapatalk
KsRancher
WKR
- Joined
- Jun 6, 2018
- Messages
- 889
Wondering what the width of that walnut slab is? And what it cost you? I have recently started logging and have some fairly large walnut logs (+40in) I thought about slabbing them up and selling them that way. And +30in x 10ft long clean hedge log, +26in x 8ft cedar, big pecan and burr oak also.
Sorry, this table had the Osmo finish on it. The epoxy table had a 1/1 epoxy pour finish. After a final 3,000 grit sand and polish, I sprayed a light lacquer over the top
Sent from my iPhone using Tapatalk
No real updates. I got the 4 bottom supports secured and that’s about it. I got a new position at work which has taken up a ton of time and hasn’t left much for hobbies. But it’s my dream job and I’m having a blast so it’s worth it. Once everything calms down I’ll get out there and get it finishedCurious of an update of your table?
Similar threads
- Replies
- 11
- Views
- 1K
Featured Video
Latest Articles
- TT#64 Josh Boyd Elk Hunting Strategies for Every Season
- Aaron Davidson of Gunwerks
- TT#63 Dirk Durham’s Art of Elk Calling
- BIG Buck Stories with the Dirty Giants Podcast
- TT#62 Brian Barney Hunting Bulls without Calling
- Hoyt Alpha AX-2 SD Review
- Kuiu Kenai vs Outdoor Vitals Vario Hooded Jacket Review
- Hoyt RX-9 Ultra Review
- Hunting Vampire Bucks & Building an Optics Kit
- Darton Sequel ST2 35 Review

