Can't wait to see what you cook up this time!Really fun reading all the ongoing carbon stock building threads going on here right now! And I got the itch again... As I mentioned in my previous post, I was quite happy with the last stock I made for my Sako 85. The geometry, handling and shootability was a step up from my previous builds.
Hunting with the Sako however, did make me miss my Blaser. The modularity with easy barrel and scope swap, straight pull and manual cocking is something I prefer. On the other hand I really love the weight of the Sako, and the R8 would give me somewhat of a weight penalty. So this time I am going full circle - building a new stock to the old faithful R93.
This is gonna be my fifth stock build, and I'm using the same carbon fiber braided tube that I've used a couple of times before. I don't think I've posted pictures of that process, so I'll try to do it this time.
Navigation
Install the app
How to install the app on iOS
Follow along with the video below to see how to install our site as a web app on your home screen.
Note: This feature may not be available in some browsers.
More options
Style variation
You are using an out of date browser. It may not display this or other websites correctly.
You should upgrade or use an alternative browser.
You should upgrade or use an alternative browser.
Carbon fiber stocks - DIY tinkering
- Thread starter hpmr
- Start date
The build started out with preparing an old donor stock. I prefer this method instead of building and inletting using core and carbon fiber (see previous posts). I'm using an old Blaser R93 offroad stock thats been collecting dust the last 15 years (it was previously replaced by a R93 professional stock). The stock is pretty solid, but way too heavy for a syntetic. I cut away as much as possible, and trimmed it with some sandpaper. Roughing up the stock also helps the mechanical bonding to the carbon fiber.
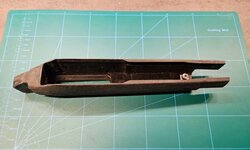
This model R93 action is secured to the stock with a screw in the rear and one in the front. The rear screw is similar to a shotgun, going in all the way through the buttstock.
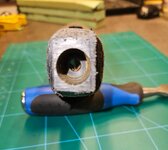
Since I'm not making a hollow stock, I had to make a channel for the screw. I found a piece of pvc conduit pipe that fit perfectly.
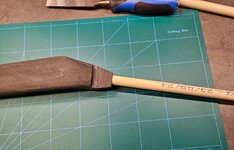
The core material is the same as before - three layers of divinycell sandwiched with carbon fiber cloth.
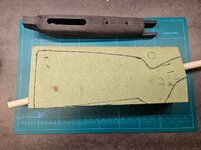
I dug out some material in the core parts to match the cut outs I made to the stock part, making the joints as solid as possible. I then glued it all together, making sure everything is level along the bore line. I also made a very small cast off.


This model R93 action is secured to the stock with a screw in the rear and one in the front. The rear screw is similar to a shotgun, going in all the way through the buttstock.

Since I'm not making a hollow stock, I had to make a channel for the screw. I found a piece of pvc conduit pipe that fit perfectly.

The core material is the same as before - three layers of divinycell sandwiched with carbon fiber cloth.

I dug out some material in the core parts to match the cut outs I made to the stock part, making the joints as solid as possible. I then glued it all together, making sure everything is level along the bore line. I also made a very small cast off.

I didn't take a lot of photos of the next step, but the process is pretty much straight forward - various hand tools to carve out a model with the desired characteristics. It still amaze me how strong and solid the divinycell core foam is, and how much time I use to get the stock just right...
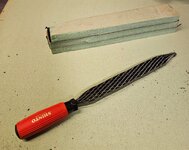
A new tool I used this time which I highly recommend is a saw rasp. It really speeds up the process of removing material.
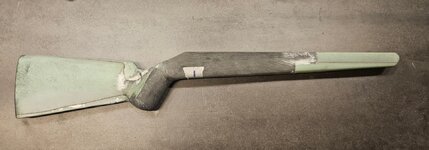
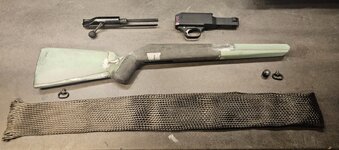
This is how the stock turned out ready for the outer carbon fiber shell.

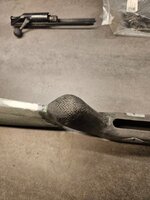
When using the braided cf tube, I've previously found it harder to get an even and uniform CF layer around the grip compared to the rest of the stock. To strengthen this part I put on a few layers of carbon fiber which the outer layer will bond onto. (I also added some longer strips of cf from the grip towards the end when I wetted the stock).
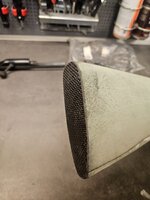
I also did the buttstock before putting on the cf tube, to make sure the bond/overlap gets as strong as possible.
And here it is in all its glory. In addition I'm gonna install QD cups and a spartan gunsmith adapter. The CF is a 430g 6k heavyweight braided carbon fibre sleeve, so it should be plenty strong with 1 layer.
A new tool I used this time which I highly recommend is a saw rasp. It really speeds up the process of removing material.

This is how the stock turned out ready for the outer carbon fiber shell.


When using the braided cf tube, I've previously found it harder to get an even and uniform CF layer around the grip compared to the rest of the stock. To strengthen this part I put on a few layers of carbon fiber which the outer layer will bond onto. (I also added some longer strips of cf from the grip towards the end when I wetted the stock).

I also did the buttstock before putting on the cf tube, to make sure the bond/overlap gets as strong as possible.

And here it is in all its glory. In addition I'm gonna install QD cups and a spartan gunsmith adapter. The CF is a 430g 6k heavyweight braided carbon fibre sleeve, so it should be plenty strong with 1 layer.

Time for an update on the build process - now its time for making the outer cf shell. Out of experience being well prepared is crucial... Once the resin is mixed and applied it gets really messy really fast. At that stage it sucks to realise you should have made better prep work, cutting breather, peel ply etc.
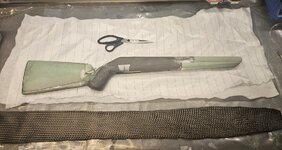
I try to make all components ready before I start mixing the epoxy. I've cut out peel ply and breather cloth, and made sure its large enough to cover the stock. I also find it helpful to make a few cuts to the peel ply where its wraps at an angle, i.e. around the grip area.
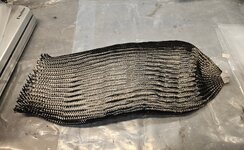
Here the carbon fiber tube is compressed all the way to get max width. Due to the stock being wetted with resin, the tube/sleeve can't slide on like a sock. If/when the cf touches the sticky stock the cf weave starts to disrupt, affecting the integrity/strength (and visually it also ends up looking like a mess) so this should be avoided.
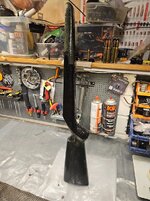
On this build I decided to apply the cf tube in full length of the stock. An alternative is do it in two steps, overlapping in the grip/neck area. The stock was wetted with resin mixed with a few drops of black pigment.
Unlike when cf skinning, I dont want the resin to turn sticky when applying the cf tube. So I pretty much go straight from wetting to putting on the cf tube. I couldn't really take any pictures of this process, as both hands were quite occupied. But I start at the top and try to stretch the cf tube all the way to the bottom with out it touching the stock. When its stretched out passed the buttstock I gently squeeze it to the stock, making sure it adhere to the stock shape.
I stole a few of my daugthers hair ties to help the cf tube to stay in the right spot before I put on a outer layer of resin.
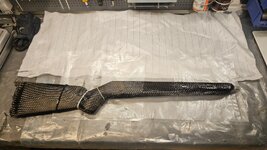
When the stock was fully wetted I cut of the hair ties and wrapped peel ply and breather around the stock.
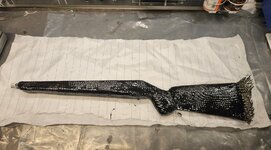
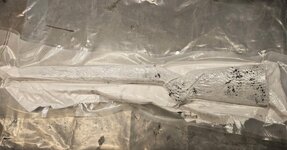
The last step was putting it all into the vacuum bag and seal it off. When vacuuming I make sure it doesn't wrinkle inside the bag, and if necessary manipulate the wrap/bag. The vaccum pulls out excessive resin through the peel ply and it gets absorbed in the breather. Its clearly doing its job here in the butt and grip area.
The stock was left to cure in vacuum over night.
I try to make all components ready before I start mixing the epoxy. I've cut out peel ply and breather cloth, and made sure its large enough to cover the stock. I also find it helpful to make a few cuts to the peel ply where its wraps at an angle, i.e. around the grip area.

Here the carbon fiber tube is compressed all the way to get max width. Due to the stock being wetted with resin, the tube/sleeve can't slide on like a sock. If/when the cf touches the sticky stock the cf weave starts to disrupt, affecting the integrity/strength (and visually it also ends up looking like a mess) so this should be avoided.

On this build I decided to apply the cf tube in full length of the stock. An alternative is do it in two steps, overlapping in the grip/neck area. The stock was wetted with resin mixed with a few drops of black pigment.

Unlike when cf skinning, I dont want the resin to turn sticky when applying the cf tube. So I pretty much go straight from wetting to putting on the cf tube. I couldn't really take any pictures of this process, as both hands were quite occupied. But I start at the top and try to stretch the cf tube all the way to the bottom with out it touching the stock. When its stretched out passed the buttstock I gently squeeze it to the stock, making sure it adhere to the stock shape.
I stole a few of my daugthers hair ties to help the cf tube to stay in the right spot before I put on a outer layer of resin.

When the stock was fully wetted I cut of the hair ties and wrapped peel ply and breather around the stock.

The last step was putting it all into the vacuum bag and seal it off. When vacuuming I make sure it doesn't wrinkle inside the bag, and if necessary manipulate the wrap/bag. The vaccum pulls out excessive resin through the peel ply and it gets absorbed in the breather. Its clearly doing its job here in the butt and grip area.
The stock was left to cure in vacuum over night.

Mojave
WKR
- Joined
- Jun 13, 2019
- Messages
- 2,959
Damn this is the best thread on ROKSLIDE ever!
Norway, Blaser, Sako, Reindeer, Red Deer, just damn. Go get a capercaillie and it will be perfect!
Norway, Blaser, Sako, Reindeer, Red Deer, just damn. Go get a capercaillie and it will be perfect!
I agree. Glad I found it. These are extremely talented people.Damn this is the best thread on ROKSLIDE ever!
Mojave
WKR
- Joined
- Jun 13, 2019
- Messages
- 2,959
I have another year of living in Europe before I go home to the USA. I ordered an FBT, but there are already things I don't like about and it doesn't arrive until the end of June.
I am not sure what rifles I love more, my Sakos, Sauer STR 200 or R8.
How did you source that green foam?
I am not sure what rifles I love more, my Sakos, Sauer STR 200 or R8.
How did you source that green foam?
Mojave
WKR
- Joined
- Jun 13, 2019
- Messages
- 2,959
Divinycell® H80 (1220 x 610 mm) | R&G Faserverbundwerkstoffe GmbH - Composite Technology
Divinycell® H80 (1220 x 610 mm), Item no.: 5800H80
Found this, so this is the green foam?
Rigid Foam Core Materials - Easy Composites
High quality rigid foam core sheet materials for use in lightweight structural composites. Range of sizes, thicknesses and types, all in stock. Expert advice, buy online.
Mojave
WKR
- Joined
- Jun 13, 2019
- Messages
- 2,959
I have a million questions, I visited FBT last year in Austria and they didn't really want to tell me much.
What machinery would you say is necessary?
I have these items in a basket a Easy Composites.
Vacuum Bagging Starter Kit
EC4 Compact Composites Vacuum Pump + European Lead
VR20 Vacuum Regulator
XCR Carbon Fibre Skinning Starter Kit Large
I think I need more carbon fiber than what is in the kit. I want to get enough for 4-5 stocks.
The Sauer 200STR is hard to beatI have another year of living in Europe before I go home to the USA. I ordered an FBT, but there are already things I don't like about and it doesn't arrive until the end of June.
I am not sure what rifles I love more, my Sakos, Sauer STR 200 or R8.
How did you source that green foam?
This action is well past 50k rounds (6,5x55 and .22lr) and still going strong, even with a lack of maintenance... Replaced the diopter for a scope a few years ago as I changed shooting discipline.
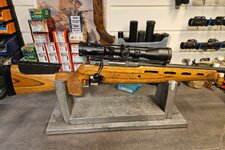
I sourced mine from a boat builder. I'm using Divinycell H60. Almost the same specs as H80, maybe a little bit less dense. Finding it online shouldn't be too hard I recon. And its probably other brands than diab / divinycell who makes foam with the same specs.Found this they are here in Germany,Divinycell® H80 (1220 x 610 mm) | R&G Faserverbundwerkstoffe GmbH - Composite Technology
Divinycell® H80 (1220 x 610 mm), Item no.: 5800H80www.r-g.de
Found this, so this is the green foam?
Rigid Foam Core Materials - Easy Composites
High quality rigid foam core sheet materials for use in lightweight structural composites. Range of sizes, thicknesses and types, all in stock. Expert advice, buy online.www.easycomposites.co.uk
I have not tried the brand easycomposites sell, but they look good. And they are cheap!
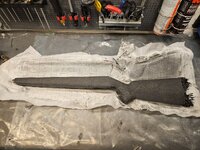
Opening the vacuum bag and unwrapping the stock from the breather and peel ply is both thrilling and exciting. If I've done a sloppy job, the cf has most likely shifted and turned wrinkly, which again means a lot of repair work. Luckily it turned out pretty good this time, with just a few spots needing some minor touch up. At this stage the stocks outer layer has excessive epoxy left by the peel ply.
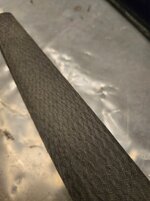
The forend is gonna be very strong judging by how tight/narrow the carbon fiber tube is compressed. It shouldn't be any flexing in the front shooting of a bipod. This close up also shows the pattern left in the epoxy from the nylon peel ply. Its quite grippy, and I'm gonna see if I can make use of the texture later on.
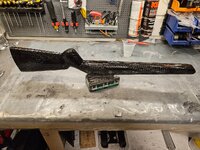
The next thing I did was sanding the stock, trying to get rid of any high tops in the surface. I then applied another layer of clear resin, building a new layer to sand down. The goal is to further smoothen the surface.
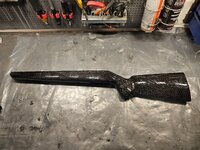
The epoxy top coat is waaay to shiny for any practical use, kinda hard to take a decent picture of it without getting reflections. I'm probably gonna use a 2k matte clear once the stock is ready for a top finish.

The forend is gonna be very strong judging by how tight/narrow the carbon fiber tube is compressed. It shouldn't be any flexing in the front shooting of a bipod. This close up also shows the pattern left in the epoxy from the nylon peel ply. Its quite grippy, and I'm gonna see if I can make use of the texture later on.

The next thing I did was sanding the stock, trying to get rid of any high tops in the surface. I then applied another layer of clear resin, building a new layer to sand down. The goal is to further smoothen the surface.

The epoxy top coat is waaay to shiny for any practical use, kinda hard to take a decent picture of it without getting reflections. I'm probably gonna use a 2k matte clear once the stock is ready for a top finish.

Mojave
WKR
- Joined
- Jun 13, 2019
- Messages
- 2,959
You are very lucky on this. Only Lothar Walther will sell Sauer STR 200 pre-fits in Germany. No German dealer can get a SigSauer, Heym, Schultz Larsen or Blaser STR 200 barrel here.The Sauer 200STR is hard to beatGreat two stage trigger, a really good stock and easy barrel swap. I can buy a new barrel over the counter for ~ $600 and install it myself with an allen key in 2 minutes. (SigSauer, Lothar Walther, Heym, Schultz&Larsen and Blaser all make prefits).
This action is well past 50k rounds (6,5x55 and .22lr) and still going strong, even with a lack of maintenance... Replaced the diopter for a scope a few years ago as I changed shooting discipline.
View attachment 884993
My dealer has put forth multiple request on my behalf. My rifle currently sits in a GRS stock..
Opening the vacuum bag and unwrapping the stock from the breather and peel ply is both thrilling and exciting. If I've done a sloppy job, the cf has most likely shifted and turned wrinkly, which again means a lot of repair work. Luckily it turned out pretty good this time, with just a few spots needing some minor touch up. At this stage the stocks outer layer has some excessive epoxy left by the peel ply.
View attachment 887075
Great looking work, love seeing these projects. Curious how you fix the wrinkles in the stock after the vacuum process?
It depends. If the wrinkle is shallow and/or the fold "connects" at the base, I just gently sand or file it down.Great looking work, love seeing these projects. Curious how you fix the wrinkles in the stock after the vacuum process?
If it doesn't close at the base (but the gap is not too big or wide), I fill it with mix of epoxy and cf dust/shavings (turns out kinda like a paste). This bonds to the cf, and I gently sand it down when solid.
If it can't be fixed like this, a patch of cf cloth or a whole new layer would be the way I'd go on about it.
The next step is opening up the barrel channel. Its not gonna be a fat carbon barrel this time, but a skinnier fluted steel barrel so it'll be somewhat narrower than the last build.
I start out by drawing up some help lines marking the middle of the forend, guiding the cut lines.
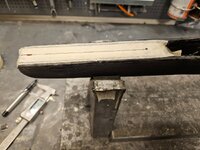
The carbon is cut with a dremel, leaving enough material to be adjusted through filing and sanding. To speed things up, the core material is first removed with a coarse wood file.
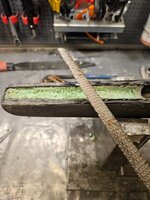
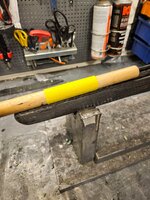
After having removed 80ish % of the material I swap to a wooden dovel wrapped with sanding paper. Its coarse, so its pretty quick getting close to where I want it.
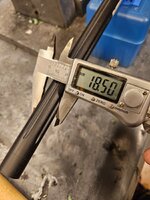
The primary barrel for this rifle is gonna be a Lothar Walther ss chambered in 280ai. Its ~18.5mm/ 0,73" at the muzzle.
Barrel channel ready for carbon fiber (with enough dead cat clearance).
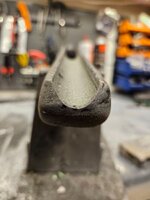
The channel is getting 3 layers of cloth.
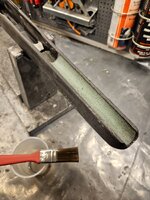
I start out by drawing up some help lines marking the middle of the forend, guiding the cut lines.

The carbon is cut with a dremel, leaving enough material to be adjusted through filing and sanding. To speed things up, the core material is first removed with a coarse wood file.

After having removed 80ish % of the material I swap to a wooden dovel wrapped with sanding paper. Its coarse, so its pretty quick getting close to where I want it.

The primary barrel for this rifle is gonna be a Lothar Walther ss chambered in 280ai. Its ~18.5mm/ 0,73" at the muzzle.

Barrel channel ready for carbon fiber (with enough dead cat clearance).

The channel is getting 3 layers of cloth.

The project it slowly moving along, but I'm have some issues accessing the forum (getting blocked by cloudflare).
Anyways, the next step was covering the barrel channel with carbon fiber cloth.
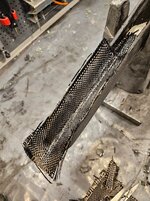
Once the epoxy cured the left over cloth was trimmed off, and the edges lightly sanded.
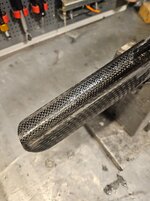
I'm also adding a spartan bipod adapter and a QD socket to this stock, identical to the setup I've used on my previous stocks.
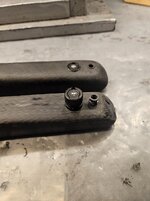
I am using a 19 mm fortstner drill bit for this task. I slightly angle the forend of the stock making sure the drill goes in 90 degrees to the surface.
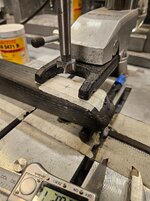
Its important to have control of the drilling depth, as I don't want to mess up the barrel channel. The adapter is roughend up a bit before it is epoxied in, making sure it binds to the cf shell, the mid cf layer in the sandwich core structure, and the core material itself.
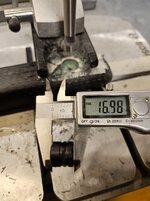
Anyways, the next step was covering the barrel channel with carbon fiber cloth.

Once the epoxy cured the left over cloth was trimmed off, and the edges lightly sanded.

I'm also adding a spartan bipod adapter and a QD socket to this stock, identical to the setup I've used on my previous stocks.

I am using a 19 mm fortstner drill bit for this task. I slightly angle the forend of the stock making sure the drill goes in 90 degrees to the surface.

Its important to have control of the drilling depth, as I don't want to mess up the barrel channel. The adapter is roughend up a bit before it is epoxied in, making sure it binds to the cf shell, the mid cf layer in the sandwich core structure, and the core material itself.

As I've mentioned in a previous post, the peel ply leaves an interesting surface in the epoxy. The texture is quite grippy, and I wanted to replicate this on the forend and the pistol grip.
I started by masking out the grip area.
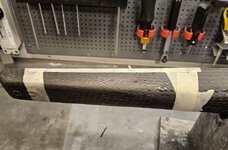
I then applied resin and a piece of peel ply, which I also wetted.
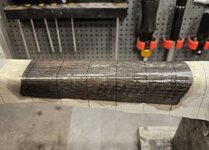
After curing over night, the peel ply and masking tape was removed, and it turned out pretty good. Uniform texture and quite grippy. I find bare Cf stocks to be slippery, especially when wet. And where I hunt it tends to rain. A lot.
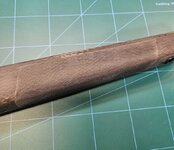
I followed the same procedure for the pistol grip, masking out where I wanted the grip area. I switched to electrician tape, as I noted some bleed outs from the masking tape.
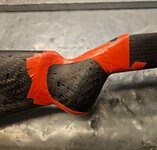
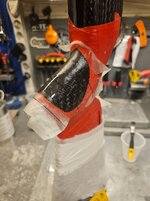
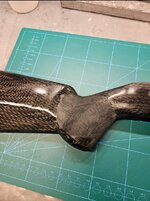
I've already done the recoil pad, so the next and final step is painting. I'm going for a light sponge paint job and 2k clear matte top coat.
I started by masking out the grip area.

I then applied resin and a piece of peel ply, which I also wetted.

After curing over night, the peel ply and masking tape was removed, and it turned out pretty good. Uniform texture and quite grippy. I find bare Cf stocks to be slippery, especially when wet. And where I hunt it tends to rain. A lot.

I followed the same procedure for the pistol grip, masking out where I wanted the grip area. I switched to electrician tape, as I noted some bleed outs from the masking tape.


I've already done the recoil pad, so the next and final step is painting. I'm going for a light sponge paint job and 2k clear matte top coat.
Similar threads
- Replies
- 22
- Views
- 2K
- Replies
- 7
- Views
- 415
Featured Video
Latest Articles
- TT#64 Josh Boyd Elk Hunting Strategies for Every Season
- Aaron Davidson of Gunwerks
- TT#63 Dirk Durham’s Art of Elk Calling
- BIG Buck Stories with the Dirty Giants Podcast
- TT#62 Brian Barney Hunting Bulls without Calling
- Hoyt Alpha AX-2 SD Review
- Kuiu Kenai vs Outdoor Vitals Vario Hooded Jacket Review
- Hoyt RX-9 Ultra Review
- Hunting Vampire Bucks & Building an Optics Kit
- Darton Sequel ST2 35 Review
