Stock painting help/examples

scottprice

Lil-Rokslider
Joined
Oct 28, 2018
Messages
173
Location
Pennsylvania
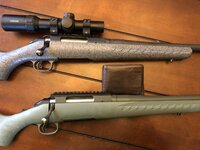
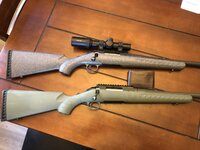
I’d like to paint both of my Rugers… I have the TAN American Ranch, and a GREEN American Predator

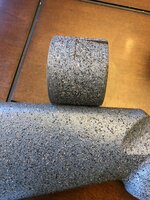
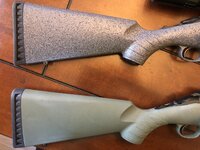
I like the “gritty” textured paint like Rustoleum Stone or Testors CREATE-FX (see pic 1)

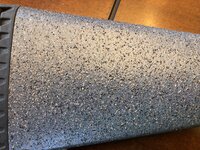
I also like a “webbing/marble” pattern like Montana Cans MARBLE effect (see pic 2)

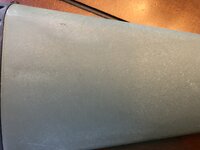
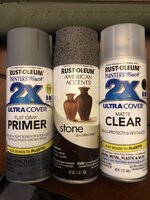
The “crackle” style paint is kind of cool too….(pic 3)

Photos are just to show how the effect looks, not necessarily interested in the below colors

I’m particularly interested to hear about proper preparation of the plastic stock, and a good durable clear coat to finish it all up


AA2077D0-5417-4583-86BD-8CABDDFE8D11.jpeg54FA0EDE-7E37-479B-AE64-920EE6D13E0A.jpegE6B6504D-EA35-4ABC-B6DC-15EC3708B7F8.jpeg
 
I use denatured alcohol with a lint free cloth to wipe it down then lay on the paint. If the stock is exceptionally shiny/smooth, I'll use a green Scotch Brite pad to scuff it up some before painting. I use Krylon camo paint. Sticks well, easy to reapply if needed. On some I'll use Minwax matte clear for some extra durability.
 
Interested I this as well. There is a primer specially made for plastics, may want to start with that.

I have a stock with checkering on the palm swell and the fore end. Any suggestion for ways to cover this up? I thought about body filler.


Sent from my iPhone using Tapatalk
 
I have a stock with checkering on the palm swell and the fore end. Any suggestion for ways to cover this up? I thought about body filler.
Cover it up for good or just protect it while painting? If protecting it I’d just use frog tape… if you want the checkering gone they make some gooey stuff that’s like liquid wood, smear it on, let it dry, then you can sand it smooth. I’d assume body filler would work too though
 
Cover it up for good or just protect it while painting? If protecting it I’d just use frog tape… if you want the checkering gone they make some gooey stuff that’s like liquid wood, smear it on, let it dry, then you can sand it smooth. I’d assume body filler would work too though

Haven’t quite decided… I like the checking for the classic look but not sure how well it would look with a painted stock.


Sent from my iPhone using Tapatalk
 
Im going to try body filler this week. I've read about a couple people having good luck with it in the past.
 
Haven’t quite decided… I like the checking for the classic look but not sure how well it would look with a painted stock.


Sent from my iPhone using Tapatalk
No need to fill it unless you want to. The checkering looks fine painted, no different than the stock black color.
 
I wouldn’t overthink it too much. I’ve painted a handful of my rifles and bows, and I find Rustoleum or Krylon camo paint works fine. No need to clear coat over that I would say. Sure, you’ll get a little bit of wear in some spots over time, but it’s simple to cover up or reapply a new paint.

Here is my sons AR we built together, and my Hoyt recurve. We got a Kryptek stencil from their website for about 30 bucks, and used Rustoleum camo colors from Home Depot. Both have held up good over the last 4 or 5 years since we painted them.
c755d30730adb671654bc534aee95808.jpg


Sent from my iPhone using Tapatalk

Is the Kryptek stencil a one time use thing? It looks really good.


Sent from my iPhone using Tapatalk
 
Is the Kryptek stencil a one time use thing? It looks really good.


Sent from my iPhone using Tapatalk

It is, Its a sticker stencil, you put on, spray, then peel off. You probably just as easily make your own with some vinyl sticker sheets, or simply print out a Kryptek pattern and use an exacto knife to cut it out. the stencil did make it way easier though
 
Update!

I cleaned the stock with alcohol first, then used a gray primer, then 3 coats of the stone texture paint, 20 mins between each. (I did 3 coats to get the density of the flakes that I wanted, obviously each successive coat would give higher density) I let the stone paint setup for an hour then did 3 coats of matte clear, ~20 minutes between coats. Today I added 2 more heavy coats of clear. Good enough for me

The side should fade a bit as the matte clear cures completely

One of the photos below shows the stone paint cap next to the final product, very very close to the cap color. Keep in mind I did use the gray primer first. If I had sprayed the stone texture paint directly onto the green stock it would have had a green background. THE STONE PAINT IS ONLY THE FLAKES. So whatever color is under the stone texture paint will be visible.

I like how it turned out. I think I may try the black webbing paint on my tan synthetic stock.
 

Attachments

  • D8934F5A-65FC-43E4-9CB6-A1497B47B723.jpeg
    D8934F5A-65FC-43E4-9CB6-A1497B47B723.jpeg
    440.7 KB · Views: 193
  • C6466FDA-161C-428F-AB16-4C87004BB5D1.jpeg
    C6466FDA-161C-428F-AB16-4C87004BB5D1.jpeg
    546.8 KB · Views: 185
  • 8E499837-ABCC-4455-AABD-F2E33FF1B62E.jpeg
    8E499837-ABCC-4455-AABD-F2E33FF1B62E.jpeg
    204.9 KB · Views: 191
  • 6DBCBE83-14BD-447E-8F6C-EB825AE72B58.jpeg
    6DBCBE83-14BD-447E-8F6C-EB825AE72B58.jpeg
    319.6 KB · Views: 199
  • D3BDC328-08C2-4369-8BC7-33F0A076385C.jpeg
    D3BDC328-08C2-4369-8BC7-33F0A076385C.jpeg
    386 KB · Views: 210
  • E172A361-F292-4D4A-95AE-AEAB4D699C50.jpeg
    E172A361-F292-4D4A-95AE-AEAB4D699C50.jpeg
    284.5 KB · Views: 201
Thanks for the write up, Scott. The stone texture turned out nice. Do you have a part number for that particular paint you used? Thanks.
 
Back
Top