Rifle stock build progress thread

OP
Decker9

Decker9

WKR
Joined
Apr 10, 2015
Messages
861
Location
BC goat mountains
Here is a rifle I built a few years on an FN Mauser action. This is how I like to do the grip cap, cheek piece and butt plate.
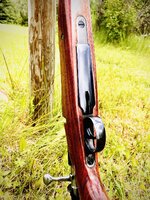
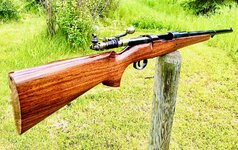
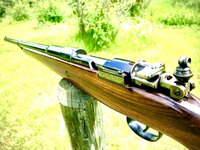
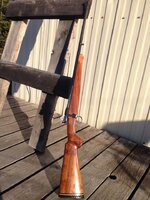
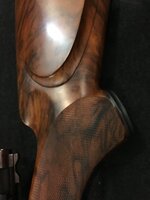
Now that is a piece of art!! Amazing work!!

Iv been searching for a skeleton grip cap to have on hand for practice, trying to find someone that will ship across the boarder has been difficult though. I think I have one on the way now from New England custom guns…. Least I haven’t gotten a message yet saying my order been canceled lol.

The next rifle I build for myself, I’d like to be a Mauser of sorts. I have a zg47 that went from 7x57 to .280 rem, but the mag box is limiting. I’d like to re barrel it back to 7x57 and re stock it I think some time in the future.
 
Joined
Dec 27, 2019
Messages
969
That would be a great project. I love the 7x57 for a custom. I also love the 257Roberts or 257 AI. I highly recommend the Mauser actions. I especially like the FNs and 1909 Argentines. They are generally in very good condition and saw little actual use. Also they came from the factory with a hinged floor plate and trigger guard that can easily be thinned down and made very attractive. I sure wish more folks appreciated the old Mausers
 
OP
Decker9

Decker9

WKR
Joined
Apr 10, 2015
Messages
861
Location
BC goat mountains
That would be a great project. I love the 7x57 for a custom. I also love the 257Roberts or 257 AI. I highly recommend the Mauser actions. I especially like the FNs and 1909 Argentines. They are generally in very good condition and saw little actual use. Also they came from the factory with a hinged floor plate and trigger guard that can easily be thinned down and made very attractive. I sure wish more folks appreciated the old Mausers

Growing up, my grandad was building a lot of rifles off of Mauser’s. One I inherited when he passed many years ago was his .458 Wm. About 20 years ago, I fired 2 rounds from it, and put it back in the safe. It has a steel model 70 but plate that didn’t feel to good, some day I’ll add a pad I think.

The single rifle there, is my first hunting rifle. Grandad built it for me when I was 7. It’s a 6.5x55 bj imp on a Mauser 96. A couple more years, I hope my daughter will take over that 6.5.

There’s a lot to be learnt about the Mauser action, I know very little, except when one looks nice lol, I guess that goes for any crf though, they just look gorgeous.
 

Attachments

  • 6CDF7523-704A-4250-9392-CE162B233246.jpeg
    6CDF7523-704A-4250-9392-CE162B233246.jpeg
    514.2 KB · Views: 88
  • 893283D0-FED6-4022-9AC6-ADC1C2AC5553.jpeg
    893283D0-FED6-4022-9AC6-ADC1C2AC5553.jpeg
    626.5 KB · Views: 86
  • B3CCF15F-29F2-4A2E-B736-F8812EF84D60.jpeg
    B3CCF15F-29F2-4A2E-B736-F8812EF84D60.jpeg
    307.2 KB · Views: 87
  • 07842B8B-6E01-4BFB-BA14-C2A92DF60A68.jpeg
    07842B8B-6E01-4BFB-BA14-C2A92DF60A68.jpeg
    199.3 KB · Views: 86
Joined
Dec 27, 2019
Messages
969
Beautiful rifle. I love the 6.5x55. That is a small ring action so you have to what you’d rechamber it too, but really nice actions. I like to take the mailers and use model 70 style safeties and Timney triggers.
 
Joined
Dec 27, 2019
Messages
969
As far as grip caps go it’s not hard to lay out and make one yourself for practice. Dakota makes a really nice one if you can find one.
 

Macintosh

WKR
Joined
Feb 17, 2018
Messages
1,986
I was buying skeleton butts and grip caps from glen fewless a number of years ago. Think he goes by Mook Machine works. No idea if he is still in business or not but the workmanship was very good and price was reasonable. I think if he’s still working he’d be listed with the acgg. It’s just a metal accent for woodworking, Id think an independent would just mail it to you? If he isnt makingbthem any longer bet hed know where you could get one.
 

Macintosh

WKR
Joined
Feb 17, 2018
Messages
1,986
On the pointed panel and the inspiration for it you mentioned, are you referring to the pointed or round “flats” just behind the action on a double gun?
 
OP
Decker9

Decker9

WKR
Joined
Apr 10, 2015
Messages
861
Location
BC goat mountains
On the pointed panel and the inspiration for it you mentioned, are you referring to the pointed or round “flats” just behind the action on a double gun?

Yeah you bet, Iv always liked the look of that transition. With that extra wood in the action area of my rifle though, it seems to look off to me, like maybe to thick/beefy. As I thin out that area, I’ll see what idea forms in my mind. It seems to change a lot as wood gets removed.
 
OP
Decker9

Decker9

WKR
Joined
Apr 10, 2015
Messages
861
Location
BC goat mountains
I worked down the action area, that point didn’t make it, I don’t think it belonged there really. A ways to go yet though, im still debating on what I want to do with the forearm area.

DFFAB5F2-330C-4095-AA54-9FB003980984.jpeg411C6760-FA46-4E93-8D80-CD81598EACC3.jpeg5C7FBEC3-9821-4DEF-8BAE-BF4F415D574D.jpeg

Flipped it over and started getting the butt true and flat on the sides. I’m loven the lines in there, can’t wait to see it with finish.

D010436B-0B55-47CB-9F21-7BD9E67A7C14.jpeg
 
OP
Decker9

Decker9

WKR
Joined
Apr 10, 2015
Messages
861
Location
BC goat mountains
Trying to figure out how to get that crisp line around the flutes at the nose of the comb, I started by scraping with my jackknife, it works good for the sweep, but I couldn’t get that crisp outer line. Figured I’d try cutting it in, well I got my edge lol.

I’m not to sure how I feel about it yet, it does form around the palm of the thumb not to bad. If I can blend it’s lower line up into the grip evenly on both sides, it may work. The edge should finish up ok once I sand it down a touch more. I need to take the comb nose back about 1/2-3/4” still too, I can feel my thumb rub on it’s front edge.

C2A2C22D-7C17-4308-80A9-4617DDC2787A.jpeg
8877A791-BFC2-4614-84BB-DD699B657BA2.jpeg

Got the tang area taken down close to flush as well, I think I’ll leave that little extra hight behind the safety until after pillar bedding.

EF457A77-5268-4051-9217-08B7A2D476B3.jpeg
DA6531B9-72C8-4F6F-9E4C-C8332C67EC2B.jpeg
 

Macintosh

WKR
Joined
Feb 17, 2018
Messages
1,986
I always used a rasp and then various sized dowels cut to 4-5” as sanding blocks for that. It is something to keep the edges crisp just where you want it though!
 
Joined
Dec 27, 2019
Messages
969
One thing that I’ve done to get into those tight areas is to take various sizes of pvc pipe and cut it to the length of a sheet of sandpaper. I then cut the paper to a width of just less than the circumference of that pipe. The I put just enough expoxy on the back of the paper (spread as thin as I can get it) and stick it to the paper. That give a right sanding rod that I can use to get the convex curves right and the edges crisp. Also it allow you to use both hands to manage the sanding. You can get the curves how you want them and keep both sides exactly the same dimension. Good luck your down in the weeds with it now. 👍
 

Attachments

  • B8253D10-F071-410F-A7C1-EEBB4B63565A.jpeg
    B8253D10-F071-410F-A7C1-EEBB4B63565A.jpeg
    271.3 KB · Views: 58
  • C378B20B-8AF1-400C-81F9-C32E64E9BEE0.jpeg
    C378B20B-8AF1-400C-81F9-C32E64E9BEE0.jpeg
    150.2 KB · Views: 56
OP
Decker9

Decker9

WKR
Joined
Apr 10, 2015
Messages
861
Location
BC goat mountains
It’s amazing the amount of round things a person acquires in this process lol, I have a bin of old wood building blocks from when my daughter was young that come in pretty handy for small backings.

I ordered up some scalloped sanding belt to try, a knife making friend recommended it for getting those spots. It looks like it would form nice to the curve with the serrated edges.

Managed to get the bolt cut before dinner time here. Still a bit of thickness to come off the side there.

2F2FB7D2-5CA0-4C2C-AD09-4224CD03C86F.jpeg1A3A08AB-D0B4-40FE-836F-3094BCAE3BEA.jpeg
 
OP
Decker9

Decker9

WKR
Joined
Apr 10, 2015
Messages
861
Location
BC goat mountains
Got the ejection port mostly done, can feel the slightest sliver still but will leave it until after bedding.

89A4A5C8-2ED7-4A5B-BF20-1A2F366D993F.jpeg0450C713-0B1D-4521-B9EA-4529FE989598.jpegCA53AEC8-CC6B-47E7-8BF3-4B2561DE5304.jpeg

Took down the forend a little, decided I will go with an Ebony tip. I found a few tiny cracks in the piece I have on hand though so will need to locate another piece.

A7C44DB3-379E-4C38-AB7A-C94648203481.jpeg871E6BA6-FDF3-4181-B1F0-A99B39BBAC47.jpeg
 
Joined
Dec 27, 2019
Messages
969
Glad you decided to go with the ebony forearm tip. Beautiful price of wood like that needs one. Without it it’s like a beautiful woman with messy makeup👍
 
Top