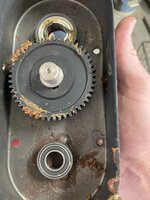
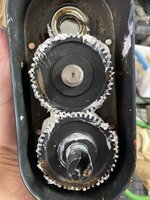
3 years ago and half way through mixing a 50# batch of summer sausage, my smaller hand crank mixer broke a paddle blade. This issue immediately caused two things to happen; 1) hack me off because now I had to mix the sausage batch by hand and 2) made up my mind to buy a new powered mixer.
I wanted a mixer that fit my budget, and it would accommodate 25# of meat easily. I already had the Cablea’s #22 grinder that would match up; so I used some Cabela’s gift cards and purchased the Cabela’s 7 Gallon Meat Mixer. I'm not sure if you could use a smaller grinder than a #22 / 1HP model. FYI: the early Cabela’s grinders will not match up to this mixer, as it must be a 6 spline output shaft on the grinder. My grinder is going on its 13th season now so if you have one that is newer than mine you should be good to go with this mixer.
https://www.cabelas.com/product/hom...ven-gal-mixer-with-tilt/1837507.uts?slotId=13
Now that my new mixer is 2 years old and this will be its 3rd season I felt I had enough experience with it to share. I would “conservatively” estimate that I have mixed about 500# of meat with this mixer now.
I have not filled the mixer to its full advertised capacity of approx. 33# of meat. I routinely work in 25# batches and I simply divide my meat, seasonings, and cure in ½ and mix as such. My main reasons for this is it doesn’t add that much time, and I’m reducing stress on components. As I said my grinder is now 13 years old and it no doubt has several thousand pounds of meat through it. It is going to quit one day, and I imagine the timing of the failure will not be great. I see no point in accelerating the process. I do honestly believe this mixer / grinder combination will mix a 25# batch just fine and dandy though. Again, I will continue to mix in 1/2 batches or 12 1/2# of meat/fat per mix.
There is an included lexan lid and a manual crank handle that I have yet to use and doubt I ever will. Other’s may have a use for them in their processing, at this time I don’t.
I have some complaints with this mixer in its design, but for the money I have invested I can overlook them.
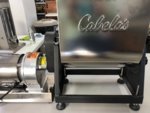
The mixer tub is Stainless steel and the gauge is more than adequate. The tub seam welds are consistent, and there is no apparent warpage. However, they only welded this on the outside of the tub (non-meat side). The issue this causes is there is an open seam on the (inside) meat side of the tub. I doubt that one can ever assume this will be 100% clean on the meat side. I’m a home brewer and I have a solid stock of Star San acid sanitizer, and I simply use this prior to final storage after washing. I also use it again prior to use to sanitize my equipment. On my mixer this open seam is consistently tight with no major gaps, but it is still an open seam.
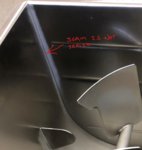
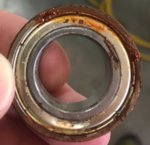
There is only one bearing in the tub, and it is a cheap sealed permanently lubricated steel ball bearing. This is not a food grade bearing, and mine rusted after the first use and cleaning. There is a standard lip seal on the meat side of the bearing, and there was no rust migration past that seal. It appears adequate. About 2 weeks after my initial use of my new mixer I noticed that this bearing was very gritty when I rotated the inner race by hand. Obviously the bearing was rusting on the inside and it would have a short life.
I sourced a stainless permanently sealed food grade bearing from VXB Bearings and simply used a set of calipers to determine the required bearing is 20mm x 37mm x 9mm (S61904-2RS). https://www.vxb.com/S61904-2RS-Food-Grade-Stainless-Steel-Ball-Bearing-p/s61904-2rs food.htm Obviously stainless can still rust, so I purchased 2 bearings so as to have a spare. However, I do expect good life from this new bearing.
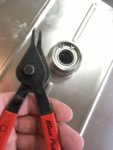
This is the original bearing after 2 weeks of use and good cleaning practices. It's junk!!
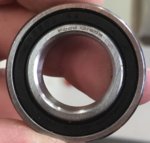
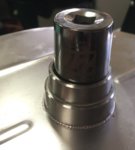
If you purchase this exact mixer or own one, I suggest replacing the bearing as I did. Remove the snap ring prior to removing the bearing. You need to be careful removing it. Mine required a punch as I expected from the back side and you must pass through the lip seal to accomplish this removal. Make sure you start the new bearing straight. I then used a 27mm ½’ drive socket and a dead blow to finish seating the bearing. Reinstalled the snap ring and off to the races.
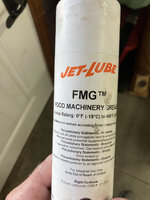
The Dasher is what it is and I have no comments one way or the other. It works. Assembly and disassembly of the mixer is straight forward. I use a food grade grease on all of the rotating points of wear. I always apply silicone spray to the tub and dasher prior to use and prior to storage. This simply aids in clean up and surface protection.
The base is mild steel that is powder coated. The quality of the paint is meh, and the welding is mediocre with spatter left behind. With the amount of use mine has seen to date; I can say the stand is solid enough. I wish that it was stainless as well, but that isn’t realistic at its price point. To date I’ve never put the stand in the sink. It is easy to keep it relatively clean during use, that I simply wipe if off then clean it with my Star San, let it air dry, and then silicone spray it down prior to putting it away.
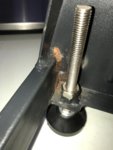
You must take some care when leveling the stand prior to connecting to the grinder power head. If not done properly the stand will dance around under the torque of the grinder and resistance of the meat in the tub. Take your time and lock the jam nuts on the 4 adjustable legs to keep them from moving.
The tilt/dump function of the tub is useful. When the mixing tub is rotated 90 degrees the opening will be about 3” from tabletop. This requires you to have the mixer elevated above whatever tub you are dumping into though if using this feature. I simply make sure I’m set up to dump the mixed meat over the edge of my table. I simply set my collection tub on top of cooler or similar to get the correct height.
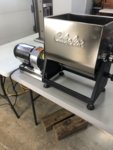
25# of Summer Sausage with Hi-Temp Cheddar Cheese after mixing
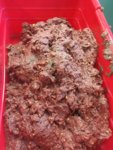
When mixing meat you will notice that there is meat in the corners that tends to be somewhat static. When mixing a cured sausage mix (sticks, summer, pepperoni) , it takes 8 minutes to break the proteins down. I will stop the mixer 2x during that 8 minutes to clean those corners to put that static meat into the middle of the mixer. I due this to simply ensure a complete mix and distribution of the ingredients and cure.

For the record I’m positive there are better dedicated mixers out there. If I could have found a good used floor standing Hobart for the right money, I would have gone that route. Overkill for some but it would be great for my household. As I stated earlier, I had some gift cards that knocked my out of pocket expense way down. I also had a grinder that was big enough to run this mixer and it would match up to it without issue. After 2 seasons of use and approximately 500# of mixed meat, I believe this mixer has been a good value, and at this point I’ve gotten my money’s worth out of it.
I wanted a mixer that fit my budget, and it would accommodate 25# of meat easily. I already had the Cablea’s #22 grinder that would match up; so I used some Cabela’s gift cards and purchased the Cabela’s 7 Gallon Meat Mixer. I'm not sure if you could use a smaller grinder than a #22 / 1HP model. FYI: the early Cabela’s grinders will not match up to this mixer, as it must be a 6 spline output shaft on the grinder. My grinder is going on its 13th season now so if you have one that is newer than mine you should be good to go with this mixer.
https://www.cabelas.com/product/hom...ven-gal-mixer-with-tilt/1837507.uts?slotId=13
Now that my new mixer is 2 years old and this will be its 3rd season I felt I had enough experience with it to share. I would “conservatively” estimate that I have mixed about 500# of meat with this mixer now.
I have not filled the mixer to its full advertised capacity of approx. 33# of meat. I routinely work in 25# batches and I simply divide my meat, seasonings, and cure in ½ and mix as such. My main reasons for this is it doesn’t add that much time, and I’m reducing stress on components. As I said my grinder is now 13 years old and it no doubt has several thousand pounds of meat through it. It is going to quit one day, and I imagine the timing of the failure will not be great. I see no point in accelerating the process. I do honestly believe this mixer / grinder combination will mix a 25# batch just fine and dandy though. Again, I will continue to mix in 1/2 batches or 12 1/2# of meat/fat per mix.
There is an included lexan lid and a manual crank handle that I have yet to use and doubt I ever will. Other’s may have a use for them in their processing, at this time I don’t.
I have some complaints with this mixer in its design, but for the money I have invested I can overlook them.

The mixer tub is Stainless steel and the gauge is more than adequate. The tub seam welds are consistent, and there is no apparent warpage. However, they only welded this on the outside of the tub (non-meat side). The issue this causes is there is an open seam on the (inside) meat side of the tub. I doubt that one can ever assume this will be 100% clean on the meat side. I’m a home brewer and I have a solid stock of Star San acid sanitizer, and I simply use this prior to final storage after washing. I also use it again prior to use to sanitize my equipment. On my mixer this open seam is consistently tight with no major gaps, but it is still an open seam.

There is only one bearing in the tub, and it is a cheap sealed permanently lubricated steel ball bearing. This is not a food grade bearing, and mine rusted after the first use and cleaning. There is a standard lip seal on the meat side of the bearing, and there was no rust migration past that seal. It appears adequate. About 2 weeks after my initial use of my new mixer I noticed that this bearing was very gritty when I rotated the inner race by hand. Obviously the bearing was rusting on the inside and it would have a short life.
I sourced a stainless permanently sealed food grade bearing from VXB Bearings and simply used a set of calipers to determine the required bearing is 20mm x 37mm x 9mm (S61904-2RS). https://www.vxb.com/S61904-2RS-Food-Grade-Stainless-Steel-Ball-Bearing-p/s61904-2rs food.htm Obviously stainless can still rust, so I purchased 2 bearings so as to have a spare. However, I do expect good life from this new bearing.

This is the original bearing after 2 weeks of use and good cleaning practices. It's junk!!


If you purchase this exact mixer or own one, I suggest replacing the bearing as I did. Remove the snap ring prior to removing the bearing. You need to be careful removing it. Mine required a punch as I expected from the back side and you must pass through the lip seal to accomplish this removal. Make sure you start the new bearing straight. I then used a 27mm ½’ drive socket and a dead blow to finish seating the bearing. Reinstalled the snap ring and off to the races.
The Dasher is what it is and I have no comments one way or the other. It works. Assembly and disassembly of the mixer is straight forward. I use a food grade grease on all of the rotating points of wear. I always apply silicone spray to the tub and dasher prior to use and prior to storage. This simply aids in clean up and surface protection.
The base is mild steel that is powder coated. The quality of the paint is meh, and the welding is mediocre with spatter left behind. With the amount of use mine has seen to date; I can say the stand is solid enough. I wish that it was stainless as well, but that isn’t realistic at its price point. To date I’ve never put the stand in the sink. It is easy to keep it relatively clean during use, that I simply wipe if off then clean it with my Star San, let it air dry, and then silicone spray it down prior to putting it away.

You must take some care when leveling the stand prior to connecting to the grinder power head. If not done properly the stand will dance around under the torque of the grinder and resistance of the meat in the tub. Take your time and lock the jam nuts on the 4 adjustable legs to keep them from moving.
The tilt/dump function of the tub is useful. When the mixing tub is rotated 90 degrees the opening will be about 3” from tabletop. This requires you to have the mixer elevated above whatever tub you are dumping into though if using this feature. I simply make sure I’m set up to dump the mixed meat over the edge of my table. I simply set my collection tub on top of cooler or similar to get the correct height.

25# of Summer Sausage with Hi-Temp Cheddar Cheese after mixing

When mixing meat you will notice that there is meat in the corners that tends to be somewhat static. When mixing a cured sausage mix (sticks, summer, pepperoni) , it takes 8 minutes to break the proteins down. I will stop the mixer 2x during that 8 minutes to clean those corners to put that static meat into the middle of the mixer. I due this to simply ensure a complete mix and distribution of the ingredients and cure.

For the record I’m positive there are better dedicated mixers out there. If I could have found a good used floor standing Hobart for the right money, I would have gone that route. Overkill for some but it would be great for my household. As I stated earlier, I had some gift cards that knocked my out of pocket expense way down. I also had a grinder that was big enough to run this mixer and it would match up to it without issue. After 2 seasons of use and approximately 500# of mixed meat, I believe this mixer has been a good value, and at this point I’ve gotten my money’s worth out of it.

