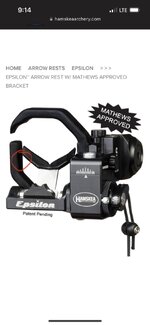
Hamskea Epsilon

Joined
Sep 13, 2020
Messages
768
When considering limb flex you will notice that the limb tip is the location with the most travel through the draw cycle. The amount of distance traveled will decrease as you move further from the limb tip and towards the limb pocket. When choosing where to attach the activation cord, the main thing to consider is the total movement of that specific location though the draw cycle. As the attachment point goes towards the limb tip, the arrow will be guided for a longer period of time. Where as the further the attachment point moves away from the limb tip, the shorter period of time the launcher will be guiding the arrow.

There is a certain amount of movement required for the activation cord to go slack and the launcher to come up to a repeatable position. For the Hybrid/Trinity Hunter we have found that about .5" of movement is required just for the launcher to hit the full upright position with a 1/8" preload on the Dampening Coil Spring or Rebound Dampener. After this point, any additional movement of the attachment point will result in distance that the launcher is guiding the arrow through the shot cycle before the launcher begins to fall. We recommend having the launcher guide the arrow for about 50-70% of the shot cycle or power stroke for the best accuracy. For 50% guidance, the attachment point would have to move about 1" through the shot cycle.

The easiest way that I have found to figure out the optimal attachment point is by marking an arrow and calculating the guidance that way. Here are the steps I take.

1. Measure the Power Stroke: With the activation cord disconnected and the launcher in the upright position, nock an arrow and let it set on the launcher. Put a mark on the top of the arrow at the location where arrow is touching the launcher. Using a draw board, bring the bow to full draw and mark the arrow where the launcher is now making contact. The distance between these two marks is the power stroke or distance the arrow is pulled back during the draw cycle.
2. Calculating the Desired Guidance: We want the launcher to guide the arrow for 50-70% of the power stroke. I find the best results for hunting closer to 50%. Since you know the distance of the power stroke, you can calculate the distance for a desired amount of guidance. For example, 50% guidance over a 22" power stroke would 11" of guidance. In this example, you would want the launcher to be in the full upright position for the last 11" of the power stroke. Mark this location on the same arrow used to measure power stroke so that you have a reference for the next steps.(you can mark both the 50% and 70% location so that you know you are in the acceptable range.
3. Dialing In the Optimal Attachment Location: Tie the activation cord around the limb(don't apply the knobby limb pad yet) and apply the recommend tension to the cord. Next, nock the arrow and rest it on the launcher that is currently in the down position. Using the draw board, draw the bow to the point that the launcher just barely reaches the full upright position and reference where the launcher is contacting the arrow in relation to the marks you have just placed on the arrow. If the launcher has not yet reached the mark for the desired guidance, then you will need to move the activation cord in the direction of the limb tip. If the launcher is past the mark for the desired guidance, then you will need to move the activation cord further from the limb tip. Bring the bow back to the brace position and move the activation cord as needed making sure to properly set the tension on the activation cord each time. Repeat this step until the launcher is guiding the arrow for the desired amount of time.
4. Mark the Location and Install the Knobby Limb Pad: Using a pencil, mark the location of the activation cord that you found gives the desired amount of guidance and then move the cord out of the way.(the pencil mark can later be wiped off) Next, install the knobby limb pad with the center of the pad in line with the pencil mark. Re-install the activation cord with the the cord crossing through the center groove set of the knobby limb pad. Apply the proper amount of tension to the activation cord and enjoy shooting with your properly timed arrow rest.

Just let me know if you have any questions on this process.

@devinhal Im just getting a new Epsilon setup on a VXR and had a few questions for you.

I don’t have access to a draw board. I saw you recommended 2-2.5” from the limb tip on the V3 and V3X. Would you recommend the same for the VXR?

I saw the instructions reference more guidance on the Hamskea website. I can’t seem to locate that. Is there a video or something that talks about tension cord placement?

One last question about the nock point. I know QADs like ~1/8” nock high. Is there a recommendation for the Epsilon?
 

BBob

WKR
Joined
Jun 29, 2020
Messages
4,441
Location
Southern AZ
I've never owned a Hamskea until this Epsilon. One thing I notice is there is a bunch of back lash in the horizontal and vertical adjustments. So a click one direction or another isn't necessarily a precise click. I'm going to have to remember to push it one way or another consistently (especially the horizontal) when tuning to keep it consistent.

Hamskea? What say you?
 

devinhal

FNG
Joined
May 23, 2015
Messages
71
@devinhal Im just getting a new Epsilon setup on a VXR and had a few questions for you.

I don’t have access to a draw board. I saw you recommended 2-2.5” from the limb tip on the V3 and V3X. Would you recommend the same for the VXR?

I saw the instructions reference more guidance on the Hamskea website. I can’t seem to locate that. Is there a video or something that talks about tension cord placement?

One last question about the nock point. I know QADs like ~1/8” nock high. Is there a recommendation for the Epsilon?
We are finding that the VXR has a similar limb flex and the 2-2.5" is a great starting point.

We don't have a video on the website for replacing the activation cord, but we do have videos on the website and our youtube channel going over arrow rest setup. Unfortunately we haven't had time to do an in depth video going over the placement of the activation cord yet, but it is in the works.

With our rests, we find that running the arrow perpendicular/square to the string gives us the best results on the Mathews bows.
 
Joined
Sep 13, 2020
Messages
768
We are finding that the VXR has a similar limb flex and the 2-2.5" is a great starting point.

We don't have a video on the website for replacing the activation cord, but we do have videos on the website and our youtube channel going over arrow rest setup. Unfortunately we haven't had time to do an in depth video going over the placement of the activation cord yet, but it is in the works.

With our rests, we find that running the arrow perpendicular/square to the string gives us the best results on the Mathews bows.

Thanks @devinhal !

One last question for you. I saw where you said support through 50% of the power stroke is recommended for hunting. Why is that (versus ~70%)? Also, would that change at all for a heavier arrow setup in the 550-600 grain range?
 
Last edited:

CB4

WKR
Joined
Oct 10, 2018
Messages
515
Location
Iowa
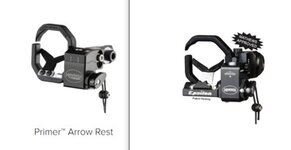
Not sure about your comparison, Looks like you have an additional spacer with the Hunter. Could be bow requirement? I just took a Primer off a bow and installed a Hybrid hunter pro micro. Primer has same body style as Epsilon w/o launcher control or Micro. Here is a side by side of the two on my bow, both adjusted to bow. They both have about the same clearance other than the Epsilon has a third bearing and the angle containment ring (like the Primer).
There is not additional spacer with the Hunter. The primer and epsilon are not the same body. They look similar but they aren't. The Epsilon is slimmer. Also notice in the screen shot below how much further to the left the bracket is to connect it to the riser. This is why the epsilon is "inline". The hybrid/trinity mount in the same way as the primer.
 

Attachments

  • Capture.JPG
    Capture.JPG
    20.5 KB · Views: 45

devinhal

FNG
Joined
May 23, 2015
Messages
71
Thanks @devinhal !

One last question for you. I saw where you said support through 50% of the power stroke is recommended for hunting. Why is that (versus ~70%)? Also, would that change at all for a heavier arrow setup in the 550-600 grain range?
We have found that 50-70% guidance is an acceptable range that offers great accuracy. But with some of the other testing we have done, we found that favoring the lower end of the range puts less shock into the rest components due to the speed the limb pulls the rest down and is quieter on the shot. As the guidance increases, the launcher will not drop until later in the shot cycle and it will be pulled down at a higher speed. Many of the shooter who claim to have "noise issues" with our rests have the activation cord attached in a location where the guidance is 70% or even higher. When this happens, the launcher is being pulled down at a much higher speed and putting more shock into the rest experienced as increased noise. This is why I favor towards 50% guidance on hunting bows.

As far as heavier arrows, this still holds true. 50% guidance should be plenty for the arrow to get up to a speed that it'll guide itself and will no longer need the launcher.
 
Last edited:

aaen

Lil-Rokslider
Joined
Jul 23, 2020
Messages
169
Replacement rest came in for my Epsilon that wasn't quite right. The finish is night and day difference and my laser etched marks actually line up and are centred on the rest so that's a win.

It's still got a few dings/nicks in it like it was rolled around in a box prior to putting the finish on. The upper bolt for the clamp is also very stiff. Took quite a bit of force to loosen it so I could install it on the mount. Hopefully that loosens up, I'll try it a few times here in the coming days to see if it gets better.

Overall the rest works and looks a lot better.
08e0467d37b01679a8bd9455471aa55f.jpg


Sent from my SM-G973W using Tapatalk
 

aaen

Lil-Rokslider
Joined
Jul 23, 2020
Messages
169
Another update on the replacment

Tuned the rest on the weekend it's works, but has some issues I have concerns about. The cosmetics I'm over with as I've seen others and it seems a lot of them are not very well done.

The issues I'm concerned about are with the upper clamp bolt that secures the rest to the moun. Tried loosen it a few times and retigteneing it, it requires a fair amount of force to do it but it doesn't seem to do anything might try a drop of lube on it to see if it helps.

The micros adjust for windage is also extremely tight. Oddly it goes to the right(towards the rest and clicks) but left it is very sticky/tight and doesn't click. I'll check it again tonight.

I'm taking it off again tonight check these and grab some more.pics to show them the cosmetic issues(they asked) and also to film these two bolts that are acting up, so I can send the links to hamskea. This is rest number 2, so far not very impressed it works but it is not how it is suppose to be.

Hopefully this sorts itself out, however I suspect I'll likely need another one shipped out to me.


Sent from my SM-G973W using Tapatalk
 

aaen

Lil-Rokslider
Joined
Jul 23, 2020
Messages
169
I went home after lunch, it wasn't a busy day and I'd rather finish up the paperwork there with the dog, then sit at the office for longer then I need to.

Broke free the set screw for the micro adjust, and started working the micro adjust back and forth a few times. As I went further then I need to on mynrestbfor ctr shot, I heard a faint pop/crack which immediateky allowed the micro adjust to move without any resistance. Voila the windage adjustment started working properly (clicking and you can feel the detents when it clicks). Guessing a piece of sand/metal shaving was binding up the micro adjust? Who knows, all I know is it works right now.

The top screw ion the clamp is still jammed up, worked it a few more times and backed it out a fair way. Put a drop of MTB chain wax lube on it let it sit and wok it's way in while I dealt with the dingo, wiped it clean, worked it back and forth a bit and it's like night and day. It's a lot better but is still stiff in comparison to the other bolt and the previous epsilon.

Pics and videos of the finish comparing it to my two year old Trinity have been sent in to Hamskea as well. Different rest and I'm not looking for a new one, the finish I've given up on as a few others I've seen lately are all the same. Only way I'll seek a new rest now is if the micro adjust decides to start binding again, or the top bolt seizes in place, although the lube has fixed it for the moment.

My trinity is two years old has had two releases shot thru it(hand slips) and barely shows any marks or wear and tear and there is likely 20k arrows thru it( we shoot a lot). Understandably the world right now is f'd because of covid and we are on the verge of potentially being in a world war (fingers crossed it won't happen) and this is very small potatoes in comparison, perhaps I'm being not picky. However when I spend my money on a product, I expect it to look good and work properly, not have to add lube, work bolts back and forth and be amrked up enforce I get to add character or it.

I'm done posting about it here, unless.something major happens to it and I'll be sure to update as I am keeping hamskea updated as well.

Regards

Steve


Sent from my SM-G973W using Tapatalk
 

>>arrow>

FNG
Joined
Jan 1, 2020
Messages
7
Ive set up several of these rests. The Epsilon is an up grade and quieter. well worth the money. My only complaint is the lack of visible reference marks for the vertical adjustment. >>>---->
 

MT257

WKR
Joined
Sep 25, 2016
Messages
1,235
was having some severe fishtailing issues with my Epsilon. My fletchings were smacking the lower containment bracket. I use Blazers and AAE max stealths . I emailed Hamskea and they say the Epsilon prefers the cock vane to be straight up VS kicked out to the side, but if I'm shooting a 90-90 four fletch then i'm still probably going to have strike issue.. I might order some high density plastic and "mod" the design so the containment arm sticks out 1/4" further.. Maybe I'll see if I can get a friend to 3d print one for me after I get the prototype up and running
I have the issue of vanes smacking the containment bracket. Did you ever find a solution?
 

devinhal

FNG
Joined
May 23, 2015
Messages
71
I have the issue of vanes smacking the containment bracket. Did you ever find a solution?
I shoot a 90 degree 4-fletch with my Epsilon without any issues. Where exactly are you getting the contact?
 

MT257

WKR
Joined
Sep 25, 2016
Messages
1,235
I shoot a 90 degree 4-fletch with my Epsilon without any issues. Where exactly are you getting the contact?
Area shown in red. But then when cock vane is at 12 o’clock it has issues with hitting the roller guard. IMG_7978.jpeg
 

devinhal

FNG
Joined
May 23, 2015
Messages
71
The containment brackets were design to be shot with the cock fletching pointed at 12 o-clock when using a 3 fletch. If you get contact with the roller guards in this orientation it is possible that your rest is adjusted outside of the recommended Center-Shot range. I recommend setting your rest so that the arrow is at a center-shot of 13/16" and adjusting the top hats or shims until the bow is in tune at that location. This should prevent any fletching contact and keep everything optimized.
 

dony

FNG
Joined
Feb 1, 2020
Messages
28
I also have an Epsilon issue where the elevation micro adjust is very tough to turn at one point each revolution. Not sure if it will resolve. It's also hard to reach on the low profile mount style on a Bowtech SS34. There's plenty of room the knob could have been made taller. The arrow rest also contacts the riser when down and the adjustment screw only allows the rest to angle farther down. Yes, I could move it towards the string but it's more convenient making it flush against the riser, and that's how the cor bracket is designed to be used on other bows.
 
Joined
Apr 22, 2018
Messages
10
Location
Navarre, Fl
This is for anyone who comes back here with these issues. I have been around the world trying to work out vane contact with various parts of the epsilon. What I ultimately found was that if you adjust your timing closer to the rest controlling your arrow to the 70% point, many of these issues become resolved. I initially thought getting it to let go faster was the key but with a heavier arrow it definitely isnt. My .02
 

dony

FNG
Joined
Feb 1, 2020
Messages
28
After shooting longer distances with heavy arrows, the rest works fine but
1. Ground some material off the riser to eliminate the rest hitting the riser. Eliminate potential bounce (no evidence just worry) and extra noise.
2. Rest angle at up position and down position can't be adjusted enough to avoid this.
3. Arrow containment arms broke. Don't need em, but the one on the side was nice. Wish it was metal coated in rubber and bendable, not plastic.
4. Bowtech ss34 31.5 draw I can't get much more than 55% support time with the cord pretty much at the end of the limb. Used a draw board but can only get so much movement.
 
Top