Mtnmilsurp
WKR
Inspired by @Decker9 ’s amazing work and guided by the great information from @Formidilosus on long range rifle stock configuration, I set out to build my own ‘stok because there’s no indication that @Stockys will ever make a RokStok for the venerable Swedish Mauser.
My rifle is a model 1896 manufactured in Sweden in 1898 (serial no 10XX) and eventually imported and sporterized by Kimber of Oregon. I put a 25” #3 contour 6.5x55 shilen barrel on it and in a plastic Ramline stock with SWFA 3-9x42 recently put 20 127gr LRX’s inside 4” at 315 yards. Somehow our great-great-grandfathers knew how to design and manufacture reliable, accurate, CRF rifles long before CNC machining.
I bought this slab of maple for $40 online and let it sit in my shop for a couple years, periodically checking for warping and never got any.

I laid out the intended dimensions as follows:
- toe parallel to bore line
- heel 1/2” above bore line
- 1.7” reach to trigger (second stage)
- nearly vertical grip
- negative comb (start at -6 degrees and increase until it fits me)
- forearm nearly parallel to bore(3 degrees)
- forearm transition from flat in front of action screw to round at 1.35” diameter tip
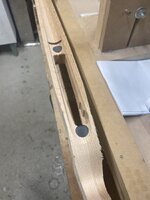
My intent was not to make an heirloom like @Decker9, just to get a functional stock built before the summer camping/shooting season. I wasn’t going to spend 60 hours trying to keep the inletted wood less than a gnat’s eyelash from steel. Instead this stock would have a thick layer of bedding between steel and wood and a good bit of that bedding would even be visible (gasp!).
My rifle is a model 1896 manufactured in Sweden in 1898 (serial no 10XX) and eventually imported and sporterized by Kimber of Oregon. I put a 25” #3 contour 6.5x55 shilen barrel on it and in a plastic Ramline stock with SWFA 3-9x42 recently put 20 127gr LRX’s inside 4” at 315 yards. Somehow our great-great-grandfathers knew how to design and manufacture reliable, accurate, CRF rifles long before CNC machining.
I bought this slab of maple for $40 online and let it sit in my shop for a couple years, periodically checking for warping and never got any.

I laid out the intended dimensions as follows:
- toe parallel to bore line
- heel 1/2” above bore line
- 1.7” reach to trigger (second stage)
- nearly vertical grip
- negative comb (start at -6 degrees and increase until it fits me)
- forearm nearly parallel to bore(3 degrees)
- forearm transition from flat in front of action screw to round at 1.35” diameter tip
My intent was not to make an heirloom like @Decker9, just to get a functional stock built before the summer camping/shooting season. I wasn’t going to spend 60 hours trying to keep the inletted wood less than a gnat’s eyelash from steel. Instead this stock would have a thick layer of bedding between steel and wood and a good bit of that bedding would even be visible (gasp!).
Last edited: