DIY E-Boiler for Euro Skulls

Joined
Feb 16, 2021
Messages
2,059
Location
Tacoma, WA
In the interest of not detracting from the Grakksaw E-Boiler thread, starting a new one for DIY E-Boiler builds. Initial build list and thoughts below:
Total Cost = ~$120

According to whitebonecreations, 170 degrees is the minimum temp you need to sustain over 10+ hours. Seems like the immersion heater linked there is capable of that, and the insulated cooler should help it maintain. I like that this unit has a set temp and current temp readout on the controller.

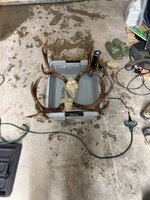
I imagine a brick or similar with the heating element hose clamped to it will suffice for keeping the element from melting the bottom of the cooler.

Depending on the cooler, could just cut out a section for antlers to protrude and skip the rigid insulation board lid. I do wonder if the 170 degree + temps will be a problem for the plastic of a cheap igloo cooler.

Thoughts? Suggestions? Constructive Criticism?
 
I too would wonder how the cheep cooler would hold up to the heat

Wondering if you could use a metal container then wrap with insulation board.
 
I have a buddy that has done something similar with one of the sous vide circulators in a cooler. Not sure how hot that thing gets but he didn't have any issues doing massive batches of pulled pork. Pretty sure pulled pork needs to be north of 170.
 
I too would wonder how the cheep cooler would hold up to the heat

Wondering if you could use a metal container then wrap with insulation board.
Hmm, yeah something like this could work. Wrap it in 1" rigid insulation. Sliding lid is a nice touch. But kinda blows the budget.

Drop-in Ice Chest 24 in. L x 18 in. W x 13 in. H Stainless Steel Commercial Ice Bin

I emailed Igloo, said I was doing something similar to a sous vide haha. See if they actually answer or give me a corporate response.
 
I'd try a version of yours if I were to start over. You don't have to do the high heat if you do the maceration method.

I built one a bunch of years back. Inkbird controller, rubber cattle feed bucket with metal handle, hot water tank 1500w element, weatherproof 1-gang junction box, 1 end of a heavy duty extension cord. I think it was less than $70 total. Drill hole through side of bucket a couple inches up, mount element and seal it off, wire a plug to it using the junction box. Plug it into the Inkbird and plug Inkbird into the wall.

This is "old school" but has worked great for skulls up to deer size. Pro - small, lightweight, inexpensive, weatherproof, easy to pour off the water and grunge, sidewalls not heat conductive, use a hose to spray the thing off when done. Cons - no circulator, no cover (so you have to improvise to hold in heat and/or reduce evaporation and smell).

I added a GFCI extension cord as a bit of CYA insurance.

I use tap water, Dawn detergent and a handful or so of Borax with my simmers. I'm guessing that over time these elements will build up minerals that may or may not lead to inefficient heating or failure.

Good luck.


When a blizzard closes the interstates for several days after an antelope hunt you get to thinking of things to do. I may have "boiled" my antelope skull in the tub of the motel. I used 180 degrees. There was little to no smell and the "bits" were poured into the toilet.

Boiler.JPG
 
If you’re real concerned about the heat an old metal mop bucket, a box and some fiberglass insulation. Then when you’re ready to pour the water out just pick the bucket up and dump it out. Some type of lid wouldn’t be hard to figure out. Should be able to pull this off pretty cheap.
 
I'd try a version of yours if I were to start over. You don't have to do the high heat if you do the maceration method.

I built one a bunch of years back. Inkbird controller, rubber cattle feed bucket with metal handle, hot water tank 1500w element, weatherproof 1-gang junction box, 1 end of a heavy duty extension cord. I think it was less than $70 total. Drill hole through side of bucket a couple inches up, mount element and seal it off, wire a plug to it using the junction box. Plug it into the Inkbird and plug Inkbird into the wall.

This is "old school" but has worked great for skulls up to deer size. Pro - small, lightweight, inexpensive, weatherproof, easy to pour off the water and grunge, sidewalls not heat conductive, use a hose to spray the thing off when done. Cons - no circulator, no cover (so you have to improvise to hold in heat and/or reduce evaporation and smell).

I added a GFCI extension cord as a bit of CYA insurance.

I use tap water, Dawn detergent and a handful or so of Borax with my simmers. I'm guessing that over time these elements will build up minerals that may or may not lead to inefficient heating or failure.

Good luck.


When a blizzard closes the interstates for several days after an antelope hunt you get to thinking of things to do. I may have "boiled" my antelope skull in the tub of the motel. I used 180 degrees. There was little to no smell and the "bits" were poured into the toilet.

View attachment 987922

That's awesome, you should have developed that into an $850 product! haha

My (very limited) understanding is that maceration temps may smell worse. That whitebone fella says the ~175-180 temp doesn't smell much, or that it actually smells like cooked meat (i.e. not gross). Which seems to mirror your experience with that temp. Limiting potential stank is appealing to me for sure with close neighbors.

But maceration temps are definitely something I'd like to experiment with. Hoping to get this project put together after New Years then get after some yotes to test it out on.
 
Back
Top