DIY Apex Quilt Complete

OP
WoodBow

WoodBow

WKR
Joined
Jul 21, 2015
Messages
1,887
Thinking about giving this a try! Did you sew it inside out on 3 sides, then flip it and grosgrain the 4th to hide the insulation? I haven't been able to find anything definitive and I am a noob when it comes to diy stuff

Yes the two pieces of fabric are stacked with the faces you want on the outside, facing each other. Then the insulation on top. Sew 3 sides, flip it inside out, and grosgrain that last edge. Thats how i did it anyways. Lots of people partially sew that 4th side before flipping it and leave just enough room to flip it inside out.
 

xrangerx

WKR
Joined
Jun 2, 2015
Messages
339
Yes the two pieces of fabric are stacked with the faces you want on the outside, facing each other. Then the insulation on top. Sew 3 sides, flip it inside out, and grosgrain that last edge. Thats how i did it anyways. Lots of people partially sew that 4th side before flipping it and leave just enough room to flip it inside out.

Okay, awesome! Thank you!
 

450

Lil-Rokslider
Joined
Mar 1, 2015
Messages
183
I have read where several people said sew it with the insulation down.
 

lam396

Lil-Rokslider
Joined
Dec 4, 2014
Messages
250
You ever get a final weight on this? It looks great! Any thoughts on whether you would do the foot box any different now that you've had some time with it?

sent from my galaxy
 
OP
WoodBow

WoodBow

WKR
Joined
Jul 21, 2015
Messages
1,887
I never got a final weight. Id guess 2-2.5 pounds roughly. I plan to make another that is about 6 inches longer and i will make a permanent footbox. I have had it on 2 trips that involved a fair amount of glassing and i have yet to ise it as a woobie. So i figure i might as well have a fully sealed footbox that involves less work.
 
Joined
Aug 3, 2015
Messages
413
I'm kinda throwing the idea around of one of these for a winter project. I'm not a very experienced sewer though. I've been watching YouTube to kind of get a handle on the basics for this project. I also need to find a source for the fabric rather than online. Except for the apex or primaloft. Not sure which I'll use. 🤔
 
Joined
Mar 15, 2016
Messages
675
Location
Boulder, Wy.
they are easy and fun to do.

i made a blanket my first go round and i have been using it all fall, very warm even into the high 20's
i used 5oz
 

mlob1one

WKR
Joined
Mar 18, 2015
Messages
445
I see that on ripstopbytheroll.com they have kits, but with so many fabric weights I have no idea what to choose... any suggestions?

Sent from my SPH-L710 using Tapatalk
 
OP
WoodBow

WoodBow

WKR
Joined
Jul 21, 2015
Messages
1,887
Fabric weight is up to you. Lighter is well.....lighter, but also less durable typically. And vice versa. Do some google searches for backpacking quilt builds and you will get an idea for what folks are using. I can't say what weight my fabric was because it was not labeled when I bought it.
 

NoWiser

WKR
Joined
Aug 15, 2013
Messages
708
I like this thread!

With a new addition to our family, I knew I'd have lots of time inside the house this winter, so I ordered some materials for making a woobie type blanket.

I used Climashield Apex 5 oz. and am happy with it.

For fabric I got some 1.1 oz foliage ripstop on Ebay. It doesn't hardly weigh anything, but is not durable at all. As I was fastening everything together, my wifes cat jumped on the dog, the dog got mad, bit the fabric out of frustration, and immediately put holes in it. My Kifaru woobie wouldn't have been damaged at all, but the light ripstop didn't fare so well.

As far as the sewing went, it was actually quite easy to do. I hadn't touched a sewing machine since 7th grade home ec class. It took me about 5 hours to make the blanket, but that included teaching myself how to thread the sewing machine, sewing a few test strips, and about an hour of troubleshooting when the machine kept jamming on me (threading error). I bought a big pack of the Acco binder clips and clipped the insulation and fabric together every 6-8" around the perimeter and then removed them as I sewed. It seemed much easier than pinning everything together. I sewed with the insulation facing down and didn't have snagging problems.

I have enough insulation to tackle a quilt, which will be my next project. I'm trying to find a better fabric before I do it, though. The light ripstop is just not tough enough. It's also too transparent and doesn't look good. I sure wish I could figure out what Kifaru uses!

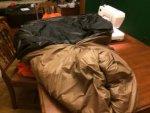
Here's my first shot at a blanket. It's far from perfect. The second one will be MUCH easier.

View attachment 43740
 

wihunter1

FNG
Joined
Sep 15, 2015
Messages
35
Location
Midwest Wisconsin
Awesome post and awesome job! I am new to sewing and after reading and learning from guys like you I have a broad question... First I will start off by saying I only hunt back country about 10 days a year so spending 300+ on a bag was hard to swallow. As my first build, I dont expect perfection but functionality. Before I order the material I will share whats in my cart and see if people agree or have any suggestions.
3yrds HyperD 1.0 (for inside)
3 yrds Robic XL 1.7
3 yrds 7.5oz Climashield APEX
2 yrds 3/8 flat elastic
I know I have extra material but I plan on making a stuff sack or pillow. I am hoping to make it 58x76. Now for the question... I have an Xtherm pad that is tapered, would you suggest making a traditional "rectangle" quilt and using a draw string (keeping the quilt above the pad I assume?) OR trying to form fit the quilt to my pad and have more of a non vented foot box. Being from Wisconsin I have not got the chance to physically see or use a quilt.. I am assuming making the rectangle and a draw cord on top and bottom and elastic across the middle of the quilt will be my best bet but just thought I would ask. Thanks in advance and hopefully in the weeks to come I can share my experience. ANY other tips that you or anyone has feel free to throw them at me!
 
Joined
Oct 2, 2016
Messages
2,918
Location
West Virginia
It looks good and you have mad skills. With that said, I'm surprised that you sewed it like that. DIY gear supply has a tutorial on how to sew a quilt or Whoobie. You had a lot of extra work there doing it the way you did compared to sewing it like a blanket. Also, I did away with the cord channel and drafting option on the ones I make now because of what you saw out of the grosgrain. IT doesn't cinch down tight enough to make it draft free. I just sew them slush now.


I wish I had your ability. Mine look good but, with sewing the foot box flush and the back side 18 inches up the seam, without grosgrain or hem tape, it doesn't look as good as it could. Yours does look great and will work great as well. God Bless
 
Joined
Oct 2, 2016
Messages
2,918
Location
West Virginia
I’ll post a pic to show you how mine puckers when I do that. Maybe you got some ideas how to make that not happen. But, it’s a lot of material under the presser foot.


FWIW, next time sew the insulation down. It won’t snag on the foot like that and feeds just fine.
 

Attachments

  • 7AC75085-2B12-409A-80F3-FBB4F1B37E5F.jpg
    7AC75085-2B12-409A-80F3-FBB4F1B37E5F.jpg
    17.5 KB · Views: 84

Steve O

WKR
Classified Approved
Joined
Feb 29, 2012
Messages
3,151
Location
Michigan
What’s the “minimum” sewing machine you need to do these type of quilt projects? I’m guessing the dinky little white one my wife has gathering dust for many years in the closet won’t cut the mustard?
 
Joined
Jun 25, 2015
Messages
347
little off subject but for those who want the least stiching do it yourself woobie clone i was thinking of something like modding a snugpak jungle blanket. opened and re- stuffed with Apex. those jungle blankets can sometimes be found for under 30$ and they dont look to have any baffles or much to unstitch and sew up again. just a thought and maybe a future project.
 
OP
WoodBow

WoodBow

WKR
Joined
Jul 21, 2015
Messages
1,887
What’s the “minimum” sewing machine you need to do these type of quilt projects? I’m guessing the dinky little white one my wife has gathering dust for many years in the closet won’t cut the mustard?
When you say dusty white ones are you talking about sewing machines? Pretty much any machine will work for quilts like this. I use my lightest duty machine.

Sent from my SM-G950U using Tapatalk
 
OP
WoodBow

WoodBow

WKR
Joined
Jul 21, 2015
Messages
1,887
little off subject but for those who want the least stiching do it yourself woobie clone i was thinking of something like modding a snugpak jungle blanket. opened and re- stuffed with Apex. those jungle blankets can sometimes be found for under 30$ and they dont look to have any baffles or much to unstitch and sew up again. just a thought and maybe a future project.
Only problem i see with what you describe is that the apex still needs to be sewn around the perimeter or it will all just bunch up.

Sent from my SM-G950U using Tapatalk
 
OP
WoodBow

WoodBow

WKR
Joined
Jul 21, 2015
Messages
1,887
I’ll post a pic to show you how mine puckers when I do that. Maybe you got some ideas how to make that not happen. But, it’s a lot of material under the presser foot.


FWIW, next time sew the insulation down. It won’t snag on the foot like that and feeds just fine.
I can't tell exactly what is happening there but puckering is usually caused by a differential feed rate between your top and bottom fabric. This is remedied by using both hands to hold tension on all of the fabric going into and coming out of the machine. You get all those layers crammed under the presser foot and only the ones closest to the feed dogs want to feed. You almost need to pull the material through sometimes. That is where a walking foot/needle machine comes in handy. I have one but it is too heavy duty and would tend to chew up this light stuff.

Sent from my SM-G950U using Tapatalk
 
OP
WoodBow

WoodBow

WKR
Joined
Jul 21, 2015
Messages
1,887
It looks good and you have mad skills. With that said, I'm surprised that you sewed it like that. DIY gear supply has a tutorial on how to sew a quilt or Whoobie. You had a lot of extra work there doing it the way you did compared to sewing it like a blanket. Also, I did away with the cord channel and drafting option on the ones I make now because of what you saw out of the grosgrain. IT doesn't cinch down tight enough to make it draft free. I just sew them slush now.


I wish I had your ability. Mine look good but, with sewing the foot box flush and the back side 18 inches up the seam, without grosgrain or hem tape, it doesn't look as good as it could. Yours does look great and will work great as well. God Bless
I will check out the tutorial. Im always open to improving things. Im working on a bag/quilt hybrid right now. Still scratching my head a bit w layup.

Sent from my SM-G950U using Tapatalk
 
Top