$100k to Convert Tikka Stock to Rokstok While I (Im)patiently Wait

Kenny Hart

Lil-Rokslider
Joined
Feb 5, 2023
Messages
109
Lucky enough to have both access to expensive equipment AND my boss lets me use it for personal projects. End result is looking pretty good:
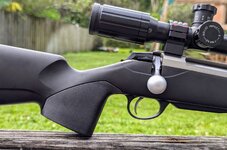
Printed Part.jpg

Modeled up the original Rokstock design for reference and grip angle (though I obviously don't have the real contour/palm swell:
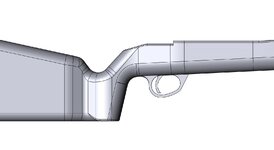
Rokstock.jpg

3D Scanned the factory grip and stock with a $70k 3D scanner:
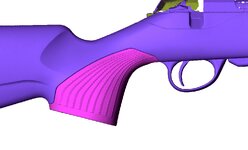
Stock Scan.jpg

Modeled new grip with grip angle and 1.7" trigger reach, but with proper blend into the stock and pushing the Tikka grip radius forward:
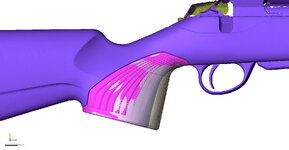
New Grip Model.jpg

Added interior supports, though I beefed them up a hair. Not that it was needed, as I printed in PEEK on an industrial 3D printer so it's strong as shit and won't deflect in heat like other material I've experimented with in the past. I have a version with texture, but the smooth model looks nicer and the build lines in the printed part give a similar feel to traction tape, so I don't feel it's needed.
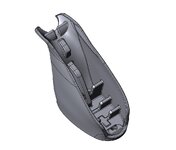
Final Model.jpg

More to come, gotta do something about that silly factory recoil pad position!
 

Bert01

Lil-Rokslider
Joined
Feb 26, 2024
Messages
125
This is awesome, we have a shop that we can do our own projects in also. I’ve started chambering my own barrels and bought my own desktop cnc. We have Faro equipment too but I don’t have time to do everything I want to. It is good to work for a small business sometimes though.
 

TheM1DoesMyTalking

Lil-Rokslider
Joined
Sep 29, 2021
Messages
292
Cool project! Looks like fun to model, scan and hit the print button.

I think there would be a market for more 3rd party grip options beyond the couple that Tikka offers.

I'm looking forward to your recoil pad solution.
 
OP
K

Kenny Hart

Lil-Rokslider
Joined
Feb 5, 2023
Messages
109
This is awesome, we have a shop that we can do our own projects in also. I’ve started chambering my own barrels and bought my own desktop cnc. We have Faro equipment too but I don’t have time to do everything I want to. It is good to work for a small business sometimes though.
That's cool, we don't have any machining capability in-house but I'd love to be able to do all my own work!

We sell Creaform scanners, though we are right down the road from Faro HQ, and my boss was one of the original engineers who helped steer the development toward metrology work.
 
OP
K

Kenny Hart

Lil-Rokslider
Joined
Feb 5, 2023
Messages
109
Cool project! Looks like fun to model, scan and hit the print button.

I think there would be a market for more 3rd party grip options beyond the couple that Tikka offers.

I'm looking forward to your recoil pad solution.
I appreciate it!

I think the tough part would be beating the $20 price tag that Tikka asks. I didn't look at the retail price but 3D prints are relatively expensive, especially with the better engineering plastics, and I'd have to sell a ton of grips to pay for a mold!

But people spend stupid money on their guns, so who knows :ROFLMAO:

I've gotta do a little cutting on the end of the stock, I'm waiting on the recoil pad to come in so I can get the exact dimensions and screw size. Will have it wrapped up soon.
 

Loper

WKR
Joined
Jul 1, 2020
Messages
1,136
That's cool, we don't have any machining capability in-house but I'd love to be able to do all my own work!

We sell Creaform scanners, though we are right down the road from Faro HQ, and my boss was one of the original engineers who helped steer the development toward metrology work.
Are you in Central Florida?
 
OP
K

Kenny Hart

Lil-Rokslider
Joined
Feb 5, 2023
Messages
109
Haven't been able to work as quickly as I wanted, as I've been dealing with a bit of a medical issue that's forcing me to work from home instead of accessing the tools at work.

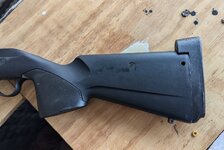
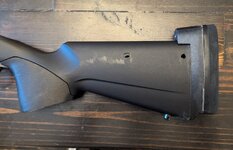
This is a Tikka youth stock, and will ultimately be for my oldest daughter, so the LOP will be a hair short for me but still useable with a feel about halfway between the shortest stock setting, and that with the adult spacer/full length stock.

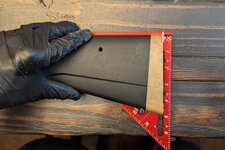
First step was to cut the stock square to the comb using the neighbor's chop saw, as the top of the comb is essentially parallel to the inlet of the stock. I eyeballed this to terminate at the bottom corner of the heel to remove a little LOP as possible, and ended up nailing it! A little sanding with some backed sandpaper and I have a perfectly flat surface.

I'll design/print a spacer here that will screw to the back and lift the recoil pad higher. If I were injection molding, this cut may be unnecessary, but the build layers of FDM 3D printing tech would make the slightly angled surface required to match the stock pretty rough, so I want the front and rear (will be top and bottom on the printer) surfaces parallel.

With the desired LOP here, it also keeps the top of the spacer a bit thicker for the recoil pad screw.

PXL_20240915_181053619.PORTRAIT~2.jpg

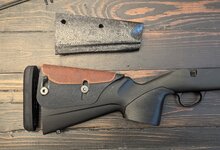
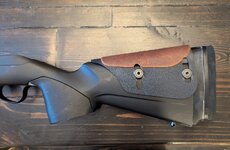
Assembled with Mountain Tactical cheek riser. I also ordered a Pachmayr Old English "small" size in .8" thickness, as it's only slightly bigger than the final dimensions and will minimize the amount of grinding required.

PXL_20240915_220921965.PORTRAIT.ORIGINAL~2.jpg

When I do this again, I'll know how I want the cheek piece to sit so the hole placement will be a bit better. I'll need to wallow out a little clearance slot rearward for the front screw here, as I followed the install directions that make for a flat comb before deciding on a much more drastic angle.

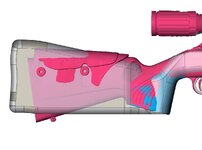
I'll end up with the rear of the cheekpiece about 1" above the stock, with the front resting on the stock and slightly forward of the rear bolt travel. Because of the angle, the bolt will clear over the top with plenty of gap. I can't really go quite as high in the rear as the Rokstok because the front of the comb is actually lower than a traditional stock, so this gives a similar height in the location where your cheek touches, and doesn't require higher rings (final position will be higher than image below):
User CaptureScreen5.jpg

Even with the foam insert, the stock begins to collapse much sooner under the cross-screw tension before the cheekpiece will stay put, so the insert that I'll design in the rear will protrude into the stock past the rear screw for solid support, and I'll print a spacer for the front screw that will push into and sit flush with the foam, and give a front ridged cross member to tighten down on.

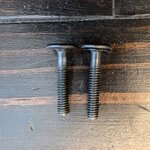
I'm not sure if it's the youth stock specifically, or this is just a step that should be expected on a thinner traditional hunting stock, but the screws that come with the MT cheek riser were too long and bottomed out before they were adequately tight, so I slightly shortened and chamfered them with a hacksaw and file. Quick job and now they seem to work much better (shorter one is front screw).
PXL_20240915_182658676.MP~2.jpg
 
OP
K

Kenny Hart

Lil-Rokslider
Joined
Feb 5, 2023
Messages
109
Would you be open to sharing that file? I have access to a printer and would love to try it out!
You know, I honestly haven't had the time to put any real thought into the next step with this thing. I'm gonna hold onto it for the moment, I need to make a slight aesthetic adjustment so one part lines up a hair better with the stock first.

Also being that I borrowed the main aspect of the design from a project that quite a bit more R&D went into, I want to make sure I'm not...stepping on toes, so to speak.

I'll get back to you.
 

Legend

WKR
Joined
Jun 13, 2017
Messages
946
You know, I honestly haven't had the time to put any real thought into the next step with this thing. I'm gonna hold onto it for the moment, I need to make a slight aesthetic adjustment so one part lines up a hair better with the stock first.

Also being that I borrowed the main aspect of the design from a project that quite a bit more R&D went into, I want to make sure I'm not...stepping on toes, so to speak.

I'll get back to you.
You better call Troy Sessions and get his advice.

Sorry everyone. Carry on.
 

NWBLKTAIL

Lil-Rokslider
Joined
Dec 27, 2019
Messages
139
Location
Oregon Coast
I love to tinker and work on things so this is very enjoyable to follow along your process and access to equipment to make ideas come to life. Thanks for posting
 
OP
K

Kenny Hart

Lil-Rokslider
Joined
Feb 5, 2023
Messages
109
Wow. Having the ability to tackle this project is mind blowing. Very cool!!!

I love to tinker and work on things so this is very enjoyable to follow along your process and access to equipment to make ideas come to life. Thanks for posting

Appreciate it, fellas! I do feel pretty lucky to not only have the tools at my disposal, but also a boss that lets us use the resources for personal projects if we do a blog write-up on it. I get a lot of enjoyment out of improvement projects as well, especially when it's to solve shortcomings of hunting gear.

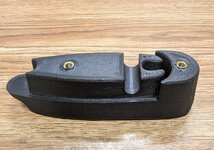
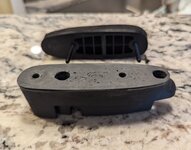
I'm able to make progress again after a bit of a a hiatus by 3D printing the LOP adapter and adding the 10-24 threaded heat set inserts for the recoil pad. My idea is that the length can be adjusted by swapping recoil pad thicknesses or adding 3D printed spacers and lengthening screws as needed.

1000006954.jpg

I have a love-hate relationship with 3D printers, and the Peek-Carbon Fiber compound is immensely tough...both in strength/heat resistance and ability to print successfully.

After 2 failed build attempts, the third finished though the recoil pad mounting surface was warped and pretty jacked up.

Nothing a little JB weld skim bed couldn't correct.

1000006955.jpg

The heat deflection temp of the material is 400 deg F, so it took me a couple attempts to find a soldering iron in the office that would reach the required temp to seat the inserts.
 
OP
K

Kenny Hart

Lil-Rokslider
Joined
Feb 5, 2023
Messages
109
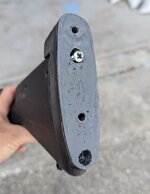
Installed the spacer with the factory recoil pad screws.

1000006963.jpg

I had to drill the screw holes deeper into the rear posts, and actually cut off 1/8" or so of the bottom screw with a hacksaw to keep it from bottoming out on the rear sling stud insert. No issues with the top one.

1000006964.jpg

On my second stock, I'll wait to drill the front cheek piece hole until I get it mounted up and the rear torqued down. Because it will be at an angle, the front hole actually needed to be slightly forward of my original location, so I had to make it a slot.

No biggie once I make it permanent.
 
OP
K

Kenny Hart

Lil-Rokslider
Joined
Feb 5, 2023
Messages
109
I was able to grind the recoil pad to fit...my first attempt at doing so, please don't judge me 🤣

Here's the recoil pad/spacer assembly installed:

1000006969.jpg


And this is the final configuration with the cheek riser bolted on:

1000006970.jpg

I like it, and my oldest daughter can get behind it, reach the trigger, and see through the scope. She's in the 90-something-th percentile in height and is projected to be as tall as me, so my intent is that we can swap to a thicker recoil pad and/or 3D print a spacer when a longer LOP is needed.

Unlike before, the cheek riser cannot crush the stock, so I was able to crank the bolts down as tight as required to keep the check piece from being pushed down by hand, or by a sudden impact.

I'll be repeating the process for my second daughter's stock after I print another grip and spacer. Then I'll bond everything together to keep water from getting into the stock, and paint them up with some fun patterns.

When I buy them each their own Tikkas, we can pull them from their factory stocks and drop, and spot bed them, into these immediately. What do you guys think?

Any suggestions that I may have overlooked or you think could be better?
 
Joined
Feb 2, 2020
Messages
2,733
I was able to grind the recoil pad to fit...my first attempt at doing so, please don't judge me 🤣

Here's the recoil pad/spacer assembly installed:

View attachment 783775

And this is the final configuration with the cheek riser bolted on:

View attachment 783776

I like it, and my oldest daughter can get behind it, reach the trigger, and see through the scope. She's in the 90-something-th percentile in height and is projected to be as tall as me, so my intent is that we can swap to a thicker recoil pad and/or 3D print a spacer when a longer LOP is needed.

Unlike before, the cheek riser cannot crush the stock, so I was able to crank the bolts down as tight as required to keep the check piece from being pushed down by hand, or by a sudden impact.

I'll be repeating the process for my second daughter's stock after I print another grip and spacer. Then I'll bond everything together to keep water from getting into the stock, and paint them up with some fun patterns.

When I buy them each their own Tikkas, we can pull them from their factory stocks and drop, and spot bed them, into these immediately. What do you guys think?

Any suggestions that I may have overlooked or you think could be better?

Looks great to me. Since you have the tools at your disposal, I'd figure out something for the toe of the stock... To make it a little flatter .
 

Macintosh

WKR
Joined
Feb 17, 2018
Messages
2,774
Why not integrate the cheek riser into the spacer? It could be held on with it being built onto the spacer at the rear, with 1 vertical screw and a plug up front, just like the factory CTR riser…all one piece.
 
Top