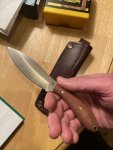
Thank you for the input. I've heard enough about the Mora I think I'm gonna buy one. I'm terrible at sharpening with a wetstone but I have the proper grit to learn. I'll probably play around with it and try to learn good techniques for sharpening. Maybe use it more for deboning and trimming than out in the field
Sent from my PH-1 using Tapatalk
The good thing about a Mora is they are cheap to learn on.
My advice on sharpening:
1. A cheap lighted microscope can really help you see what's going on when you sharpen. I don't use it much anymore, but it really helped me figure out what was going on and why the knife "wouldn't" sharpen. Each stone change, you can see how much of the bevel you've affected and how much more to go. Use it to look at one side of the bevel at a time.
2. If you got the money burning a hole in your pocket, the wicked edge is awesome. Otherwise, a DMT aligner will help you keep an angle while you learn how many strokes it takes to remove steel. It comes with three stones, and I like to buy a "black" DMT stone as I want something even more coarse to reshape. I still use mine when re-profiling so I don't have to pay as much attention while I'm doing it. I generally freehand for touch ups though.... Also, I'm a big fan of the Case Peanut.... they are too small to use on the aligner, so I have to free hand those.
3. Once you get really comfortable with the work required to sharpen the edge, try free handing. I have to take my time and really focus on the task at hand..... otherwise, I spin my wheels not holding the angle right and take much longer to get the result needed.
My process on sharpening:
1. Unless this is a touch up, start with the 120ish grit stone. Hold the knife's bevel to the stone and sharpen one side until a curl builds up. The curl is a fine wire of metal. You can feel this when rubbing your finger (from spine past the edge!) past the bevel of the side you are working. It'll cut if you are going in the wrong direction! The curl will obviously grab your finger as it passes by. Make sure you carefully follow the bevel from the handle all the way to the tip! Time your stroke so that each pass goes the whole distance from handle to tip!
2. Now do the opposite edge until you get that curl.
3. I like to strop on leather at this point back and forth (don't press heavy) in order to break that curl. This will give you a super sharp edge. You won't see the curl broken off, but it won't grip your finger when passing over anymore. I stick on one side until the curl is removed and then lightly strop the other side.
4. At this point I might go back to the stone and do twenty strokes on each side, then ten, then five, then two, then one. Mostly just to even things out.
5. Now you have a choice. Finer grit stones or final strop.
Finer stones only polish that bevel you created (or restored). That finer bevel can look nice and it can aid in making a shaving sharp blade. It's not really needed if all you are doing is processing meat.
I always (If I can) finish with a stropping. Stropping straightens out the micro sized waves in the edge and just makes it cut smoother. At this point, I swap sides with each pass. I have compound on my strops, but I wouldn't bother with it. You just need a leather strop..... I've even used my wallet as a strop. If a leather strop is not available, just go backwards on the last stone you were using being careful to maintain the angle of your bevel.
Hope this helps.