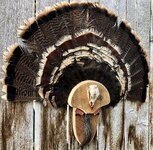
Tail Fan Preservation

johnhroberts1993

FNG
Classified Approved
Joined
Feb 10, 2024
Messages
7
Location
Fayetteville, NC
Hey all.

Sitting here thinking about how to ‘mount’ this tail fan I have.

I am not such a huge fan of the traditional spread-fan mounts. I would much rather have something that I could pick up off a table, inspect, admire, and pass to others to do the same.

I am trying to figure out a way to preserve a tail fan in a way that would allow me to spread the fan open and close whenever the hell I want, while trying to mitigate the risk of damaging it.

Does anyone have any idea how I might be able to accomplish this? Think its even possible?

Thanks much.

John
 
Last edited:

JeffP_Or

WKR
Joined
Jul 1, 2020
Messages
363
Location
PDX
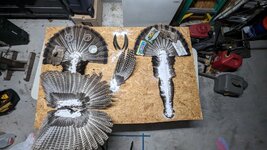
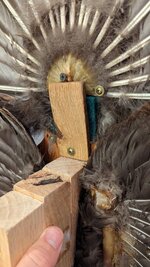
Only way I could see you doing it would be to use the plucked feather/rebuild tail method but instead of bondo to remake the tail, epoxy the feathers back to a fabric base - maybe a heavy camo pattern nylon or felt?
The smaller base feather would be a PITA though.
 
Joined
Jul 20, 2014
Messages
1,354
Location
Kirtland, NM
Only way to do it would be to remove all the feathers then reattach to something soft. The end of the feathers all have tissue on them and needs to be removed. If not it will dry hard and the feathers will remain in that dried position.
 

Kenny Hart

Lil-Rokslider
Joined
Feb 5, 2023
Messages
113
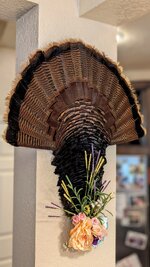
I just make sure that I have ALL meat cut off and around the fan, then add borax and tack out the fan.

As the meat dries, it becomes easier and easier to cut away more of it with a sharp knife until all you have left is the cartilage around the feather quills. I also use a pair of snips and cut off the little bone on the backside of the fan as well.

The process takes about a week or so, but this is how I've done my birds.
 

Attachments

  • PXL_20230422_013344284.jpg
    PXL_20230422_013344284.jpg
    297.9 KB · Views: 58
  • PXL_20230507_231800695.jpg
    PXL_20230507_231800695.jpg
    260.3 KB · Views: 55
  • PXL_20230610_200642119.PORTRAIT~3.jpg
    PXL_20230610_200642119.PORTRAIT~3.jpg
    266.1 KB · Views: 56
  • PXL_20230730_212032332.PORTRAIT.ORIGINAL~4.jpg
    PXL_20230730_212032332.PORTRAIT.ORIGINAL~4.jpg
    528.3 KB · Views: 57

RunNGunSC

FNG
Joined
Nov 3, 2022
Messages
80
I’ve got two fans from this season that will likely just lay around. I use a sharp knife to cut as much meat off the base as I can, on both sides. Remove the center tail bone. Then use a stiff wire brush to loosen most of the fat and remaining meat. Spread the fan to dry with the base covered in Borex on both sides. I leave it a week. You can then add bondo to the base to make it better looking or make it work for a decoy.
 

longrie

FNG
Joined
May 13, 2024
Messages
15
I just make sure that I have ALL meat cut off and around the fan, then add borax and tack out the fan.

As the meat dries, it becomes easier and easier to cut away more of it with a sharp knife until all you have left is the cartilage around the feather quills. I also use a pair of snips and cut off the little bone on the backside of the fan as well.

The process takes about a week or so, but this is how I've done my birds.
These look fantastic!
 

WCB

WKR
Joined
Jun 12, 2019
Messages
3,652
This is the way I'm doing my next one. Like JeffP said. You could probably get creative with the bondo part.

I just completed 2 with jb weld (since I had it sitting around). I did not break them completely apart. But cleaned the quills completely with just a small amount of connective tissue between the feathers. Little borax on that tissue and put it together. basically mirrored the video below.


JWM

FNG
Joined
Feb 2, 2018
Messages
39
Location
UT
This is how I do mine. I do the same borax method but also clean the skull and spurs. I coat the spurs and skull with a low gloss sealer.
 

Attachments

  • IMG_2847.jpeg
    IMG_2847.jpeg
    1,009.2 KB · Views: 13

Kenny Hart

Lil-Rokslider
Joined
Feb 5, 2023
Messages
113
These look fantastic!
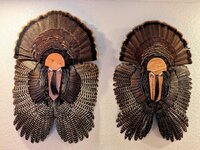
Thanks, I appreciate it! They aren't hard but do take a bit of time, and some trial/error to get the symmetry right.

Larger one, and the one my wife decorated for our daughters' room, are both Eastern birds, and the smaller is an Osceola.

My brother does wood working and those are his plaques. Need to get a line on a Rio and Merriam's to complete the turkey wall!
 

Kenny Hart

Lil-Rokslider
Joined
Feb 5, 2023
Messages
113
This is how I do mine. I do the same borax method but also clean the skull and spurs. I coat the spurs and skull with a low gloss sealer.
Looks great!

One day I want to clean & bleach the skull from my bird, but they're always...unusable
 

Kenny Hart

Lil-Rokslider
Joined
Feb 5, 2023
Messages
113
Hey all.

Sitting here thinking about how to ‘mount’ this tail fan I have.

I am not such a huge fan of the traditional spread-fan mounts. I would much rather have something that I could pick up off a table, inspect, admire, and pass to others to do the same.

I am trying to figure out a way to preserve a tail fan in a way that would allow me to spread the fan open and close whenever the hell I want, while trying to mitigate the risk of damaging it.

Does anyone have any idea how I might be able to accomplish this? Think its even possible?

Thanks much.

John
Having revisited this post, I realize I never actually answered your original question.

My buddy had a fan that he could easily spread and collapse exactly like you're talking about.

Generally just follow the same procedure (clip the back tail bone off and systematically dry and cut ALL meat and fat from around quills.

The difference is that he said he just worked the fan open and closed throughout the entire drying process, which I guess just broke apart the fibers and such that dry and keep the fan ridged.

If you want the cleanest possible method, I presume that you could make some sort of leather or felt semi circle and glue each fan feather into its own slot. I don't think this would let the fan collapse naturally on itself the way it could if left in its natural state like above though.

Let us know if you get it to work!
 
Top