yycyak
WKR
- Joined
- Apr 1, 2018
- Messages
- 318
BLUF: Here's how to make some hard panniers for $28 and a couple hours of your time
***
I'd like to say this post was inspired by two books: Townsend Whelen's “On your Own in the Wilderness” and Joe Back's “Horses, Hitches, and Rocky Trails.” And it sort of was.
But mostly it was this:

I'm up in Canada, so the USD$ conversion sucks. So for guys who maybe can't spend that kind of money, below is a functional alternative that costs a whopping $28 Canada-Bucks per box. The design draws from those two books mentioned above, and also from a set of DIY salt panniers I've seen used in action by an old cowboy.
Difficult level: Easy. It took longer to write and format this post than it did to build the boxes.
SHOPPING LIST
– 2x10x8, x2
– 2x4x8, x2
– 4x8ft ⅜ plywood sheet
– Gate hinges, 2-4”, x8
– Rope, ⅝ or whatever, @ 25ft +
– Old ratchet strap or nylon webbing @ 40”, x4
– D-rings, 1”, x8
– Glue
– Wood screws (½, ¾, 1 ¹/², and 3”)
CUT LIST
– 2x10 @ 17 ⅝”, x2
– 2x4 @ 19”, x2
– ⅜ plywood @ 22x17 ⅝”, x2
– ⅜ plywood @ 22x10, x1
– D-rings, 2x
– Nylon strap, cut @ 40"
– Rope, cut @ 6ft
This list gives you enough lumber to build 2x sets of 2 panniers, or 4 boxes in total. Hardware and consumable stuff is your call on what you want to use, but this had me covered.
Tools Needed
– skilsaw
– measuring tape
– square
– screw gun
– drill
***
Okay on to the build.
Step 1
Cut your lumber using the cut list above.

Step 2
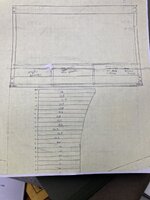
Write “top” at the top of your 2x10 blocks. Now you know where Top is.
Measure down 6 ¾” from the top, along the left side of the block. Make a mark.
At the bottom, measure 7” from the right side of block. Make a mark.
Draw a line between your two marks. Use your skilsaw to cut that line. (May need to fight your blade guard here to make this cut - angle is a bit of a fight.)

Step 3
Glue and screw your 2x 2x4's to the bottom of your cut 2x10's

Step 4
Glue and screw one of your 22x18” ⅜ panels to the back of the frame you just made.

Step 5
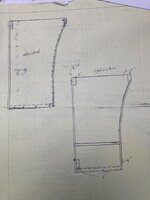
Get your second 22x18” panel. Measuring down from the top, make a mark at 6 ¾. Carry this line across the face of the panel.

Set your blade depth to a fat 1/16 of an inch

and scribe (cut) your line. You are removing a bit of material here to make the “bend” in the front face of the pannier a bit easier.
Step 6
Glue and screw the panel you just scribed to the front of the frame.
**Note: your panel might crack along the line. Oh well. Plywood sucks these days. If it does, just keep going.

Step 7
Take your 22x10” panel, and put it on top. Add your hinges. Use your ½” screws on top, and longer screws for going into the 2x10

Step 8
Measure 5” across, and 5” down, from the top of your 2x10 sides. Make a mark.
Get your drill out, and drill a hole for your rope.

Thread your rope through the hole, and tie the ends in a Figure-8.


Step 9
Cut a 4” length of nylon strap. Thread 2x D-rings onto it, and fold it over.
Screw this to one side of your 2x10, somewhere above the hole you drilled for your rope.

Step 10
Get the rest of your nylon strap. Go to the other side of your pannier, and screw this strap to the 2x10

Now you have a simple and robust way to keep the lid closed when needed

Step 11.
Done. Finish the panniers with paint or spar varnish.
Total weight = 16.73lbs. (Lighter than some of the plastic ones out there)


***
EDIT: Ran out of room. See Part 2 below.
***
I'd like to say this post was inspired by two books: Townsend Whelen's “On your Own in the Wilderness” and Joe Back's “Horses, Hitches, and Rocky Trails.” And it sort of was.
But mostly it was this:
I'm up in Canada, so the USD$ conversion sucks. So for guys who maybe can't spend that kind of money, below is a functional alternative that costs a whopping $28 Canada-Bucks per box. The design draws from those two books mentioned above, and also from a set of DIY salt panniers I've seen used in action by an old cowboy.
Difficult level: Easy. It took longer to write and format this post than it did to build the boxes.
SHOPPING LIST
– 2x10x8, x2
– 2x4x8, x2
– 4x8ft ⅜ plywood sheet
– Gate hinges, 2-4”, x8
– Rope, ⅝ or whatever, @ 25ft +
– Old ratchet strap or nylon webbing @ 40”, x4
– D-rings, 1”, x8
– Glue
– Wood screws (½, ¾, 1 ¹/², and 3”)
CUT LIST
– 2x10 @ 17 ⅝”, x2
– 2x4 @ 19”, x2
– ⅜ plywood @ 22x17 ⅝”, x2
– ⅜ plywood @ 22x10, x1
– D-rings, 2x
– Nylon strap, cut @ 40"
– Rope, cut @ 6ft
This list gives you enough lumber to build 2x sets of 2 panniers, or 4 boxes in total. Hardware and consumable stuff is your call on what you want to use, but this had me covered.
Tools Needed
– skilsaw
– measuring tape
– square
– screw gun
– drill
***
Okay on to the build.
Step 1
Cut your lumber using the cut list above.
Step 2
Write “top” at the top of your 2x10 blocks. Now you know where Top is.
Measure down 6 ¾” from the top, along the left side of the block. Make a mark.
At the bottom, measure 7” from the right side of block. Make a mark.
Draw a line between your two marks. Use your skilsaw to cut that line. (May need to fight your blade guard here to make this cut - angle is a bit of a fight.)
Step 3
Glue and screw your 2x 2x4's to the bottom of your cut 2x10's
Step 4
Glue and screw one of your 22x18” ⅜ panels to the back of the frame you just made.
Step 5
Get your second 22x18” panel. Measuring down from the top, make a mark at 6 ¾. Carry this line across the face of the panel.
Set your blade depth to a fat 1/16 of an inch
and scribe (cut) your line. You are removing a bit of material here to make the “bend” in the front face of the pannier a bit easier.
Step 6
Glue and screw the panel you just scribed to the front of the frame.
**Note: your panel might crack along the line. Oh well. Plywood sucks these days. If it does, just keep going.
Step 7
Take your 22x10” panel, and put it on top. Add your hinges. Use your ½” screws on top, and longer screws for going into the 2x10
Step 8
Measure 5” across, and 5” down, from the top of your 2x10 sides. Make a mark.
Get your drill out, and drill a hole for your rope.
Thread your rope through the hole, and tie the ends in a Figure-8.
Step 9
Cut a 4” length of nylon strap. Thread 2x D-rings onto it, and fold it over.
Screw this to one side of your 2x10, somewhere above the hole you drilled for your rope.
Step 10
Get the rest of your nylon strap. Go to the other side of your pannier, and screw this strap to the 2x10
Now you have a simple and robust way to keep the lid closed when needed
Step 11.
Done. Finish the panniers with paint or spar varnish.
Total weight = 16.73lbs. (Lighter than some of the plastic ones out there)
***
EDIT: Ran out of room. See Part 2 below.
Last edited: