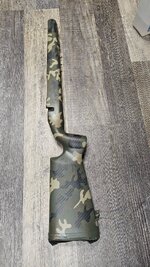
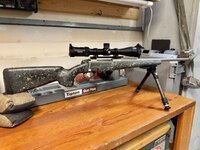
I found a picture of my sponge camo over stone paint.
Factory tupperware Savage stock that I modified. I chopped a few inches up front, raised the comb with a piece of wood and Bondo, as well as created a vertical grip and palmswell with more Bondo a latex glove.
When I bought th gun used, it had grey stone paint, fairly grippy, but I added the sponge camo with Rustoleum paints


") But, for an incredibly solid clear coat, I've used Spraymax 2K matte on guns, a motorcycle, bikes, etc. It's basically an automotive hardened clear coat in a spray can. Super durable and easy to use. Once you pop the can, it's a one time use so I usually wait until I have a few things to paint, I have a Tikka stock that has been heavily hunted and has held up great with it.
But, for an incredibly solid clear coat, I've used Spraymax 2K matte on guns, a motorcycle, bikes, etc. It's basically an automotive hardened clear coat in a spray can. Super durable and easy to use. Once you pop the can, it's a one time use so I usually wait until I have a few things to paint, I have a Tikka stock that has been heavily hunted and has held up great with it.


 love when people aren’t afraid to make something work without shipping it off somewhere. Nothing more custom than that!