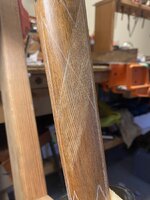
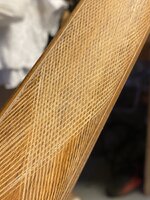
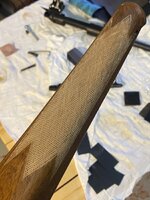
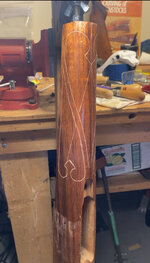
My mountain rifle is getting walnut…

Macintosh

WKR
Joined
Feb 17, 2018
Messages
2,726
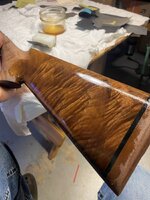
I appreciate the recommendations on finishes fellas, finishing is a trade in itself im finding. My favourite so far is a tung oil finish, done properly with wet sanding to fill pores, and bare hand rubbing until it burns a layer of skin off ( exaggerating, kinda)

Tbh I always put tru oil in the gimmick category, but after bs’ing with a old time stock maker who’s used it all, tru oil sounds like a great product, either by itself or as a base and modified how one likes his finish.

Another great finisher, for sealing, saturates the whole stock in spar urethane, lets it dry a week or two then sands it down to wood, leaving the pores filled. I can’t help but think though that a guy might get a glitter looking finish maybe, though I can see how that system would seal and harden the wood quite well.

I’m not sure there’s enough time in a lifetime to try them all lol.

True, and more than one way to skin that cat. As someone posted, maybe best to find one you like
And learn to manipulate that well, rather than keep experimenting. I never liked true oil, still dont, and yet some exceptional stockers use it and it seems to look and handle great.

I always found a glossy finish was pretty easy, an “in the wood” finish also pretty easy but not durable or weather resistant, so the trick for me was finding the best balance. Ive tried a lot of finishes, and ime its really difficult to keep a built up finish looking “satin” over time, as hand oils and use slicks it up and it glosses-up over time. Re: the soaking in urethane then sanding back—its a lot of work, but this is actually where ive landed as well. I use waterlox (a very hard oil modified urethane floor finish) cut at least 50:50 with spirits to seal for several coats, then you can fill the pores with a slurry using the same finish, let it dry very well so it's fully cured, then cut it back to bare wood using water as a sanding lubricant. The water is critical because if you have even a tiny amount of buildup on the wood surface, that will become a glossy spot in the eventual finish, and using finish as a lubricant prevents identifying these built-up spots. I think the remaining built up spots, or possibly that finish in the pores, is the “glittery” effect you refer to, but this method results in a very hard, well-sealed wood surface that repels water pretty well, takes stain or dye evenly, that will then take a rubbed finish very well without being too built up. If you sand in that finish with a slurry to fill pores and then cut back before your topcoats, the sanding dust in the pores prevents them from being shiny and you can use whatever topcoat you want to achieve your desired durability, look, etc. i like BLO cut with turp and japan dryer for absolute best look, but its very soft, so field guns I’ll use a modern finish like benmatte or similar for top coats. I actually have a turkey gun I did for myself like this, it got the full meal deal seal/fill treatment with the modern stuff, then pure BLO thinned and with japan dryer for top coats. The finish is still soft from abrasion like the oil always is, but it has held up well due to the undercoats, is quite waterproof, and its super easy to touch up the topcoat. (Plus, its the worlds classiest 870 express!)

Regardless, I really, really like your work. Really classic lines with a personal touch, looks fantastic and well done. This is fun to follow along, and it makes me happy to hear you will checker it!
 
Last edited:
OP
Decker9

Decker9

WKR
Joined
Apr 10, 2015
Messages
1,017
Location
BC goat mountains
True, and more than one way to skin that cat. As someone posted, maybe best to find one you like
And learn to manipulate that well, rather than keep experimenting. I never liked true oil, still dont, and yet some exceptional stockers use it and it seems to look and handle great.

I always found a glossy finish was pretty easy, an “in the wood” finish also pretty easy but not durable or weather resistant, so the trick for me was finding the best balance. Ive tried a lot of finishes, and ime its really difficult to keep a built up finish looking “satin” over time, as hand oils and use slicks it up and it glosses-up over time. Re: the soaking in urethane then sanding back—its a lot of work, but this is actually where ive landed as well. I use waterlox (a very hard oil modified urethane floor finish) cut at least 50:50 with spirits to seal for several coats, then you can fill the pores with a slurry using the same finish, let it dry very well so it's fully cured, then cut it back to bare wood using water as a sanding lubricant. The water is critical because if you have even a tiny amount of buildup on the wood surface, that will become a glossy spot in the eventual finish, and using finish as a lubricant prevents identifying these built-up spots. I think the remaining built up spots, or possibly that finish in the pores, is the “glittery” effect you refer to, but this method results in a very hard, well-sealed wood surface that repels water pretty well, takes stain or dye evenly, that will then take a rubbed finish very well without being too built up. If you sand in that finish with a slurry to fill pores and then cut back before your topcoats, the sanding dust in the pores prevents them from being shiny and you can use whatever topcoat you want to achieve your desired durability, look, etc. i like BLO cut with turp and japan dryer for absolute best look, but its very soft, so field guns I’ll use a modern finish like benmatte or similar for top coats. I actually have a turkey gun I did for myself like this, it got the full meal deal seal/fill treatment with the modern stuff, then pure BLO thinned and with japan dryer for top coats. The finish is still soft from abrasion like the oil always is, but it has held up well due to the undercoats, is quite waterproof, and its super easy to touch up the topcoat. (Plus, its the worlds classiest 870 express!)

Regardless, I really, really like your work. Really classic lines with a personal touch, looks fantastic and well done. This is fun to follow along, and it makes me happy to hear you will checker it!

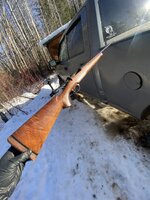
Thanks Mac!! I always wrote off tru oil as a gimmick, kinda like an “easy way out”, it’s hard to tell just yet how it will turn out, another week or so, I’ll start on wet sanding with tru oil and blo 50/50 and see how it goes.

Some day, I’ll start playing a bit with dryers and such, the finishing I find it pretty interesting, plus all the finished chunks of practice wood make for great checkering practice pieces lol.

The next build I have coming up is for a friend. I believe he’s after the Clymer type stock profile, not really my jam but should be an interesting build.
 
OP
Decker9

Decker9

WKR
Joined
Apr 10, 2015
Messages
1,017
Location
BC goat mountains
I got in a second wet sanding yesterday, it’s starting to lighten up a bit. It will be another couple or few until I have all the pores filled, I think. I finished with 400 grit paper, so been wet sanding with 50/50 tru oil and BLO, with 400 until the pores are good, then I’ll go up to 600 for the last wet sanding, I think.

IMG_3203.jpegIMG_3206.jpeg

With some spare time on my hands, Iv brought out the checkering tools. Iv checkered some flats, so hit my first junker stock last week with a simple panel. Being so small and thin, it wasn’t easy to get around that bends and quickly had lines scratched up all over.

IMG_3191.jpegIMG_3194.jpegIMG_3199.jpeg

By the last photo, I figured I’m an expert (totally joking) and that I should just jump in head first 🤣

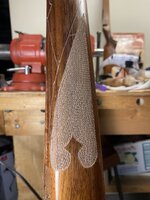
I have this old semi inlet with alot of wood on it, with a big round forend, so a bit easier to practice on, I think. But instead of a simple pattern, I picked one that’s always caught my eye. Iv got the layout cut in, sorta, we’ll see in a week or so how it turns out.


IMG_3221.jpeg
 
OP
Decker9

Decker9

WKR
Joined
Apr 10, 2015
Messages
1,017
Location
BC goat mountains
Glad to see you getting into the checkering! Cant have those luscious stocks naked.
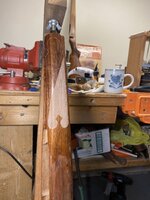
I ordered some carbide cutters from a Ullman’s last summer, sure is a step up from the Dem-Bart cutters. The 3 line spacer and a single line in the clear view handle im finding great to work with
 
OP
Decker9

Decker9

WKR
Joined
Apr 10, 2015
Messages
1,017
Location
BC goat mountains
Thanks fellas. I got a third wet sanding in, 1-2 more should have the pores filled.

Been tinkering with the checking tools, figured go big or go home on a pattern to try, this is my first panel, lots to be improved upon. I’m part way into the panel on the other side, it’s looking a bit better… so far.

As they say, good from far…

IMG_3263.jpeg

But far from good

IMG_3264.jpeg


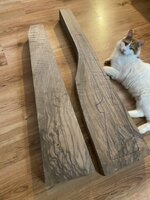
Another build in the plans, I’ll have to check with the fellow to be sure he’s ok with me posting his build, if he is, I’ll start another thread for that one (the blank on the left). Still trying to decide what to build with the slab on the right.

IMG_6961.jpeg
 

Macintosh

WKR
Joined
Feb 17, 2018
Messages
2,726
@Decker9 on the overruns—not sure what “textbook” is, but for a fill pattern like that I leave the border uncut and taped—I use automotive pinstripe tape for this so I can flex it into a curve, or the non-flexible plastic tape made for embossed lettering for straight lines. I’ll do full-depth checkering only to within 1/8” or 3/16” from the border. Then go back and finish the checkering with a “pull” stroke using the tip of your cutter so you cant over-run the tape. I’ll cut the actual border last using the tape as a guide, which will also clean up any tiny overruns.
 
OP
Decker9

Decker9

WKR
Joined
Apr 10, 2015
Messages
1,017
Location
BC goat mountains
@Decker9 on the overruns—not sure what “textbook” is, but for a fill pattern like that I leave the border uncut and taped—I use automotive pinstripe tape for this so I can flex it into a curve, or the non-flexible plastic tape made for embossed lettering for straight lines. I’ll do full-depth checkering only to within 1/8” or 3/16” from the border. Then go back and finish the checkering with a “pull” stroke using the tip of your cutter so you cant over-run the tape. I’ll cut the actual border last using the tape as a guide, which will also clean up any tiny overruns.

I need to figure out something for borders. I seen Ullman’s mentioning he checkers with 90 degree, then cut his boarder with a 75 degree. I coulda swore I had a border cutter, but can’t see it in my little pile here.

What do you prefer for cutting the boarder? Or does it depend on the pattern?

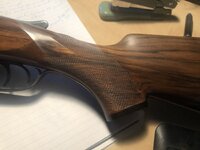
The panel on the opposite side Iv been stopping short, so far so good with only 1-2 overruns, but Iv got a little ways to go still on it. By the time this panel is done, I’m hoping I can nail the center panel. I’m going to grid it out in hopes of keeping my lines straighter too.
 
OP
Decker9

Decker9

WKR
Joined
Apr 10, 2015
Messages
1,017
Location
BC goat mountains
They're only imperfections if you see it that way. I'd love to make my own stock. One of these days. I've thought about building a duplicator but I'm not sure it'd be worth it

Iv thought long and hard about a duplicator, or a mill, some day I’d love to have a mill for random projects, but with rifle stocks, there’s just something about “hand made”.

As a note, I find building a symmetrical and straight stock easier from a blank, but I’m pretty new still so that’s just my experience so far. I found the couple semi inlets I did just, harder.

Either way, I’d dive into it, it’s a great feeling packing a rifle you’ve built!
 

Macintosh

WKR
Joined
Feb 17, 2018
Messages
2,726
I need to figure out something for borders. I seen Ullman’s mentioning he checkers with 90 degree, then cut his boarder with a 75 degree. I coulda swore I had a border cutter, but can’t see it in my little pile here.

What do you prefer for cutting the boarder? Or does it depend on the pattern?

The panel on the opposite side Iv been stopping short, so far so good with only 1-2 overruns, but Iv got a little ways to go still on it. By the time this panel is done, I’m hoping I can nail the center panel. I’m going to grid it out in hopes of keeping my lines straighter too.
The wider cutter spreads that line out a bit to chew up little overruns, OR connects lines that dont quite connect. I used some of the mullering cutters and didnt really care for them. My own taste is mostly point patterns and simple lines with single borders—I just use a regular cutter for borders, but Id have to look if its a 75 or 90 degree. I am no pro, I just use the dembart cutters and figure I go through several cutters on each stock, I usually plan for at least 1 single line cutter and at least one double cutter per panel, and then replace them so they stay sharp, especially if you fill pores with anything other than sanding dust and finish. Looking online it appears the dembart cutters arent even really available as much and have about quadrupled in price since I last looked…hopefully my supply is robust!
The fleur de leis you have is more than Ive ever attempted to be honest, just not my personal aesthetic and no one ever asked for one…not sure I would have said yes anyway, It’s probably beyond my ability to do well.
 

Macintosh

WKR
Joined
Feb 17, 2018
Messages
2,726
I did a mullered border for a guy who was turning his beretta into a british “best” lookalike on a woodward grip, I figured the border looked right on that. Fleur probably is right on a winchester. My personal stuff is various flavors of simple: (and you’ll still see an overrun or two if you look close)
IMG_8578.jpeg
 
OP
Decker9

Decker9

WKR
Joined
Apr 10, 2015
Messages
1,017
Location
BC goat mountains
I did a mullered border for a guy who was turning his beretta into a british “best” lookalike on a woodward grip, I figured the border looked right on that. Fleur probably is right on a winchester. My personal stuff is various flavors of simple: (and you’ll still see an overrun or two if you look close)
View attachment 670475
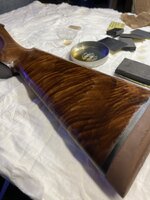
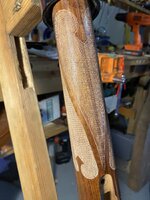
That looks pretty clean to me! I say super nice job!!

Since Iv went with carbide’s from Ullman precision, I haven’t changed my cutters. No exaggeration, I would have gone through a few Dem-barts with the practicing Iv been doing, and these still cut like new. They are pricy, but I think the lines per dollar (lol) will be better. Worth checking out if you’re ever on the lookout.

I figured since I had the extra wood on this semi inlet, it would be a good time to play with the V chisel, as you can see it needs practice lol.
 
OP
Decker9

Decker9

WKR
Joined
Apr 10, 2015
Messages
1,017
Location
BC goat mountains
Got the last wet sanding in, looks like all the pores are filled nicely, inletting is all sealed up too. I’ll let this cure a couple / few weeks now, I may go over it one last time with wet 600grit, but I don’t think it needs it. A final couple thin coats of finish should have it.

IMG_3291.jpeg

Playing on the Center panel on my practice checkering, got the lines all in mostly straight, see if I can deepen them without screwing it up to bad.

IMG_3315.jpeg

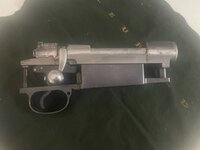
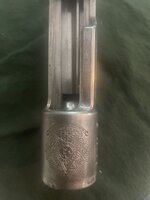
Found a 1908 Brazilian in not bad shape, a building base for the other stock blank posted above. Thinking a nice slim iron sighted 7x57 or 257 rob maybe, no needs, only wants.

What would you build?

IMG_3658.jpegIMG_3661.jpeg
 
Top