There are a ton of questions out there on the forum right now around sight tape softwares and methods that are being deployed to establish and create these tapes. The method I use is a method that was given to me years ago while on the tournament trail and is by no means the end all be all method for creating these tapes. It is simply the method that I use and it has proven itself to be my most accurate method of sight tape development. I have simply adjusted this method to work for the most common bow sights on the market as well as sights that have the tape itself attached to the dial. (Fast eddie, HHA, etc) The only sight I have not used this on is a Dialed sight because of the variable sight radius it creates.
This may be broken into several posts due to the amount of information and images needed, so if you show up early try not to post to interrupt the flow until I've put out all the info I can.
Prerequisites
A Fully tuned bow: An improper tune creates poor trajectory; poor trajectory creates slow sight tapes. Use whatever method you want; I covered my tuning methods with @realunlucky on the Rokcast a few months back. https://www.rokslide.com/tt30-bow-tuning-with-daykota-kime-and-the-cold-bow-challenge/
Archers Advantage subscription: This software is invaluable when you learn to use it at a high level, yes it costs $20 a year but that $20 is worth its weight in gold when your buddies want to argue over trajectory of heavy vs light arrows.....
www.archersadvantageonline.com
Initial Peep height measurement while at full draw. This is done easiest in a Drawboard. Don't obsess over getting this measurement perfect. Just get it within 1/8" to start with a tape measure. If you don't have a draw board then just use your buddy.
Peep to sight radius measurement while at full draw: Again either a draw board or a very trusting friend would make this all possible. Get this measurement within 1/16" using a tape measure.
Calipers: Calipers are going to be your best friend when pulling measurements off of your sight. A tape measure is not going to be accurate enough to create a truly bomb proof sight tape.
Adhesive backed paper or similar and pen: This is going to be used for your sight tape blank., pen will be used for making marks on this for your 3 different yardages.
0-70 Range: In this method you will develop 3 baseline yardage marks. Why 3? Because mathematically any 2 points can fall on an arc, while 3 points are used to establish an arc. These marks need to be established on the same day, on the same range, under the same conditions. This is important because variable light conditions create shadows inside of a peep which creates POI shift.
30yd and 70yd mark. It is important to establish your first two marks at a distance at which you can begin to see what minute changes to your sight. 20yds is too close because I can be off a yard in either direction with my arrow setup and still be inside of the X ring on a vegas face. Use a horizontal line, shoot until your grouping trend is centered about the line. Like all things, the better you can shoot, the better your sight tape is going to be. Shit in = Shit out as the saying goes.
3yd mark. Why 3yds? 3yds is inside of the crossover point where your arrow is below your normally established 20yd mark. (Archers Parallax) This mark is used to manipulate your peep height in the software. Think of it as BC number in the rifle world, we use our shot in 3yd measurement, and adjust out peep height measurement in the software until the curve matches.
Notes: Use the same pin for establishing all sight marks. No chronograph is required and frankly shouldn't ever be required. The manipulation of your peep height number in the software alters your estimated velocity and it ends up being completely irrelevant what the software says your estimated speed will be. I won't get into the weeds on this because the software takes into consideration launch angle, shot angle, as well as line of sight angle, all of which ultimately are negated by the peep height adjustment. Chronograph based softwares have no way of taking into consideration an accurate speed degradation based on the amount of helical you put on vanes, or specific vanes in general. What you are essentially about to do is create a custom drag model.
Step 0: Establish your 3 yardage marks on your sticky back. As listed above, get your groups centered about a horizontal line for the first two distances. For your 3yard Mark I suggest using a sheet of printer paper with a hole poked in it from your arrow. Establish your 3yd mark as meticulously as possible. Put a single arrow inside of a single arrow hole, you can do it just work at it. Once these 3 marks are established you will remove your temporary sight tape from the sight for measurement.
Step 1: Build your setup inside of archers advantage. You will need to fill out the information on each tab of all 3 areas of input Arrow configuration, Sight configuration (Select Inch for type of sight covered in step 2), Bow configuration

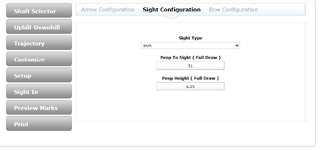
Step 2. Under the sight configuration tab it is important to select "Inch" for the sight type because we will be using our calipers to provide trajectory information for the assembly of the sight tapes

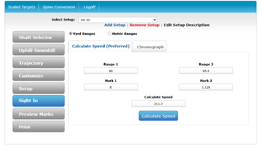
Step 3: Go to the "Sight in tab" shown on the left hand side of the screen and this is where your calipers come in handy. You will input the first two yardage distances as range 1 and range 2. You can see that I used 30 and 65.5 in this example. Your first mark will always be established as your 0 mark because the other two measurements will be pulled from this mark. As you can see below the distance on the tape from my 30 to my 65.5 is 1.125" as measured on my temporary tape with calipers. Images shown below. Input the data and click calculate speed. My speed is showing that is off by a margin of 60fps compared to the real world because I use a Fast eddie and the sight tape attaches to the dial knob rather than the vertical travel bar.


Step 4: Go to the preview marks tab and see what the difference between your calculated 3yd mark would be in the software and what the actual 3yd mark is when you shot it in. As you can see above my shot in 3yd mark is .743" and as you can see below my calculated 3yd mark is .247"

Step 5 is a lot of button clicking to get these numbers to match. Because my calculated 3yd mark is less than my real world calculated mark, I need to lie to the software and raise my peep height in the software under the setup tab. This is going to take some trial and error to figure out how much you would raise your peep virtually. For the sake of being more succinct I know that a 6.25" peep height in the software gives me my correct 3yd mark. So we go back the setup tab as previously alluded.

Step 6: This is very important, after you have adjusted your peep height in the software you must return to the sight in tab and click calculate speed once again. As you can see below it changed my previously irrelevant speed to an even more irrelevant speed.

Step 7: Return to preview marks page and validate that your virtual 3yd mark matches your real world mark.

Step 8: Go to the print tab and follow the instructions to print your now perfect sight tapes.
Pretty lengthy post but once you figure this out it becomes very easy and will become essential to shooting accurately at distance.
This may be broken into several posts due to the amount of information and images needed, so if you show up early try not to post to interrupt the flow until I've put out all the info I can.
Prerequisites
A Fully tuned bow: An improper tune creates poor trajectory; poor trajectory creates slow sight tapes. Use whatever method you want; I covered my tuning methods with @realunlucky on the Rokcast a few months back. https://www.rokslide.com/tt30-bow-tuning-with-daykota-kime-and-the-cold-bow-challenge/
Archers Advantage subscription: This software is invaluable when you learn to use it at a high level, yes it costs $20 a year but that $20 is worth its weight in gold when your buddies want to argue over trajectory of heavy vs light arrows.....
www.archersadvantageonline.com
Initial Peep height measurement while at full draw. This is done easiest in a Drawboard. Don't obsess over getting this measurement perfect. Just get it within 1/8" to start with a tape measure. If you don't have a draw board then just use your buddy.
Peep to sight radius measurement while at full draw: Again either a draw board or a very trusting friend would make this all possible. Get this measurement within 1/16" using a tape measure.
Calipers: Calipers are going to be your best friend when pulling measurements off of your sight. A tape measure is not going to be accurate enough to create a truly bomb proof sight tape.
Adhesive backed paper or similar and pen: This is going to be used for your sight tape blank., pen will be used for making marks on this for your 3 different yardages.
0-70 Range: In this method you will develop 3 baseline yardage marks. Why 3? Because mathematically any 2 points can fall on an arc, while 3 points are used to establish an arc. These marks need to be established on the same day, on the same range, under the same conditions. This is important because variable light conditions create shadows inside of a peep which creates POI shift.
30yd and 70yd mark. It is important to establish your first two marks at a distance at which you can begin to see what minute changes to your sight. 20yds is too close because I can be off a yard in either direction with my arrow setup and still be inside of the X ring on a vegas face. Use a horizontal line, shoot until your grouping trend is centered about the line. Like all things, the better you can shoot, the better your sight tape is going to be. Shit in = Shit out as the saying goes.
3yd mark. Why 3yds? 3yds is inside of the crossover point where your arrow is below your normally established 20yd mark. (Archers Parallax) This mark is used to manipulate your peep height in the software. Think of it as BC number in the rifle world, we use our shot in 3yd measurement, and adjust out peep height measurement in the software until the curve matches.
Notes: Use the same pin for establishing all sight marks. No chronograph is required and frankly shouldn't ever be required. The manipulation of your peep height number in the software alters your estimated velocity and it ends up being completely irrelevant what the software says your estimated speed will be. I won't get into the weeds on this because the software takes into consideration launch angle, shot angle, as well as line of sight angle, all of which ultimately are negated by the peep height adjustment. Chronograph based softwares have no way of taking into consideration an accurate speed degradation based on the amount of helical you put on vanes, or specific vanes in general. What you are essentially about to do is create a custom drag model.
Step 0: Establish your 3 yardage marks on your sticky back. As listed above, get your groups centered about a horizontal line for the first two distances. For your 3yard Mark I suggest using a sheet of printer paper with a hole poked in it from your arrow. Establish your 3yd mark as meticulously as possible. Put a single arrow inside of a single arrow hole, you can do it just work at it. Once these 3 marks are established you will remove your temporary sight tape from the sight for measurement.
Step 1: Build your setup inside of archers advantage. You will need to fill out the information on each tab of all 3 areas of input Arrow configuration, Sight configuration (Select Inch for type of sight covered in step 2), Bow configuration
Step 2. Under the sight configuration tab it is important to select "Inch" for the sight type because we will be using our calipers to provide trajectory information for the assembly of the sight tapes
Step 3: Go to the "Sight in tab" shown on the left hand side of the screen and this is where your calipers come in handy. You will input the first two yardage distances as range 1 and range 2. You can see that I used 30 and 65.5 in this example. Your first mark will always be established as your 0 mark because the other two measurements will be pulled from this mark. As you can see below the distance on the tape from my 30 to my 65.5 is 1.125" as measured on my temporary tape with calipers. Images shown below. Input the data and click calculate speed. My speed is showing that is off by a margin of 60fps compared to the real world because I use a Fast eddie and the sight tape attaches to the dial knob rather than the vertical travel bar.
Step 4: Go to the preview marks tab and see what the difference between your calculated 3yd mark would be in the software and what the actual 3yd mark is when you shot it in. As you can see above my shot in 3yd mark is .743" and as you can see below my calculated 3yd mark is .247"
Step 5 is a lot of button clicking to get these numbers to match. Because my calculated 3yd mark is less than my real world calculated mark, I need to lie to the software and raise my peep height in the software under the setup tab. This is going to take some trial and error to figure out how much you would raise your peep virtually. For the sake of being more succinct I know that a 6.25" peep height in the software gives me my correct 3yd mark. So we go back the setup tab as previously alluded.
Step 6: This is very important, after you have adjusted your peep height in the software you must return to the sight in tab and click calculate speed once again. As you can see below it changed my previously irrelevant speed to an even more irrelevant speed.
Step 7: Return to preview marks page and validate that your virtual 3yd mark matches your real world mark.
Step 8: Go to the print tab and follow the instructions to print your now perfect sight tapes.
Pretty lengthy post but once you figure this out it becomes very easy and will become essential to shooting accurately at distance.
Attachments
Last edited by a moderator:
