Navigation
Install the app
How to install the app on iOS
Follow along with the video below to see how to install our site as a web app on your home screen.
Note: This feature may not be available in some browsers.
More options
Style variation
You are using an out of date browser. It may not display this or other websites correctly.
You should upgrade or use an alternative browser.
You should upgrade or use an alternative browser.
Lightweight Kimber Build with Custom Carbon Fiber Stock
- Thread starter RepeatPete
- Start date
BREAKCONTACT
FNG
- Joined
- Jul 15, 2024
- Messages
- 92
Awesome, thank you for this. How's the shoot ability of that geometry?Absolutely! I’m putting this out there to encourage others to try it too. I’m no composites engineer, just going for it and seeing what happens.
Overall, the whole stock has at least two layers. I’m working from a box of super generously donated scraps, and I didn’t always take the time to look at what weight the fabric was - I just went by feel, thick vs. thin. From the forend back:
- The forend tip has two thinner layers, I think 3k each. This area shouldn’t see a whole of stress/impacts, and the thinner fabric contours over the tight radius better.
- Where the forend cap meets the straight portion of the forend, the layers overlap, giving strength to the front sling lanyard hole.
- The main section of the forend is two layers, one thick and one thin. I want to say one 3k and one 12k? Then the barrel channel is made up of two thick (12k?) layers. I think this is mainly what makes the forend so rigid.
- The action area of the stock has all the inletting structure covered earlier, and the same thick and thin layers as the forend on the outer skin of the stock. I was originally planning to put extra layers here, but didn’t feel it was necessary after the second layup.
- The grip-to-inletting area junction, down through the grip, and back through the wrist all have 3-4 layers of thinner (3k or maybe 6k) fabric. I used thinner carbon to wrap the contours better, and did extra layers at alternating fabric orientations because these areas have the smallest cross-sections, and need to be very stiff.
- The butt section has the same one thin and one thick layer as the forend. Towards the end of the butt there are some extra pieces of thin 3k fabric, but solely for the purpose of building up dimensions to match the recoil pad.
Overall, I’m very happy with the stiffness. Would I put the bare stock spanning between two logs and jump on it in the middle? Probably not. I think it’s more than adequate, but not ridiculously overbuilt, which achieves the strength and weight I was after.
As an aside for anyone looking to buy carbon for doing this yourself, the "K" number of fabrics has to do with tow construction and not thickness, that's the oz/GSM number. And for building a stock with lots of compound and complex curves you would want to use an "X harness satin weave" with higher numbers being more formable fabrics with a tradeoff in stability and some other properties. I'm probably going go go with all 5 harness satin weaves for my attemp, and I might use some unidirectional tapes in some of the reinforcement areas.
BREAKCONTACT
FNG
- Joined
- Jul 15, 2024
- Messages
- 92
I should also note, 3k, the higher the K numbers are going to be more difficult to conform to the curves
RepeatPete
Lil-Rokslider
- Joined
- Aug 13, 2023
- Messages
- 231
Shootability? I’m all loaded up to go shoot a lot this weekend, so I’ll let you know. However, my previous stock build had a very similar grip, similar recoil pad height, and a negative comb (although with a funky curve) and I thought it was very easy to get behind.Awesome, thank you for this. How's the shoot ability of that geometry?
As an aside for anyone looking to buy carbon for doing this yourself, the "K" number of fabrics has to do with tow construction and not thickness, that's the oz/GSM number. And for building a stock with lots of compound and complex curves you would want to use an "X harness satin weave" with higher numbers being more formable fabrics with a tradeoff in stability and some other properties. I'm probably going go go with all 5 harness satin weaves for my attemp, and I might use some unidirectional tapes in some of the reinforcement areas.
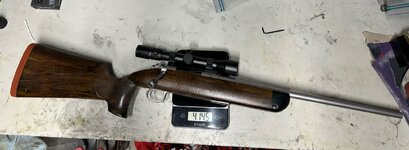
I degreased and loctited the Talleys, mounted up a SWFA ultralight 2.5-10x32, and still have an ounce and a half to spare.
BREAKCONTACT
FNG
- Joined
- Jul 15, 2024
- Messages
- 92
That's awesome, looking forward to hear how it does.Shootability? I’m all loaded up to go shoot a lot this weekend, so I’ll let you know. However, my previous stock build had a very similar grip, similar recoil pad height, and a negative comb (although with a funky curve) and I thought it was very easy to get behind.
I degreased and loctited the Talleys, mounted up a SWFA ultralight 2.5-10x32, and still have an ounce and a half to spare.
View attachment 747164
RepeatPete
Lil-Rokslider
- Joined
- Aug 13, 2023
- Messages
- 231
Magazine:
84M hunters come with a removable box magazine, but apparently the earlier ones had some problems. Mainly that it’s extremely hard to fit the third round into the magazine, and then with three rounds the magazine doesn’t latch into the stock when the bolt is closed because everything is too tight. Mine has both of those issues. The blind magazine version, present in Montana and Mountain ascent versions, can hold 4 rounds. So I ordered the blind magazine box, spring, and follower from Kimber.
The factory DBM is 2.6 ounces and the blind setup is 2.4 ounces. However, just the metal magazine box is 1.8 ounces. So, I decided to try and recreate it in carbon fiber.
I poured a mold off the inside of the metal magazine box with mold rubber. Then went on to wrap that mold in carbon, but the mold rubber compressed too much, and the interior dimensions ended up too tight.
Then I poured another interior mold with epoxy resin, wrapped it with CF using my electrical tape method, and the dimensions were much more accurate.
I am also working through some feeding issues, as I knew could be the case with a Kimber. I polished the feed ramp and softened the edges of the feed rails while also opening them up slightly, which seems to have helped a lot. Then I got a milled Remington 700 follower and spring, per some suggestions from 24 hour campfire. Still playing with what combinations work best.
Factory Metal Box Magazine
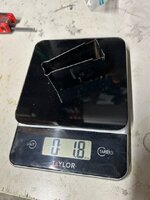
Carbon Fiber box magazine
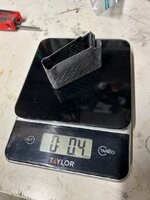
Factory polymer follower
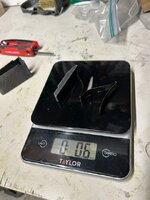
Remington 700 milled aluminum follower
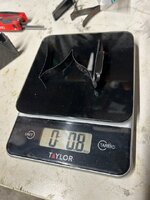
Currently I’m at 4 pounds, 14.5 ounces with the carbon box and the polymer follower, which seems to be the best feeding combination, though not perfect. Needs a bit more tinkering.
84M hunters come with a removable box magazine, but apparently the earlier ones had some problems. Mainly that it’s extremely hard to fit the third round into the magazine, and then with three rounds the magazine doesn’t latch into the stock when the bolt is closed because everything is too tight. Mine has both of those issues. The blind magazine version, present in Montana and Mountain ascent versions, can hold 4 rounds. So I ordered the blind magazine box, spring, and follower from Kimber.
The factory DBM is 2.6 ounces and the blind setup is 2.4 ounces. However, just the metal magazine box is 1.8 ounces. So, I decided to try and recreate it in carbon fiber.
I poured a mold off the inside of the metal magazine box with mold rubber. Then went on to wrap that mold in carbon, but the mold rubber compressed too much, and the interior dimensions ended up too tight.
Then I poured another interior mold with epoxy resin, wrapped it with CF using my electrical tape method, and the dimensions were much more accurate.
I am also working through some feeding issues, as I knew could be the case with a Kimber. I polished the feed ramp and softened the edges of the feed rails while also opening them up slightly, which seems to have helped a lot. Then I got a milled Remington 700 follower and spring, per some suggestions from 24 hour campfire. Still playing with what combinations work best.
Factory Metal Box Magazine

Carbon Fiber box magazine

Factory polymer follower

Remington 700 milled aluminum follower

Currently I’m at 4 pounds, 14.5 ounces with the carbon box and the polymer follower, which seems to be the best feeding combination, though not perfect. Needs a bit more tinkering.
- Joined
- Apr 29, 2023
- Messages
- 2,812
Very very well done sir! Absolutely amazing!
RepeatPete
Lil-Rokslider
- Joined
- Aug 13, 2023
- Messages
- 231
mthayr
WKR
- Joined
- Oct 16, 2018
- Messages
- 787
RepeatPete
Lil-Rokslider
- Joined
- Aug 13, 2023
- Messages
- 231
Well, at about round #95, I noticed a crack in the top of the thin section between the grip and the buttstock. The carbon that cracked was about 1/32” thick - I had sanded almost all the way through and there was essentially no material left. No worries, easy fix. Add more carbon, sand smooth making sure not to sand too much, and re-paint. I also added some Lucid skateboard grip to the grip and forend, and spread some E6000 on the inside of my ultralight sling for some traction.
Bare rifle is now 4 lbs, 14.6 oz, and ready to hunt, with a sling and 4 rounds of 143 ELDX: 5 lbs, 2.3 oz.
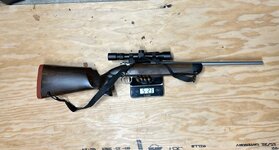
Bare rifle is now 4 lbs, 14.6 oz, and ready to hunt, with a sling and 4 rounds of 143 ELDX: 5 lbs, 2.3 oz.

RepeatPete
Lil-Rokslider
- Joined
- Aug 13, 2023
- Messages
- 231
When I started this project the goal was to build something lightweight, but also to not compromise in the name of ounces. I really liked the SWFA ultralight, but it did feel like a compromise. I liked the overall size, weight, and the floating center dot and thick outer posts of the reticle. However, in low light conditions the small objective was noticeable, and when pointed in the direction of a sunrise or sunset, the glass had a significant white haze to it. Also, I did not have any problems with the Talley’s, but I knew it wasn’t the most durable setup long term.
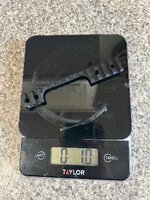
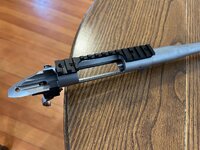
So, enter an SWFA 3-9 I got for a great price before the restock, and a Leupold backcountry picatinny rail. I cut out the center over the open action, and chopped off the front of the rail that hangs over the barrel, which brought it down to only 1 oz. A quick application of aluminum black made everything the same color again.
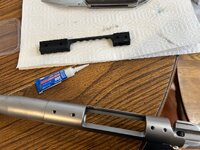
Then everything was degreased, the rail was bonded with Loctite 380 black max and the screws got blue loctite.
So, enter an SWFA 3-9 I got for a great price before the restock, and a Leupold backcountry picatinny rail. I cut out the center over the open action, and chopped off the front of the rail that hangs over the barrel, which brought it down to only 1 oz. A quick application of aluminum black made everything the same color again.

Then everything was degreased, the rail was bonded with Loctite 380 black max and the screws got blue loctite.


Magnumwill
FNG
- Joined
- May 15, 2025
- Messages
- 12
This is a really cool thread! I have been looking at trying to build a CF stock for a Mauser I have chambered in .284 Winchester. This might push me over the edge to get started on it!
@RepeatPete thanks for sharing your process here. Thanks to you and several other DIYers on here, I'm ready to start wrapping my CVA buttstock with carbon fiber. Looking through your first DIY thread, someone (I think @Gobber) recommended Soller Composites for carbon fiber materials.Absolutely! I’m putting this out there to encourage others to try it too. I’m no composites engineer, just going for it and seeing what happens.
Overall, the whole stock has at least two layers. I’m working from a box of super generously donated scraps, and I didn’t always take the time to look at what weight the fabric was - I just went by feel, thick vs. thin. From the forend back:
- The forend tip has two thinner layers, I think 3k each. This area shouldn’t see a whole of stress/impacts, and the thinner fabric contours over the tight radius better.
- Where the forend cap meets the straight portion of the forend, the layers overlap, giving strength to the front sling lanyard hole.
- The main section of the forend is two layers, one thick and one thin. I want to say one 3k and one 12k? Then the barrel channel is made up of two thick (12k?) layers. I think this is mainly what makes the forend so rigid.
- The action area of the stock has all the inletting structure covered earlier, and the same thick and thin layers as the forend on the outer skin of the stock. I was originally planning to put extra layers here, but didn’t feel it was necessary after the second layup.
- The grip-to-inletting area junction, down through the grip, and back through the wrist all have 3-4 layers of thinner (3k or maybe 6k) fabric. I used thinner carbon to wrap the contours better, and did extra layers at alternating fabric orientations because these areas have the smallest cross-sections, and need to be very stiff.
- The butt section has the same one thin and one thick layer as the forend. Towards the end of the butt there are some extra pieces of thin 3k fabric, but solely for the purpose of building up dimensions to match the recoil pad.
Overall, I’m very happy with the stiffness. Would I put the bare stock spanning between two logs and jump on it in the middle? Probably not. I think it’s more than adequate, but not ridiculously overbuilt, which achieves the strength and weight I was after.
What i wanted to ask you, based on the pic below, what would you suggest for material thickness and how many yards? I'm leaning towards 6k and getting 2 yards.
Thanks!
Attachments
RepeatPete
Lil-Rokslider
- Joined
- Aug 13, 2023
- Messages
- 231
I’d definitely defer to @Gobber here, as I’ve only done two so far and completely guessed on the thicknesses. But, I would suggest going with multiple layers of 3k. The thinner fabric will conform much better to those complex curves with simple methods (but if you have a full vacuum bag setup that should do 3k and 12k equally as well). I think there are areas in my ultralight Kimber where there are only 2 layers of 3k, but areas like the wrist have more. A good core with one or two layers of thin 3k carbon that was laid and conformed well is incredibly rigid. My learning curve is a bit slower, so around the complex curves in the wrist/grip area I can feel that the first few layers didn’t pull perfectly to the core or the previous layer, and another layer or two is required.
I would say for the first time only try do do one layer of carbon at a time, and you’ll learn how it pulls, bends, and dries pretty quickly. Then just add layers until you are happy with how rigid it feels.
And remember that if you are going for a good to perfect surface finish, you will definitely sand through some of the carbon, especially with the thinner stuff. But therin lies the beauty of carbon fiber - you can just add more!
Keep us updated and don’t hesitate if you have more questions!
Gobber
FNG
- Joined
- Aug 8, 2023
- Messages
- 51
Fully concur with RepeatPete comments above.
Hopefully you are planning on using a proper vacuum bagging set up. This can be done on the cheap with a salvaged fridge compressor like I use that has all the strength I have ever needed. The small investment in stretchalon type bagging material sealed with vacuum sealing tape pays for itself in the proper 'pull down' it produces. I typically reuse the bags I make numerous times. Soller carries the pink stuff that works really well. BTW- If you find a reliable composite supplier with better prices than Soller, please let me know. They might not have all the different bits that the big guys carry, but their prices are the best I've found on the basics.
As to CF fabric, order at least 50% more than you think you need. These projects are like Lays Potato Chips and CF fabric doesn't spoil
Specifically for this single project 6K is really good in that when applied at a 45 deg angle, it conforms well to curves of the grip and the weave doesn't separate too much. Two yards should be plenty, but since you are already paying shipping, might bump it up.
ProTip - When you cut CF, the edges have to be taped or it will fray all over the place. Tamiya 6mm Masking Tape it the best stuff I've found to hold the edges together while then being able to remove without grabbing the strands too much because after several minutes, the resin softens the tape's adhesive. It is just wide enough to cut down the middle and hold. The plastic shell applicator is perfect as well.
The approach I would recommend is to first get the core surface nice and smooth with a lightweight filler that is porous to take a good bond to the resin. My preferred filler is an epoxy dough from smooth-on called Free Form Air. Stuff is so easy to work with and has a shelf life of years. Once tried, I use it for all types of projects.
For the first CF application, recommend applying a few small pieces of CF fabric at a 45deg angle to the curved area of the grip. This will give you a feel for how to get the fabric to conform while building strength to a stress areas that needs extra thickness. First time applying, do a small patch or two, let cure over night and then sand smooth the next day to get a feel for how the fabric adheres.
ProTip - Toasty heat gives a full cure overnight. I finally picked up a hot resin curing pad and it work great to give a good rigid resin cure overnight. Otherwise, the resin will have set but still be a bit flexible and gum up your cutting & sanding surfaces. I simply put it beneath my piece and wrap a towel around it. It typically gets to about 110deg which is perfect for curing West System resin.
The above pic looks like it is a pretty strong structure, but you want a smooth contour of any protrusions like the cap area beneath the grip. If there is a screw that goes through the cap, I would put 4-5 layers of gorilla tape on it to act as a sacrificial stand off that the CF can encapsulate and then you can sand it off down to the tape and clean up the edge where it meets in the final layer.
Honestly, if this is your first shot at laying CF, I would recommend doing a small test. My first ever attempt was to simply wrap an 8in section of 1in x 1in green insulation foam to form a simple square tube. I did 2 layers of 6K and still have it. Light as a feather and incredibly rigid.
Once you do a few small applications of CF, you will get a feel for what it will do and what is will fight you on. Go small initially, sand smooth and layer it up as needed. Don't do a big ole section over complex cures and have the resin start to harden on you as you are wrestling with it. BTDT!
ProTip - Use the slowest hardener for the longest work time you can get. Much better to have the work time and not need it than the other way around.
Also have a plan on how you will finish the butt pad surface and how it will be mated to the CF.
Hopefully not to long of a ramble, but it is a really interesting process that can yield really cool results. Just takes a few iterations to get a feel. My philosophy is to first go for functional and ugly. Then proceed to pretty as you see how it works. Pretty takes a lot of extra effort that may or may not be worth your time. I think out of the various stock projects I've done, only one gets close to pretty because it's a CF & walnut hybrid. But each one has done what I wanted it to do and that's what works for me.
Fully concur with RepeatPete comments above.
Hopefully you are planning on using a proper vacuum bagging set up. This can be done on the cheap with a salvaged fridge compressor like I use that has all the strength I have ever needed. The small investment in stretchalon type bagging material sealed with vacuum sealing tape pays for itself in the proper 'pull down' it produces. I typically reuse the bags I make numerous times. Soller carries the pink stuff that works really well. BTW- If you find a reliable composite supplier with better prices than Soller, please let me know. They might not have all the different bits that the big guys carry, but their prices are the best I've found on the basics.
As to CF fabric, order at least 50% more than you think you need. These projects are like Lays Potato Chips and CF fabric doesn't spoil
Specifically for this single project 6K is really good in that when applied at a 45 deg angle, it conforms well to curves of the grip and the weave doesn't separate too much. Two yards should be plenty, but since you are already paying shipping, might bump it up.
ProTip - When you cut CF, the edges have to be taped or it will fray all over the place. Tamiya 6mm Masking Tape it the best stuff I've found to hold the edges together while then being able to remove without grabbing the strands too much because after several minutes, the resin softens the tape's adhesive. It is just wide enough to cut down the middle and hold. The plastic shell applicator is perfect as well.
The approach I would recommend is to first get the core surface nice and smooth with a lightweight filler that is porous to take a good bond to the resin. My preferred filler is an epoxy dough from smooth-on called Free Form Air. Stuff is so easy to work with and has a shelf life of years. Once tried, I use it for all types of projects.
For the first CF application, recommend applying a few small pieces of CF fabric at a 45deg angle to the curved area of the grip. This will give you a feel for how to get the fabric to conform while building strength to a stress areas that needs extra thickness. First time applying, do a small patch or two, let cure over night and then sand smooth the next day to get a feel for how the fabric adheres.
ProTip - Toasty heat gives a full cure overnight. I finally picked up a hot resin curing pad and it work great to give a good rigid resin cure overnight. Otherwise, the resin will have set but still be a bit flexible and gum up your cutting & sanding surfaces. I simply put it beneath my piece and wrap a towel around it. It typically gets to about 110deg which is perfect for curing West System resin.
The above pic looks like it is a pretty strong structure, but you want a smooth contour of any protrusions like the cap area beneath the grip. If there is a screw that goes through the cap, I would put 4-5 layers of gorilla tape on it to act as a sacrificial stand off that the CF can encapsulate and then you can sand it off down to the tape and clean up the edge where it meets in the final layer.
Honestly, if this is your first shot at laying CF, I would recommend doing a small test. My first ever attempt was to simply wrap an 8in section of 1in x 1in green insulation foam to form a simple square tube. I did 2 layers of 6K and still have it. Light as a feather and incredibly rigid.
Once you do a few small applications of CF, you will get a feel for what it will do and what is will fight you on. Go small initially, sand smooth and layer it up as needed. Don't do a big ole section over complex cures and have the resin start to harden on you as you are wrestling with it. BTDT!
ProTip - Use the slowest hardener for the longest work time you can get. Much better to have the work time and not need it than the other way around.
Also have a plan on how you will finish the butt pad surface and how it will be mated to the CF.
Hopefully not to long of a ramble, but it is a really interesting process that can yield really cool results. Just takes a few iterations to get a feel. My philosophy is to first go for functional and ugly. Then proceed to pretty as you see how it works. Pretty takes a lot of extra effort that may or may not be worth your time. I think out of the various stock projects I've done, only one gets close to pretty because it's a CF & walnut hybrid. But each one has done what I wanted it to do and that's what works for me.
Great stuff here Gobber thank you.
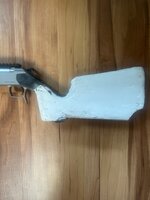
All the white on my buttstock is free form air. It has a carbon fiber arrow shaft in the comb so it’s really solid. I’ll add another skim coat layer and get it smoother than what it is.
Sent from my iPhone using Tapatalk
Gobber
FNG
- Joined
- Aug 8, 2023
- Messages
- 51
Here’s another tip on using epoxy dough to get a really nice surface. Mix up a small batch and apply it to the surface then wet your hand with water and work it like potters clay. It acts as a great surface lubricant that allows you to smooth it out just like a potter works the surface of their clay. The water has no effect on the epoxy dough as it cures and over a half hour or so as the dough begins to firm up, it gets much easier to smooth out the surface.
I use this technique to get a great grip area contour to my hand. Last grip I did had my finger print visible after it cured.

This allows the surface to be sanded to the exact contour of my hand at the angle I hold the rifle at. This is something I designed into my last walnut CF stock build that will allow me to easily grind off the cured dough area if I want to reshape the contour of the grip. It’s actually worked quite well as I added a dab of black resin dye into the white epoxy dough to make it gray. I initially coated it with bed liner paint which lasted a good 6 months before peeling at the edges. I will probably apply a thin layer of CF fabric at some point, but it works for my immediate purpose and there are other projects above it in the stack.
Fun stuff!

I use this technique to get a great grip area contour to my hand. Last grip I did had my finger print visible after it cured.

This allows the surface to be sanded to the exact contour of my hand at the angle I hold the rifle at. This is something I designed into my last walnut CF stock build that will allow me to easily grind off the cured dough area if I want to reshape the contour of the grip. It’s actually worked quite well as I added a dab of black resin dye into the white epoxy dough to make it gray. I initially coated it with bed liner paint which lasted a good 6 months before peeling at the edges. I will probably apply a thin layer of CF fabric at some point, but it works for my immediate purpose and there are other projects above it in the stack.
Fun stuff!

Fully concur with RepeatPete comments above.
Hopefully you are planning on using a proper vacuum bagging set up. This can be done on the cheap with a salvaged fridge compressor like I use that has all the strength I have ever needed. The small investment in stretchalon type bagging material sealed with vacuum sealing tape pays for itself in the proper 'pull down' it produces. I typically reuse the bags I make numerous times. Soller carries the pink stuff that works really well. BTW- If you find a reliable composite supplier with better prices than Soller, please let me know. They might not have all the different bits that the big guys carry, but their prices are the best I've found on the basics.
As to CF fabric, order at least 50% more than you think you need. These projects are like Lays Potato Chips and CF fabric doesn't spoil
Specifically for this single project 6K is really good in that when applied at a 45 deg angle, it conforms well to curves of the grip and the weave doesn't separate too much. Two yards should be plenty, but since you are already paying shipping, might bump it up.
ProTip - When you cut CF, the edges have to be taped or it will fray all over the place. Tamiya 6mm Masking Tape it the best stuff I've found to hold the edges together while then being able to remove without grabbing the strands too much because after several minutes, the resin softens the tape's adhesive. It is just wide enough to cut down the middle and hold. The plastic shell applicator is perfect as well.
The approach I would recommend is to first get the core surface nice and smooth with a lightweight filler that is porous to take a good bond to the resin. My preferred filler is an epoxy dough from smooth-on called Free Form Air. Stuff is so easy to work with and has a shelf life of years. Once tried, I use it for all types of projects.
For the first CF application, recommend applying a few small pieces of CF fabric at a 45deg angle to the curved area of the grip. This will give you a feel for how to get the fabric to conform while building strength to a stress areas that needs extra thickness. First time applying, do a small patch or two, let cure over night and then sand smooth the next day to get a feel for how the fabric adheres.
ProTip - Toasty heat gives a full cure overnight. I finally picked up a hot resin curing pad and it work great to give a good rigid resin cure overnight. Otherwise, the resin will have set but still be a bit flexible and gum up your cutting & sanding surfaces. I simply put it beneath my piece and wrap a towel around it. It typically gets to about 110deg which is perfect for curing West System resin.
The above pic looks like it is a pretty strong structure, but you want a smooth contour of any protrusions like the cap area beneath the grip. If there is a screw that goes through the cap, I would put 4-5 layers of gorilla tape on it to act as a sacrificial stand off that the CF can encapsulate and then you can sand it off down to the tape and clean up the edge where it meets in the final layer.
Honestly, if this is your first shot at laying CF, I would recommend doing a small test. My first ever attempt was to simply wrap an 8in section of 1in x 1in green insulation foam to form a simple square tube. I did 2 layers of 6K and still have it. Light as a feather and incredibly rigid.
Once you do a few small applications of CF, you will get a feel for what it will do and what is will fight you on. Go small initially, sand smooth and layer it up as needed. Don't do a big ole section over complex cures and have the resin start to harden on you as you are wrestling with it. BTDT!
ProTip - Use the slowest hardener for the longest work time you can get. Much better to have the work time and not need it than the other way around.
Also have a plan on how you will finish the butt pad surface and how it will be mated to the CF.
Hopefully not to long of a ramble, but it is a really interesting process that can yield really cool results. Just takes a few iterations to get a feel. My philosophy is to first go for functional and ugly. Then proceed to pretty as you see how it works. Pretty takes a lot of extra effort that may or may not be worth your time. I think out of the various stock projects I've done, only one gets close to pretty because it's a CF & walnut hybrid. But each one has done what I wanted it to do and that's what works for me.
I’m not familiar with the vacuum bags that you’re referencing, but do you think a guy could use those with a food vacuum sealer? I have a LEM unit that I use for meat.
Sent from my iPhone using Tapatalk
Gobber
FNG
- Joined
- Aug 8, 2023
- Messages
- 51
I took a look at a LEM food sealer and depending on the model you have, they state they can pull 21-25 inHg vacuum which is pretty good considering a full vacuum is 29.9 inHg.
With that as a vacuum source, the key would be using the pink vacuum bag material that Soller sells and seal it with proper vac bag sealant tape. Reason being that proper stretch type bagging plastic / film is amazing in that it will stretch 3-4x down into contours and not leak or rupture. Stuff is amazing and tough as nails.
The real trick is to shape the bag in a certain way. Leave it at least 3-4x wider than the item being bagged which gives you plenty of working room to move it about as the vacuum is pulled. The problem with using a food sealer is that the vacuum source needs to run continuously while the resin cures. You could make the bag to fit into the mouth of the food sealer, but I don't know if you can heat seal bagging type plastic. Most likely it would end up leaking off it's vacuum and allow the fabric to pull up from the form.
If your food sealer can run for several hours, you could taper the mouth of the bag to fit into the sealer's opening and then clamp it down to run for at least a few hours while the resin hardens up enough to stay in place. I've never investigated this method but google it to see if possible.
Better yet, check around to see if you can simply borrow a vacuum pump unit to use for a while.
Here is the el-cheapo unit I have used for the last several years from an old fridge pump.

Frame is made from scrap plywood, the gauge was maybe $10 on amazon, the piping joints were from Home Depot plumbing and the key to the unit is the small pin valve fixture that allows me to introduce a controlled leak to give me the exact vacuum I want. This thing will run overnight with no problem and I have actually imploded a UAV airframe main body by using just a bit too much vac
In the corner is the tape for CF fabric cutting. Secret is to find an OLD fridge and salvage the pump and power connection.
Here's a part just before pulling down the vacuum.

Here is how the vacuum film pulls down into every crevasse.

Once pulled down, it squeezed all the excess resin out through the peel ply and into the breather cloth. This is what gives you the ideal 50% CF / 50% resin combination that works so well.
With that as a vacuum source, the key would be using the pink vacuum bag material that Soller sells and seal it with proper vac bag sealant tape. Reason being that proper stretch type bagging plastic / film is amazing in that it will stretch 3-4x down into contours and not leak or rupture. Stuff is amazing and tough as nails.
The real trick is to shape the bag in a certain way. Leave it at least 3-4x wider than the item being bagged which gives you plenty of working room to move it about as the vacuum is pulled. The problem with using a food sealer is that the vacuum source needs to run continuously while the resin cures. You could make the bag to fit into the mouth of the food sealer, but I don't know if you can heat seal bagging type plastic. Most likely it would end up leaking off it's vacuum and allow the fabric to pull up from the form.
If your food sealer can run for several hours, you could taper the mouth of the bag to fit into the sealer's opening and then clamp it down to run for at least a few hours while the resin hardens up enough to stay in place. I've never investigated this method but google it to see if possible.
Better yet, check around to see if you can simply borrow a vacuum pump unit to use for a while.
Here is the el-cheapo unit I have used for the last several years from an old fridge pump.

Frame is made from scrap plywood, the gauge was maybe $10 on amazon, the piping joints were from Home Depot plumbing and the key to the unit is the small pin valve fixture that allows me to introduce a controlled leak to give me the exact vacuum I want. This thing will run overnight with no problem and I have actually imploded a UAV airframe main body by using just a bit too much vac
In the corner is the tape for CF fabric cutting. Secret is to find an OLD fridge and salvage the pump and power connection.
Here's a part just before pulling down the vacuum.

Here is how the vacuum film pulls down into every crevasse.

Once pulled down, it squeezed all the excess resin out through the peel ply and into the breather cloth. This is what gives you the ideal 50% CF / 50% resin combination that works so well.
Similar threads
- Replies
- 0
- Views
- 88
- Replies
- 22
- Views
- 3K
- Replies
- 0
- Views
- 416
Featured Video
Latest Articles
- Black Diamond Alpine Start Insulated Hoody Review
- Tenacity Firearms with Andrew Whitney
- The Thrill of Moose Hunting with Henry Ferguson
- Final Rise Upland Hand Muff Review
- Kodiak Deer Hunt Round II
- Killing a Timber Giant
- Titanium Suppressor Shootout
- Best Gear of 2025
- Swarovski AT Balance Review
- YETI Outdoor Kitchen Expansion

