- Joined
- Jul 29, 2020
- Messages
- 1,371
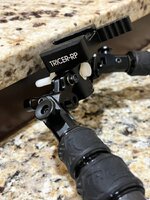
The Tricer RP seems great in every regard besides the fact that it pans 360° (and the owner seems hard to like)
So I disassembled the bipod, determined the center of the spherical ball and socket joint, then crossdrilled and bolted the joint. The bolt prevents panning, but allows the bipod to cant still.

Here are the instructions:
I am using nylon bolts.
Currently just have what was immediately available at the hardware store. Will cut to length.
Try to get hardware that will have no threads internal to the crossdrilled hole. This will help with a tight fit.

So I disassembled the bipod, determined the center of the spherical ball and socket joint, then crossdrilled and bolted the joint. The bolt prevents panning, but allows the bipod to cant still.
Here are the instructions:
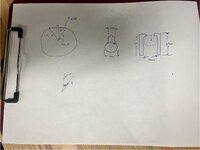
- Measure 21.35mm from the bottom of the center cylinder and make a mark. This is critical as this is the location of the center of the ball and socket. If you do not drill it centered, the bipod will not cant.

- Eyeball center on the cylinder itself and make a mark. The intersection of the two marks is where you will drill. See the two scribed lines in the pic below

- Centerpunch that location well. Your bit will wander if you don't
- Put your bipod onto your rifle and lock the legs in the position that looks straight. You are going to lock out panning, so get it where you like it.
- (Optional) remove the legs to make it easier to work on
- Fix it square below a drillpress. I had a vise and I set the bipod up on 1/2" nuts to hold the assembly square with the drill press bed. This ensured it was square in two planes. Eyeball at your own risk. Hand drill at your own risk. (I personally think I could have crossdrilled it by hand just fine, but I wanted as clean of a hole as possible to limit wiggle, so drillpress was preferred). See centerpunched location and setup below

- Drill it with a pilot bit. 1/8" or less. Use cutting oil. Aluminum is grabby

- Check if you have it drilled in the right location. Take the pilot bit you just used, and stick it into your new hole to check if it will hinge correctly. If it does, move to the next step. If it does not, then you did not drill the right location, and you should remeasure and drill the correct location
- Drill out with a finish size bit of choice. I used 5/16" on the first one

I am using nylon bolts.
Currently just have what was immediately available at the hardware store. Will cut to length.
Try to get hardware that will have no threads internal to the crossdrilled hole. This will help with a tight fit.