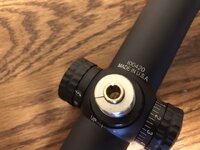
DIY Zero Stop for Nightforce SHV 3-10x42 and 4-14X56

ToolMann

WKR
Joined
Dec 8, 2020
Messages
680
Location
Parker, CO
After reading this I'm going to mess with mine again today. I've tried twice with 3D printed ones. They fit perfectly but it seems like the turret keeps spinning when sitting on top of the spacer. I'm afraid of putting weird torque on the internals. I'll raise it a few turns to make sure I'm getting the screw tight, but it is still clicking when I do it so assumed I was getting it tight already.
 
OP
C

cliffy109

FNG
Joined
Oct 20, 2022
Messages
33
After reading this I'm going to mess with mine again today. I've tried twice with 3D printed ones. They fit perfectly but it seems like the turret keeps spinning when sitting on top of the spacer. I'm afraid of putting weird torque on the internals. I'll raise it a few turns to make sure I'm getting the screw tight, but it is still clicking when I do it so assumed I was getting it tight already.
It keeps spinning when it contacts the printed ring? It shouldn't. My guess is that your printed ring is still too tall. Back it off and then see if the slotted screw on the top will tighten more. I went through that while fitting it.

I do need to paint this and then add a drop of hot glue. The ring is loose on the turret.
 
OP
C

cliffy109

FNG
Joined
Oct 20, 2022
Messages
33
In the title it states the 2-10 and 4-14, and I only noticed the 2-10, and I agree on the 4-14, I didn’t even know that was in the conversation, but it makes your reply I quoted make more sense 👍
3-10... not 2-10. The SHV is a 3-10X42 and has the same turret arrangement as the 4-14X56.
 

ToolMann

WKR
Joined
Dec 8, 2020
Messages
680
Location
Parker, CO
I'm guess
I'm guessing by "Go on" you want some more info :) I screwed the turret out two full revolutions, removed it, installed my 3D printed zero-stop ring, screwed the turret back on and was able to get it to stop about 4 MOA below zero. Works for me. I then cut my notch in the ring so I could see the vertical line at zero, went back through the install process. What I noticed now that I had a view port of sorts was that the ring begins to spin at about 1 MOA below zero. I think a dab of hot glue or a strip of electrical tap on the back side of the ring to snug it up will do the trick. Hitting the range on Saturday so I'll play with it.

I also printed some yardage strips to try using instead of the MOA marks but I just don't like how they turned out. The black print on white background shows up the most but it isn't a waterproof paper. I then made some on clear transparency "film" with black background and white numbers, but the black just isn't dark enough (printer thing) for the white numbers to really pop. Trying to find something better without paying $50 bucks to have one made.
 

fwafwow

WKR
Joined
Apr 8, 2018
Messages
5,513
I'm guess

I'm guessing by "Go on" you want some more info :) I screwed the turret out two full revolutions, removed it, installed my 3D printed zero-stop ring, screwed the turret back on and was able to get it to stop about 4 MOA below zero. Works for me. I then cut my notch in the ring so I could see the vertical line at zero, went back through the install process. What I noticed now that I had a view port of sorts was that the ring begins to spin at about 1 MOA below zero. I think a dab of hot glue or a strip of electrical tap on the back side of the ring to snug it up will do the trick. Hitting the range on Saturday so I'll play with it.

I also printed some yardage strips to try using instead of the MOA marks but I just don't like how they turned out. The black print on white background shows up the most but it isn't a waterproof paper. I then made some on clear transparency "film" with black background and white numbers, but the black just isn't dark enough (printer thing) for the white numbers to really pop. Trying to find something better without paying $50 bucks to have one made.
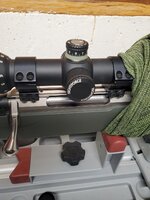
Exactly - and please keep us posted. Thanks for the detail!
 

ToolMann

WKR
Joined
Dec 8, 2020
Messages
680
Location
Parker, CO
No problem. Will probably cancel the range day due to it being mud hole after last night's snow, but hopefully soon.
 

JCMCUBIC

WKR
Joined
Nov 22, 2020
Messages
457
May or may not help anyone, but the following is what I do with the 3D printed sand to fit I use:

1. Zero scope and remove/reset turrets to "0".
2. Cover a small, flat block of wood with sandpaper. Sand the "stop" evenly until I can slip the edge of the stop between the turret and base of turret.
3. Remove elevation turret and verify fit. No need to add the screw.
4. Dremel a window notch.
5. Slip the stop on and install elevation turret.

It takes about 5 minutes. The stop isn't a hard stop and I like it to be able to travel a little below 0. It's just something to keep me from getting lost in revolutions. The stop can move a bit but rarely does on it's own, usually only if I screw down past 0. If it does I can move the window back.
 

JFK

WKR
Joined
Sep 13, 2016
Messages
823
May or may not help anyone, but the following is what I do with the 3D printed sand to fit I use:

1. Zero scope and remove/reset turrets to "0".
2. Cover a small, flat block of wood with sandpaper. Sand the "stop" evenly until I can slip the edge of the stop between the turret and base of turret.
3. Remove elevation turret and verify fit. No need to add the screw.
4. Dremel a window notch.
5. Slip the stop on and install elevation turret.

It takes about 5 minutes. The stop isn't a hard stop and I like it to be able to travel a little below 0. It's just something to keep me from getting lost in revolutions. The stop can move a bit but rarely does on it's own, usually only if I screw down past 0. If it does I can move the window back.

Where are you getting the 3D printed part? I took measurements and contacted a local
shop that does 3D printing to see if they’d make a few up and they said they require a CAD drawing…whole thing just seemed like more than I wanted to do given that the lack of zero stop hasn’t been an issue so far. Is there a shop that’s produced them that has a saved CAD drawing?
 

ToolMann

WKR
Joined
Dec 8, 2020
Messages
680
Location
Parker, CO
Where are you getting the 3D printed part? I took measurements and contacted a local
shop that does 3D printing to see if they’d make a few up and they said they require a CAD drawing…whole thing just seemed like more than I wanted to do given that the lack of zero stop hasn’t been an issue so far. Is there a shop that’s produced them that has a saved CAD drawing?
Check you local libraries if you live in an urban area. Our neighboring city does free 3D printing at the library. You draw the file in free software. If you have the SHV 3-10 ID be happy to send you my file.
 
OP
C

cliffy109

FNG
Joined
Oct 20, 2022
Messages
33
So I got to try this out in my first ever long range match. Keep in mind, I'm not a match shooter and not even a long range shooter. I just shot the match in anticipation of taking a class. Not kidding.

Anyway... the zero stop was awesome. On the clock, there were two times when I completely lost track of how many turns I was into the elevation. I just cranked it back down and started over. I knew the thing stops about 2 MOA below my real zero so I just cranked until it stopped and moved back to zero and began again. It worked really well. Kinda proud of this modification.
 

JCMCUBIC

WKR
Joined
Nov 22, 2020
Messages
457
Where are you getting the 3D printed part? I took measurements and contacted a local
shop that does 3D printing to see if they’d make a few up and they said they require a CAD drawing…whole thing just seemed like more than I wanted to do given that the lack of zero stop hasn’t been an issue so far. Is there a shop that’s produced them that has a saved CAD drawing?

Sorry, I just saw this. A friend printed them for me. I gave them one I'd previously purchased from a guy who used to make them....I can't remember his name or contact info. Any rate, my friend did several trial/error attempts until a good one was produced.
 
OP
C

cliffy109

FNG
Joined
Oct 20, 2022
Messages
33
So I just changed out my rings to the Zee Signature rings and put in a 20 MOA offset. I removed the ring and re-zeroed the rifle. After that, I had to remove more metal from the ring but now it is back and ready to go. I used this opportunity to smooth up the edges and it now fits more snug and is a more positive stop. I also painted the ring and just the thickness of the paint was enough to keep it from floating freely on the turret.

At this point, that ring is very thin but it does exactly what I needed it to do. It stops me from turning past my 100 yard zero.
 
Joined
Jan 6, 2020
Messages
1,798
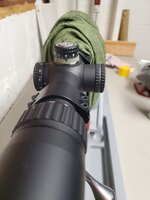
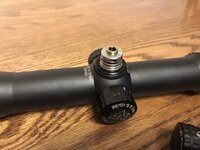
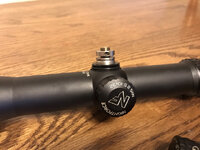
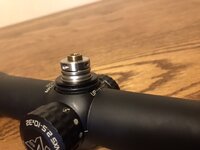
Hey I know this is an older thread , But I recently purchased a nightforce nxs 2.5-10x32 it is supposed to have zero stop but when I took the turret cap off this is what it has. Could this possibly be a earlier version of a zero stop? Has anyone seen anything like this on older nightforce scopes
 

Attachments

  • 8AFDC152-A064-4327-898F-2014EFB46337.jpeg
    8AFDC152-A064-4327-898F-2014EFB46337.jpeg
    89.8 KB · Views: 50
  • 6C667918-AA12-4039-92C9-FC4DAD722497.jpeg
    6C667918-AA12-4039-92C9-FC4DAD722497.jpeg
    108.6 KB · Views: 51
  • 7EDF812C-95F9-4A3A-AA19-22C3A499E357.jpeg
    7EDF812C-95F9-4A3A-AA19-22C3A499E357.jpeg
    57.4 KB · Views: 48
  • 9C8F0934-DEA4-491D-92BA-911669A0E016.jpeg
    9C8F0934-DEA4-491D-92BA-911669A0E016.jpeg
    74.8 KB · Views: 49
OP
C

cliffy109

FNG
Joined
Oct 20, 2022
Messages
33
Hey I know this is an older thread , But I recently purchased a nightforce nxs 2.5-10x32 it is supposed to have zero stop but when I took the turret cap off this is what it has. Could this possibly be a earlier version of a zero stop? Has anyone seen anything like this on older nightforce scopes
That's a head scratcher. That looks like nothing I can find on a Nightforce zero stop. You might want to call NF on this.
 
Top