Over the last couple years my wife and I have been learning to can and preserve, as well as experimenting with recipes. We've made a couple batches of bone broth using game bones, and it's turned out awesome and is great to have on the shelf. I figured I'd post my recipe and a couple of the things I've learned along the way if anybody was interested in trying it themselves. This recipe is for a 30QT stock pot nearly full with liquid at the start, and yields about 21 pints cooked down. Perfect for a full load in a 23QT pressure canner.

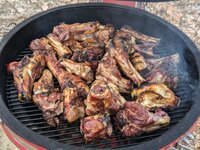
Then I like to cut them into more manageable chunks and to get the marrow exposed. Skill saw worked great, cutting them frozen before going on the grill might be the better route. I had to improvise in this situation as plan A with a sawzall failed miserably.

Then get everything in the pot, and cook for 12 hours. Some recipes say don't add vegetables until the last hour or two, but I throw them in and let them cook down too, I think it makes a heartier base. I also have seen advice to barely simmer at low heat, but I have had no noticeable issue with bringing it to a boil initially, and then backing down just below a rolling simmer. I cover it and check it quite often and micro adjust the temperature because I did it outside in the elements.

This is the important part with game bones, the removal of the tallow. If you only plan to use it as a soup or roast base, you probably won't notice it, but if you intend on drinking it, you absolutely will. It will leave a waxy film coating on the inside of your mouth, and you probably won't like it. SO, after the entire batch is done, strain it extremely well through strainers with cheesecloth, and get it in the fridge (we strain into big bowls, wash the stock pot, and return the liquid to it before refrigerating). The tallow will solidify on top and as long as you get all of that out, and pick all the little bits and pieces as well, you'll have a quality end result.

Once all the tallow is removed, I bring it to a rolling boil again, and then off the burner and straight into the kitchen to load into hot jars, and into the pressure canner.

And you should end up with liquid gold! This recipe has yielded my best results, it's so good we usually just use store bought stuff for cooking and save this to drink on cold mornings or if we don't feel good. I think you could go longer on the cook time, but I've read into it a little bit and it doesn't seem like there's much truth to the result being drastically more nutrient dense than the shorter cook time. I like to make batches on a weekend during the winter, so the timing works pretty well this way.
So if you've ever wondered if you could use the bones for anything before tossing them, give this a shot!
- 4 complete elk legs, cut into ~6" or less pcs (frozen cuts easiest)
- 2 cups chopped white/yellow onion
- 2 cups chopped carrot
- 1 cup chopped celery
- 1/3 cup dried basil
- 1/3 cup dried or minced garlic
- 1/3 cup dried or chopped parsley
- 5 bay leaves
- 2 tbsp Johnny's seasoning salt
- 2 tbsp Beef bouillon salt
- Splash of apple cider vinegar
Then I like to cut them into more manageable chunks and to get the marrow exposed. Skill saw worked great, cutting them frozen before going on the grill might be the better route. I had to improvise in this situation as plan A with a sawzall failed miserably.
Then get everything in the pot, and cook for 12 hours. Some recipes say don't add vegetables until the last hour or two, but I throw them in and let them cook down too, I think it makes a heartier base. I also have seen advice to barely simmer at low heat, but I have had no noticeable issue with bringing it to a boil initially, and then backing down just below a rolling simmer. I cover it and check it quite often and micro adjust the temperature because I did it outside in the elements.
This is the important part with game bones, the removal of the tallow. If you only plan to use it as a soup or roast base, you probably won't notice it, but if you intend on drinking it, you absolutely will. It will leave a waxy film coating on the inside of your mouth, and you probably won't like it. SO, after the entire batch is done, strain it extremely well through strainers with cheesecloth, and get it in the fridge (we strain into big bowls, wash the stock pot, and return the liquid to it before refrigerating). The tallow will solidify on top and as long as you get all of that out, and pick all the little bits and pieces as well, you'll have a quality end result.
Once all the tallow is removed, I bring it to a rolling boil again, and then off the burner and straight into the kitchen to load into hot jars, and into the pressure canner.
And you should end up with liquid gold! This recipe has yielded my best results, it's so good we usually just use store bought stuff for cooking and save this to drink on cold mornings or if we don't feel good. I think you could go longer on the cook time, but I've read into it a little bit and it doesn't seem like there's much truth to the result being drastically more nutrient dense than the shorter cook time. I like to make batches on a weekend during the winter, so the timing works pretty well this way.
So if you've ever wondered if you could use the bones for anything before tossing them, give this a shot!
")