I have not begun reloading yet. I’m waiting to find a good deal on a press, lost an ebay auction on Big Boss II the other day. I have, however, gone ahead and built a workbench to:
I think I can still make a handy system though. I am planning to build a DIY modular tool plate system to swap tools/stations out quickly and or move the press and other tools aside.
I’d like to spell out my plan here and see if y'all have any thoughts on my questions below:
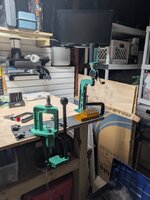
The Bench:


Don't worry a thorough cleaning to the garage has happened since building. Looks way cleaner now.
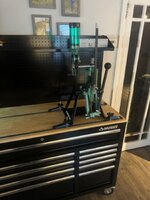
My plan is to attach a 12” W x 6”D x ¼”H steel backing plate on the bottom side of the table top in front of the front legs
I will bed this plate to the underside of the table top using JB Weld. It will usually be held up with the plate mounting bolts as well, but bonding it to the table should ensure it does not fall off when swapping out tool plates

I realize it will be frustrating to have to remove both plates if I want to pull just the press off the bench, but I think that will be what gets moved the least.
I’m also going to drill out holes and install T-nuts in the same pattern as the steel plates on the underside of the bench along the back right side of the bench so I can store unused plates / stations out of the way.
Some notes about how I plan to case prep and reload:
- Have a better space to do general handy work on bikes, household items etc.; and
- Get into reloading.
I think I can still make a handy system though. I am planning to build a DIY modular tool plate system to swap tools/stations out quickly and or move the press and other tools aside.
I’d like to spell out my plan here and see if y'all have any thoughts on my questions below:
- Does this seem feasible?
- Are there any glaring holes?
- I’m right handed, should I have the press on the left with the accessory tool plate on the right, or visa versa?
- I plan on putting this setup on the right side of the bench
- I started out thinking the press needed to be in the corner, but thinking about my movement from putting powder in a case to seating a bullet, I’m thinking it might make sense to fill cartridges on the right and move to the press on the left?
- Are there any reasons a press should be mounted on a corner vs mid bench?
- Any good ideas to add on to this?
The Bench:
- It’s 60” W x 36” D x 40.5ish” H
- Table top
- Material - ¾” maple plywood
- It sticks out 6.5” in front of the front legs.
- Rail – ½” of that 6.5” is a rail that I put on just to prevent splinters and look nicer
Don't worry a thorough cleaning to the garage has happened since building. Looks way cleaner now.
My plan is to attach a 12” W x 6”D x ¼”H steel backing plate on the bottom side of the table top in front of the front legs
- It will be aligned with the front right corner of the table top inside of the 0.5” “decorative rail
- I will drill and tap 8x 3/8-16 holes into the plate
- The 4 corner holes will be located 1” inward from each side at each corner
- The 4 other holes will be located 1” in from each depth edge and 5” from each width edge like pictured

I will bed this plate to the underside of the table top using JB Weld. It will usually be held up with the plate mounting bolts as well, but bonding it to the table should ensure it does not fall off when swapping out tool plates
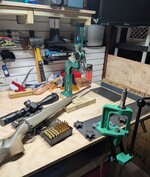
Tool Plates: All tool plates will be mounted to the bench using hand tightening star knob bolts that pass through the table top and thread directly into the tapped bottom plate on the underside- Press Tool Plate –
- I’m going to drill out the same size ¼” steel plate as the bottom plate for mounting the press.
- I’ll also drill and tap holes for the press specific mounting bolts. So, the press will mount directly to this top steel plate
- The top steel will be held down by star knobs that go through the corners of it, the bench top and then screw directly into the bottom backing steel plate
- I think I need it to be a bit bigger than 6”x 6” for added support. So, if I make it the same 12” x 6” size, I can mount the Non-Press tool plates directly over the top of unused side of this plate
- Non Press Tool plates: I’m going to cut my remaining maple plywood into 6” x 6” squares that I’ll mount tools to. I have a few specific plates I’m considering right now
- Lee bench top primer
- Powder thrower on mount
- Drop directly onto pan sitting on a digital scale (I’ll chisel out an indention for the scale)
- Possibly make it hangover a few inches to side to rest reloading block on it as well
- Trimmer – to save money getting started I’m going to start using the lee cutter lock stud and case length gauge on a drill, but Imay add later
- Setup A: 1 Press and 1 6” x 6” accessory plates
- Setup B: Side by Side 6” x 6” accessory plates
- Setup C: Side by Side Presses (additional press would mount directly into the steel top plate as well
I realize it will be frustrating to have to remove both plates if I want to pull just the press off the bench, but I think that will be what gets moved the least.
I’m also going to drill out holes and install T-nuts in the same pattern as the steel plates on the underside of the bench along the back right side of the bench so I can store unused plates / stations out of the way.
Some notes about how I plan to case prep and reload:
- Reloading for:
- 22-250 heavies for sure (1:8 twist barrel)
- 6.5 Grendel maybe
- 6.5 Creedmoor maybe
- 100-200 rounds a month
- Purpose:
- Load heavies for 22-250 and improve my shooting
- Be able to shoot / load 6 GT when it’s time to rebarrel, or I build a custom gun
- Single Stage Press
- Decap
- FL Size
- Seating
- Prime on bench with lee bench primer
- Case Prep
- Triming - Lee case length gauge and cutter
- Start out by mounting on hand drill
- Chamfer/Debur with hand tool
- Eventually Get Burstfire 2 & 1 Annealer / Case Prep and put lee cutter/case length gauge on it
- Annealing
- Start out on Drill
- Eventually switch to burstfire
- Triming - Lee case length gauge and cutter
- Powder handling
- Thrower mounted over pan on digital scale
- Charge cases over reloading block
- Eventually upgrade to Chargemaster dispenser/scale or similar
- I'll probably never buy anything other than a press that costs over $300. As much as I would love a 3 in 1 trimmer I just can't do it.
 .
.