Navigation
Install the app
How to install the app on iOS
Follow along with the video below to see how to install our site as a web app on your home screen.
Note: This feature may not be available in some browsers.
More options
Style variation
You are using an out of date browser. It may not display this or other websites correctly.
You should upgrade or use an alternative browser.
You should upgrade or use an alternative browser.
Ultra light skeleton hunting knife Recommendations?
- Thread starter Glendine
- Start date
AK Troutbum
WKR
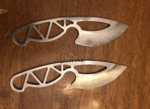
I couldn’t find exactly what I wanted in an ultralight skinner that was a “full sized” knife, so I made my own!
View attachment 157872
Looks great! I like the Ulu blade style. I take a Ulu on all my moose hunts and find them superb for skinning bigger game.
Sent from my iPhone using Tapatalk
Glock 81?Hi Guys,
Can you please recommend me a ultra light skeleton hunting knife for use on deer.
I have looked at Kestrel but I do not like the scabbards - due to the fact the cannot be belt attached.
Are there any other manufactures you could recommend??.
thanking you in advance for your time.
Regards,
Glendine.
TradLife406
WKR
Tyto
Sent from my SM-G975U using Tapatalk
Sent from my SM-G975U using Tapatalk
BradArnett
WKR
I used a kestrel skeletonized ovis hunter and mountain caper last season on 4 whitetail and really liked them both.
Gettincloser
WKR
- Joined
- Apr 2, 2020
- Messages
- 355
Just out of curiosity, what is the point in these skeletonized knives that you have to wrap 550 paranoid or other "stuff" ar
Ound them to make them comfortable?
Why not just get a light knife with comfortable scales on them that are still reasonable. I could be wrong but by the time you wrap the additional cordage on it, are you not close to 2 or 3 or so ounces in the end?
I have not tried anything other than the blue handled scalpel and learned that replaceable blades were not for me. I just suppose I missed the idea of shaving 1 or 2 ounces just to add some back on it and spend another $100... (that said, I also do not hike much more than 3 or so miles and on a dedicated hiking trip not more than 18 miles...)
Just out of curiosity, what is the point in these skeletonized knives that you have to wrap 550 paranoid or other "stuff" ar
Ound them to make them comfortable?
Why not just get a light knife with comfortable scales on them that are still reasonable. I could be wrong but by the time you wrap the additional cordage on it, are you not close to 2 or 3 or so ounces in the end?
Iron Will K1 Ultralight Knife:
- Knife weight: 1.0 oz
- Knife and Kydex sheath: 1.28 oz
- Knife, sheath, and paracord wrap: 1.5 oz
Gettincloser
WKR
- Joined
- Apr 2, 2020
- Messages
- 355
Iron Will K1 Ultralight Knife:
I'm workiing on CNC machined G10 handle skins that can be added instead of the paracord. It will add about 0.6 oz and should be available this summer.
- Knife weight: 1.0 oz
- Knife and Kydex sheath: 1.28 oz
- Knife, sheath, and paracord wrap: 1.5 oz
Thanks for the insight. I have never used one and have never weighed the paracord that would have been wrapped around the handle.
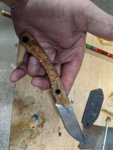
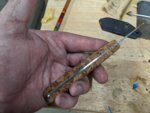
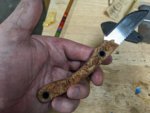
That's pretty cool. Where'd you get cork that thick?In one of these ultralight knife threads I mentioned the possibility of using cork. I had some time today so I made one up from one one of @Bill V 's K1s. I weighed the knife with Paracord and on my scale came up with 1.8oz, I have 1.5oz now and a full handle.
View attachment 173978View attachment 173979View attachment 173980
chippewawarrior
WKR
I'd love to try that! Could you provide a quick tutorial and a supply source? That is so awesome!In one of these ultralight knife threads I mentioned the possibility of using cork. I had some time today so I made one up from one one of @Bill V 's K1s. I weighed the knife with Paracord and on my scale came up with 1.8oz, I have 1.5oz now and a full handle.
View attachment 173978
View attachment 173979
View attachment 173980
sndmn11
"DADDY"
Tutorial later today.
Billy Goat
“MOMMY”
I have never used this on fly rods, but thought I'd try it for this application. It does "toughen" the cork a little so far. My test knife is doing well. I also thought it would be a potential solution to "won't blood make it gross?". https://customflygrips.com/en/adhesives-and-finish/307-u-40-cork-seal.html
Tutorial later today.
Does this seal it enough so it won't be holding water against the tang?
- Banned
- #95
I bought a Baladeo 22 gram frame lock folder. 4" blade, 40$, under an ounce, but really only capable of food prep, opening packages, and maybe cleaning a trout. The grind and lock design dont lend themselves to carving or other "bushcraft " tasks very well, and the thin handle wouldn't be very comfy for long term use, but for the average backpacker it is a viable option for a megalight cutting tool.
sndmn11
"DADDY"
I epoxied the scales to the knife, and cork is waterproof.Does this seal it enough so it won't be holding water against the tang?
Billy Goat
“MOMMY”
I epoxied the scales to the knife, and cork is waterproof.
Sounds like it should do it.
sndmn11
"DADDY"
I'd love to try that! Could you provide a quick tutorial and a supply source? That is so awesome!
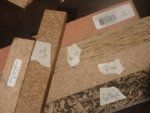
I have some other blanks and will do a full build a long when I get those made up. The pieces on bottom are 1.5" x 1.5" x 12" blocks, the two on top are .5" x 1.5" x 12" strips. The heavier strip is rubberized cork. All are from the above link.
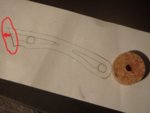
There are a two things that will make this exponentially easier if you take care of them at the start: 1) Two mechanical locks, in this case the pins. The "pins" I used are a CX Heritage 350 shaft which is 5/16" O.D. The pin towards the blade won't let the scales move in any direction, and the pin in back is surrounded on three side mainly so the scales wont spin. This matters a little bit for use, but makes a huge difference in glue up. Drawing below. 2) Shape the front face of the scales before glue up (circled in red). If you glue upand then try to contour this face, you are going to likely screw up the blade, but more importantly, you will be working on each side independently and will be pretty certain of not being symmetrical.
Two ways to do this, and three in this case.
1) You can work with a full width block, like the 1.5" x 1.5" above, shape the front face of the bolster area, drill your pin holes, and then rip in half on a table saw. This requires a table saw, and it is really important that the blade spins true and the fence is plumb. If it is wonky, then the scales will be of kilter just a little but it can be fixed later.
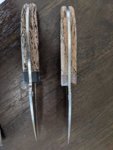
2) You can work with scales to begin with either by ripping your block to start with, or buying slabs like the .5" x 1.5" above. You need some thin double sided carpet tape, and stick the two scales together. I then drill my pin holes and put my pins in unglued and leave them about 1/4" long. The tape hold things together, and the pins are insurance. I leave them long because later the thickness of the blade will be there and it makes it easy to pull them in and out. Below I I have two bolsters , for two different knives, I am making. The brown one is from a solid block of micarta, the other is from two pieces of solid carbon fiber that are stuck together with the carpet tape. You can see the tape if you are unsure what I mean, and I have some micarta pins for these bolsters.
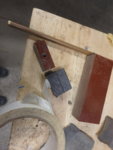

The third option in the case of the Iron Will knife and potentially others is to get rings like shown two pictures above. The width of the ring is well wider than the skinny handle of the knife and it would work. You would just get some all thread, washers, and nuts, stack, glue, and compress the rings, and then you would have a cylinder just like a rod grip. You could rip it down the middle and sand flat to get rid of the center hole and you would have an oval contour already started. I thought about this, but didn't want to use my cool rings.
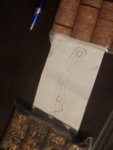
Once you have the front face final shaped, and your pin holes drilled, I like to cut the outline as close to the handle shape as I dare. This makes it so that once glued up, there is not much stock to remove and you don't have to risk getting the knife blade whacked in saw blade or beat up on the sander. For this knife, I traced the outline on the cork and then sanded on an oscillating belt sander to the outside edge of my tracing. This left me only the thickness of my pen line of material to remove later. If the scaled or block were wood, I would use a band saw, and then possible sand.
I sanded down my pins so that they are just slightly shorter than the thickness of the scales plus knife. I do not want them sticking past because when clamping they would get in the way of pressure on the scales. I prep all my surfaces by cleaning with denatured alcohol, I used a dremel engraving tip to scratch up the sides of the knife handle, and I roughed up my pins well.
One thing that needed to be solved in this instance because the knife is skeletonized is to provide support in the hollow, but particularly the front hollow. Since the blade cover of the K1 partially covers the front hollow means that one has to choose to cut the blade cover back so the scales can fully cover, or leave the cover as is and know there is a space between the two scales that is not enclosed. I tried cutting some pieces of various synthetics to match the shape of the front hollow, but that failed. I remembered that the Gorilla brand version of JB weld is pretty thick and waterproof, so I decided to use that.
On glue up I lay a scale with show side down, rub glue in the pin holes, glue on the pins, glue on the scale, put pins in scale, and then the blade. In this instanced I filled the hollows with epoxy. On the other scale I put glue in the holes and glue on the knife side, then set over the pins and on the knife.
DO NOT COMPRESS FIRMLY. If you compress and then uncompress, you will squeeze out glue and then end up with voids. Compression must be linear, you cannot compress to level 5 then relax to level 2.
I start to clean off any squeezed epoxy. In this instance, areas of interest to me were the hollow of the shaft cleaned with a qtip, the serrations on the spine cleaned with a toothpick initially when still liquid and later with a needle when more like wax. I also used a toothpick to clean flush the glue in the front hollow. This left me with solid epoxy wall in between the scales that filled the void in the front hollow is was worried about. You can c clamp, preferably with a board on each side so the pressure is dispersed. I just took my my fly vice pedestal and set it on top.
I then used the oscillating belt sander to sand flush to the steel handle, you can sand the steel, it is fine. In tight spots I use a spindle, the only place needed on the K1 was the finger grove and the 1/2" spindle worked well.
So at this point I had 1/2" thick scales on each side, ~90 degrees/ no contour, but the handle shape from the sides is flush and essentially final. What I do then is bravely (since it is cork) knock down the corners all the way around at as close to a 45deg angle as possible using the round end of the belt sander or the spindle. The wider the round the better as you can easily take out a big deep gouge with the thin spindles. One finished, if I look at the butt end or look down the tip, I basically have an octagon. I then sand the flat sides to get whatever thickness i want, and whatever taper using the flat of the belt sander. The pins protect the scales from rapid loss.
Then I do everything else by hand from 120 down to 6000. I find that if I just cup the sand paper in my hand nd move the handle around in it somewhat randomly, things end up contoured smoothly and pretty darned well.
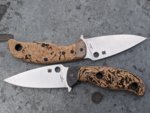
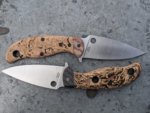
This was a bit of an experiment. I had made a cork handle on a Spyderco Mule over the winter to see if it would work, and the experimental part of this was seeing how the arrow shaft pins would work out, and how cork would work on a skeleton knife as far as if the void would be weak and if the weight would be similar. So, I used the worst piece of cork I had. This cork looks cool with the big chunks giving a granulated irregular look, but it also makes it susceptible to flaking or chipping out. You can see below that a crater on sanding chipped out, and also around the pin it didn't drill out well....another reason why I chose the thicker epoxy. Compared to the first cork handle I made over the winter, is smooth and solid. Any of the "burl" cork at the link above will be smooth and solid like on the right. The U40 cork seal filled in most of the crater, and the black epoxy filled the gap around the pin.
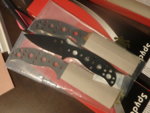
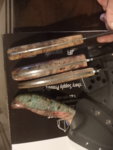
For reference, the red/green knives are full size handles.
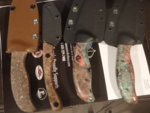
I was laid off earlier this month, so I can surely do this for anyone who doesn't want to do it themselves. I have some more Spyderco mules on the way and think I can get those to be around 3oz without the sheath. The sheaths I have right now are 2oz on their own, but am sure they can be lightened. Like I said before, I will do a true build a long when making those up.
Last edited:
chippewawarrior
WKR
I had no idea. This ^^^ is awesome! Sorry to derail the thread, but I think it’s worth it to learn some fine craftsmanship.
sndmn11
"DADDY"
Similar threads
- Replies
- 4
- Views
- 767
Featured Video
Latest Articles
- TT#64 Josh Boyd Elk Hunting Strategies for Every Season
- Aaron Davidson of Gunwerks
- TT#63 Dirk Durham’s Art of Elk Calling
- BIG Buck Stories with the Dirty Giants Podcast
- TT#62 Brian Barney Hunting Bulls without Calling
- Hoyt Alpha AX-2 SD Review
- Kuiu Kenai vs Outdoor Vitals Vario Hooded Jacket Review
- Hoyt RX-9 Ultra Review
- Hunting Vampire Bucks & Building an Optics Kit
- Darton Sequel ST2 35 Review

