As the popularity of limb driven rests continues to increase, Hamskea would like to make sure dealers and customers are able to get the best performance out of their limb driven arrow rest. One of the key components of this is identifying the correct location to attach the actuation cord on their limb. Here is a brief description of how we recommend identifying the best attachment point for each individual bow model as well as the reasoning behind our method.
Before we get into the actual set up of a Hamskea Limb Driven Rest, we would first like to clarify the difference between Cable Fall-Away, Limb Driven, and Cable Driven. Cable Fall-Away is a method where the actuation cord is slack when the bow is at brace with the internal spring is holding the launcher in the down position. The down cable will apply tension to the cord through the draw cycle lifting the launcher to the full upright position. When the bow is shot, the internal spring of the rest will pull the launcher back to the down position. Limb Driven and Cable Driven arrow rests operate by having tension on the actuation cord when the bow is at brace with tension being released as the bow is drawn. As the tension is released from the actuation cord the internal spring tension of a Limb Driven or Cable Driven rest will raise the launcher to the up position. When the bow is shot, tension will be applied to the actuation cord and will pull the launcher to the down position. The main difference between setup with the Limb Driven vs Cable Driven rests is where the actuation cord is attached. Limb Driven rests will have the actuation cord attached directly to the limb, Cable Driven rests will have the cord attached on the up cable or yolk splitter.
A major benefit to using a rest in Limb Driven mode is having the ability to adjust the amount of time the launcher is in the up position. Limb flex varies as you move down the length of the limb with the most flex being experienced at the limb tip and no flex being experienced at the limb pocket. Since a Limb Driven rest relies on limb travel for actuation, we can use the varied amount of flex to adjust the timing of the rest. The closer the actuation cord is attached to the limb tip, the sooner the rest will reach the up position and the longer it will stay in that position. As we move the actuation cord away from the limb tip, the launcher will come up later in the draw cycle and be in the up position for a shorter time. If the cord is attached to the yolk splitter, all this adjustment ability is lost.
When choosing the best location on the limb to mount the actuation cord, you will want to choose a location that allows the launcher to guide the arrow for 50-70% of the shot cycle or power stroke. If the percentage guidance is less than 50%, then the arrow might lose support before it reaches a speed that it is able to guide itself. If the percentage of guidance is greater than 70%, there will be a greater chance of fletching contact as well as added shock being introduced to the rest at the shot. The specific bow and settings can have a drastic effect on where the best mounting location will be located on the limb due to the varying amount of limb flex. An example of bows with higher limb flex is the Mathews VXR, V3, and V3X. On these bows, we don’t recommend utilizing the Hamskea Limb Cord Attachment because the launcher guidance will be well above 70%. This has been known to cause fletching contact and a loud slapping noise due to the excessive shock being transferred on the rest. These bows benefit from having the activation cord attached about 2-3” from the limb tip. For Mathews with less limb flex, such as the TRX series, the Hamskea Limb Cord Attachment Bracket is still a great choice.
You can easily determine the optimal location range for the actuation cord attachment by utilizing a draw board.
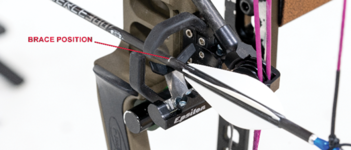
1. With the bow in a draw board, nock an arrow and place it on the rest launcher with no tension on the actuation cord. Mark the arrow where it contacts the launcher at the brace position.

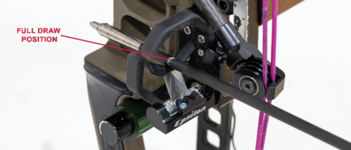
2. Use the draw board to bring the bow to full draw and mark the arrow where it contacts the rest launcher at full draw. The distance between these two points is called the power stroke. On a pictured Mathews V3, we measured a power stroke of 22”.

3. You will want the launcher to be in the up position for 50-70% of the power stroke to provide proper guidance. Using the same arrow, add marks for the 50% and 70% guidance locations. With the sampled V3 mentioned in step #2, the 50% mark will be 11” from the full draw mark and the 70% mark will be 15.4” from the full draw mark. You will want the launcher to hit the up position between these two marks to get the best performance out of your limb driven rest.

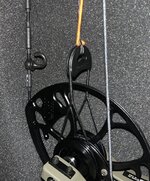
4. Once you have the acceptable 50-70% marks on your arrow, attach the actuation cord to the limb without the limb pad and draw the bow until the arrow hits the up position. You will want the launcher to hit the up position between these two marks to get the best performance out of your limb driven rest. If the launcher hits the up position before reaching the 70% mark, you will need to move the cord further from the limb tip. If the launcher hits the up position after the 50% mark, you will need to move the actuation cord towards the limb tip. Repeat this step until your arrow has the proper guidance. I tend to favor the 50% area with 285fps or higher bows and the 70% area with bow
5. Once you have found the optimal mounting location, apply the knobby limp pad, and reinstall the actuation cord for the final time.
Before we get into the actual set up of a Hamskea Limb Driven Rest, we would first like to clarify the difference between Cable Fall-Away, Limb Driven, and Cable Driven. Cable Fall-Away is a method where the actuation cord is slack when the bow is at brace with the internal spring is holding the launcher in the down position. The down cable will apply tension to the cord through the draw cycle lifting the launcher to the full upright position. When the bow is shot, the internal spring of the rest will pull the launcher back to the down position. Limb Driven and Cable Driven arrow rests operate by having tension on the actuation cord when the bow is at brace with tension being released as the bow is drawn. As the tension is released from the actuation cord the internal spring tension of a Limb Driven or Cable Driven rest will raise the launcher to the up position. When the bow is shot, tension will be applied to the actuation cord and will pull the launcher to the down position. The main difference between setup with the Limb Driven vs Cable Driven rests is where the actuation cord is attached. Limb Driven rests will have the actuation cord attached directly to the limb, Cable Driven rests will have the cord attached on the up cable or yolk splitter.
A major benefit to using a rest in Limb Driven mode is having the ability to adjust the amount of time the launcher is in the up position. Limb flex varies as you move down the length of the limb with the most flex being experienced at the limb tip and no flex being experienced at the limb pocket. Since a Limb Driven rest relies on limb travel for actuation, we can use the varied amount of flex to adjust the timing of the rest. The closer the actuation cord is attached to the limb tip, the sooner the rest will reach the up position and the longer it will stay in that position. As we move the actuation cord away from the limb tip, the launcher will come up later in the draw cycle and be in the up position for a shorter time. If the cord is attached to the yolk splitter, all this adjustment ability is lost.
When choosing the best location on the limb to mount the actuation cord, you will want to choose a location that allows the launcher to guide the arrow for 50-70% of the shot cycle or power stroke. If the percentage guidance is less than 50%, then the arrow might lose support before it reaches a speed that it is able to guide itself. If the percentage of guidance is greater than 70%, there will be a greater chance of fletching contact as well as added shock being introduced to the rest at the shot. The specific bow and settings can have a drastic effect on where the best mounting location will be located on the limb due to the varying amount of limb flex. An example of bows with higher limb flex is the Mathews VXR, V3, and V3X. On these bows, we don’t recommend utilizing the Hamskea Limb Cord Attachment because the launcher guidance will be well above 70%. This has been known to cause fletching contact and a loud slapping noise due to the excessive shock being transferred on the rest. These bows benefit from having the activation cord attached about 2-3” from the limb tip. For Mathews with less limb flex, such as the TRX series, the Hamskea Limb Cord Attachment Bracket is still a great choice.
You can easily determine the optimal location range for the actuation cord attachment by utilizing a draw board.
1. With the bow in a draw board, nock an arrow and place it on the rest launcher with no tension on the actuation cord. Mark the arrow where it contacts the launcher at the brace position.

2. Use the draw board to bring the bow to full draw and mark the arrow where it contacts the rest launcher at full draw. The distance between these two points is called the power stroke. On a pictured Mathews V3, we measured a power stroke of 22”.

3. You will want the launcher to be in the up position for 50-70% of the power stroke to provide proper guidance. Using the same arrow, add marks for the 50% and 70% guidance locations. With the sampled V3 mentioned in step #2, the 50% mark will be 11” from the full draw mark and the 70% mark will be 15.4” from the full draw mark. You will want the launcher to hit the up position between these two marks to get the best performance out of your limb driven rest.

4. Once you have the acceptable 50-70% marks on your arrow, attach the actuation cord to the limb without the limb pad and draw the bow until the arrow hits the up position. You will want the launcher to hit the up position between these two marks to get the best performance out of your limb driven rest. If the launcher hits the up position before reaching the 70% mark, you will need to move the cord further from the limb tip. If the launcher hits the up position after the 50% mark, you will need to move the actuation cord towards the limb tip. Repeat this step until your arrow has the proper guidance. I tend to favor the 50% area with 285fps or higher bows and the 70% area with bow
5. Once you have found the optimal mounting location, apply the knobby limp pad, and reinstall the actuation cord for the final time.


