Nickofthewoods
WKR
The Poor Man's Hot Tent
I had originally posted this as a response to another member's post but I decided it needed it's own thread and writeup. This is my homemade hot tent that I created several years ago after deciding that I would not be purchasing any of the very expensive setups that were available at the time. Whether this writeup encourages or (more likely) discourages you from making your own, I hope it's at least an interesting read.
Materials:
Alps Mountaineering Lynx 4
Baby Eagle Stove from Riley Stoves
Stove Jack from Bearpaw Designs, size small
Miscellaneous Stove Pipe Sections and Elbows
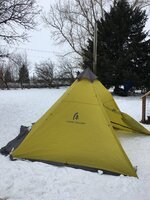
I already had the Alps Tent so I tried to find the cheapest stove which at least at the time was the Baby Eagle Backpacker Stove from Riley Stoves. It's galvanized metal so I made sure to do a few "cleansing burns" to remove the zinc coating before actual use in an enclosed space.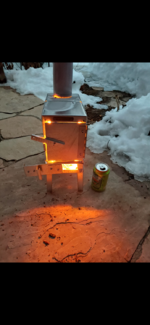
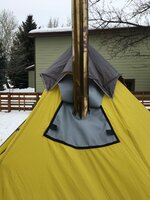
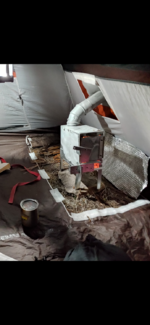
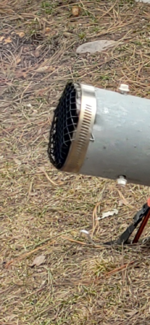
I set up the tent and used a silver sharpie to make lines and write instructions on what and where to cut, then took it to a local sewing alterations shop and described the project. The ladies working there instantly tried to talk me out of it and thought that I was certain to become a burn victim. They even made me sign a special liability waiver before taking on the project. All said and done they exceeded my expectations and did a wonderful job! I could have saved money here if I knew how to sew but I do not possess those skills unfortunately. I was charged about $90.00 dollars for the alterations and I think they gave me a break because they didn't think it would work. There are flaps that either roll up or fold down so that I can still use the tent without the stove setup, and they even made me a little rain cover that velcroes over the top of the stove jack which I didn't even ask them to do so that was nice. Once I had the tent ready I had to grab a few more stove pipe sections from the hardware store to make the pipe assembly. I used a hose clamp and some fence wire to make a spark arrestor. When in use, the weight of the stove pipe will rest on the stove jack ok, but I prop it up with a forked stick or my bipod to add stability.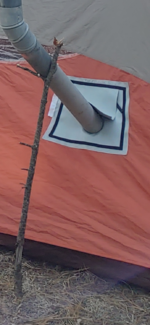
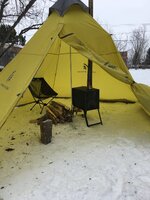
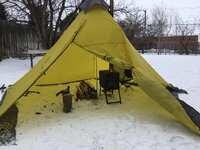
The stove legs will sit on most surfaces just fine but if the ground is soft I'll put a nice flat rock under it. Wood for the stove can be easily stored in a pile behind the stove or in one of the vestibules. Once lit, the tent will get up to about 80 degrees in 3 minutes or so, but doesn't rise much more than that which is good or it would become a sauna. I pop the top flaps of the tent fly to help ventilate which may not be necessary since smoke really isn't an issue. The stove is really only meant to be used in the morning when getting ready, and in the evening before bed. I don't leave it burning while sleeping for safety reasons, and being so small it usually burns out in 30 minutes anyway. Another safety feature is bringing wire ties to attach to the screws on the stove pipe sections. This is to prevent the stove pipes from separating from the stove or other stove pipe sections if accidentally bumped. Great caution must be taken not to hit or bump the stove, and for this reason no dogs are allowed. It's great for 2 people max, but is best for just 1 with hunting gear. I bring this on llama pack trips, cold weather river trips, and have used it as my primary shelter while truck camping as well. It fits one cot very nicely if I can bring one. It's too heavy and bulky for me to want to backpack with. The tent is about 8 lbs and the stove/pipe assembly is another 8 lbs or so. Maybe split up between 2 people it wouldn't be terrible but that's still too heavy and awkward for me.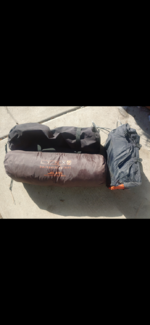
It's probably been used for 30 + nights since I've had it now and nothing has melted or burned even in breezy conditions. I won't use in extreme wind though. Those that see it definitely think I'm some kind of mad camping scientist or that I'm cooking meth in there.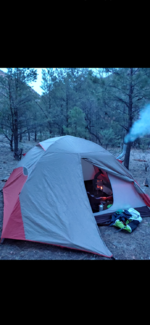
Final Thoughts
Now before you set out to build your own poor man hot tent consider these warnings.
-It's not the safest contraption
-Dogs (and probably kids) are a big no no
-It still isn't that cheap. It cost me about $350 all said and done which was about $100 more than my original budgetary goal for this project.
-People may think you're homeless or making drugs
It was still a fun project and it is nice when its 12 degrees outside and I'm putting on my boots and making coffee in a t-shirt before I head out into the Elk Woods for the day. Researching this project may even be why I joined Rokslide in the first place. Happy hot tenting!
I had originally posted this as a response to another member's post but I decided it needed it's own thread and writeup. This is my homemade hot tent that I created several years ago after deciding that I would not be purchasing any of the very expensive setups that were available at the time. Whether this writeup encourages or (more likely) discourages you from making your own, I hope it's at least an interesting read.
Materials:
Alps Mountaineering Lynx 4
Baby Eagle Stove from Riley Stoves
Stove Jack from Bearpaw Designs, size small
Miscellaneous Stove Pipe Sections and Elbows
I already had the Alps Tent so I tried to find the cheapest stove which at least at the time was the Baby Eagle Backpacker Stove from Riley Stoves. It's galvanized metal so I made sure to do a few "cleansing burns" to remove the zinc coating before actual use in an enclosed space.

I set up the tent and used a silver sharpie to make lines and write instructions on what and where to cut, then took it to a local sewing alterations shop and described the project. The ladies working there instantly tried to talk me out of it and thought that I was certain to become a burn victim. They even made me sign a special liability waiver before taking on the project. All said and done they exceeded my expectations and did a wonderful job! I could have saved money here if I knew how to sew but I do not possess those skills unfortunately. I was charged about $90.00 dollars for the alterations and I think they gave me a break because they didn't think it would work. There are flaps that either roll up or fold down so that I can still use the tent without the stove setup, and they even made me a little rain cover that velcroes over the top of the stove jack which I didn't even ask them to do so that was nice. Once I had the tent ready I had to grab a few more stove pipe sections from the hardware store to make the pipe assembly. I used a hose clamp and some fence wire to make a spark arrestor. When in use, the weight of the stove pipe will rest on the stove jack ok, but I prop it up with a forked stick or my bipod to add stability.

The stove legs will sit on most surfaces just fine but if the ground is soft I'll put a nice flat rock under it. Wood for the stove can be easily stored in a pile behind the stove or in one of the vestibules. Once lit, the tent will get up to about 80 degrees in 3 minutes or so, but doesn't rise much more than that which is good or it would become a sauna. I pop the top flaps of the tent fly to help ventilate which may not be necessary since smoke really isn't an issue. The stove is really only meant to be used in the morning when getting ready, and in the evening before bed. I don't leave it burning while sleeping for safety reasons, and being so small it usually burns out in 30 minutes anyway. Another safety feature is bringing wire ties to attach to the screws on the stove pipe sections. This is to prevent the stove pipes from separating from the stove or other stove pipe sections if accidentally bumped. Great caution must be taken not to hit or bump the stove, and for this reason no dogs are allowed. It's great for 2 people max, but is best for just 1 with hunting gear. I bring this on llama pack trips, cold weather river trips, and have used it as my primary shelter while truck camping as well. It fits one cot very nicely if I can bring one. It's too heavy and bulky for me to want to backpack with. The tent is about 8 lbs and the stove/pipe assembly is another 8 lbs or so. Maybe split up between 2 people it wouldn't be terrible but that's still too heavy and awkward for me.

It's probably been used for 30 + nights since I've had it now and nothing has melted or burned even in breezy conditions. I won't use in extreme wind though. Those that see it definitely think I'm some kind of mad camping scientist or that I'm cooking meth in there.


Final Thoughts
Now before you set out to build your own poor man hot tent consider these warnings.
-It's not the safest contraption
-Dogs (and probably kids) are a big no no
-It still isn't that cheap. It cost me about $350 all said and done which was about $100 more than my original budgetary goal for this project.
-People may think you're homeless or making drugs
It was still a fun project and it is nice when its 12 degrees outside and I'm putting on my boots and making coffee in a t-shirt before I head out into the Elk Woods for the day. Researching this project may even be why I joined Rokslide in the first place. Happy hot tenting!

