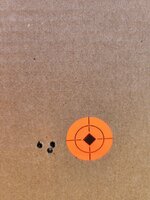
The scope evals have been a really eye opening experience for me, and I happen to have a scope in my possession that I haven't seen drop tested yet (Revic Accura. With that in mind I set about setting up a proofing rifle both for testing my own equipment and being able to give back a little. After reading as much of the info already posted as possible, I purchased a SWFA 10x Gen 2 (MOA Quad), Nightforce rings, a Nightforce pic rail and got to work.
The rifle is a Remington 700 action that has had the receiver face, bolt lug recesses, and bolt lugs trued. It wears a Criterion Heavy Sporter 24” Remage Barrel in 223 Remington that has been a little picky for bullet selection, but it will shoot 60 grain vmax bullets reasonably well. The rifle is in an MC3 Tradition sporter style stock (Comes with pillars), and has had the recoil lug spot bedded. Barrel channel has been opened up to fit the proverbial cat. Triggertech special set to 1.75#s. More on the rifle later. Barrel has had at least 600 rounds through it. I also had 300 Starline 5.56 cases that needed fireformed, so I loaded them up over a fairly mild charge of varget. Basically equivalent to mid power factory ammo.
I followed form's scope mounting process to a T as best as I understand it. Everything was thoroughly degreased including all contact surfaces between the action, rail, rings, and scope. I have done a few scope/rail mounting sessions since I did this one and can’t remember if I bonded the rail on this rifle with Loctite 380, but I torqued the rail down with I think 20 in/lbs. Rings were torqued to the rail at 60 in/lbs, ring cap screws at 22 in/lbs. Actions screws were also degreased and torqued to 60 in/lbs. Every screw had nail polish applied to the threads and then to the head to seal it, and then I put witness marks on everything including the action screws, recoil lug to action, barrel nut to barrel, muzzle thread cap, the scope where it met the rings, the rings where they met the rail, and there is an outline around the rail on the action. Basically anything I thought could ever move has some sort of witness mark.
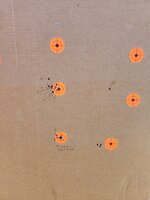
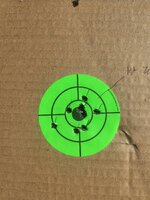
The scope was already pretty close to zeroed, so I clicked a minute up to keep from obliterating my aiming point and fired the 30 round group seen below. 5 rounds at a time as that’s what the internal box magazine holds and let the rifle cool a little while I worked on some other rifles, more for mirage than anything. I used a front rest I made a few years ago with a protector leather front rest bag secured to a flat plate welded on a car jack secured to a 12x12x2 paving stone. Rear rest was a protector leather bunny ear bag. Group was right around 1.5”, but in all honesty some of the shots around the edges were not my best work. Not excusing anything or calling “Flyers”, but this group is probably a better indicator of my ability to shoot 30 rounds with a lower magnification scope than I’m used to than a great test of the equipment. I used 3” target stickers, probably would have been better off with 1 ½”.
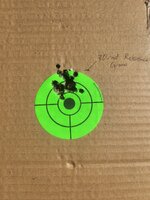
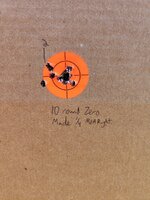
After the 30 round group I dialed the scope down one minute and ¼ minute right, and fired 2 more 5 round groups at a fresh dot to confirm zero (below).
Everything looked good so I went to the drop test. The place I was shooting doesn’t have any “soft” ground (it’s an old cinder pit), so I did the test in the softest part of it I could find. I put down two layers of harbor freight anti fatigue floor mat (So total just under an inch of foam probably) seen here: https://www.harborfreight.com/4-piece-anti-fatigue-foam-mat-set-94635.html
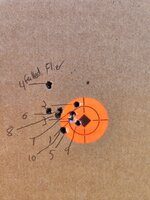
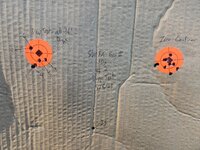
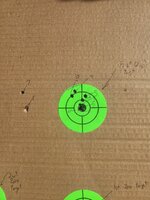
Then I laid a canvas shooting mat over that. 18” drops no problem, single drops from 36” Everything was going great until I got to the 3x 36” drop on the left side of the scope. Impacted 4” to the left and an inch high of the aiming point (Marked #7 below), well outside the cone of fire. I shifted to another target and fired again to confirm, impact was 3.5” left of the aiming point (I drew this impact on the original dot, labeled #8). I decided to move on and see what happened, made no adjustment to the scope, dropped 3x from 36” on the top of the scope and fired shot #9. Moved back towards center but slightly high and left of the previous cone. Dropped the scope 3x from 36” on the right side of the scope, shot impacted in basically the same place again (#10).
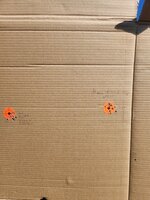
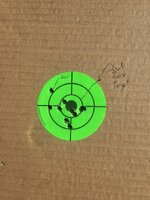
I checked all the witness marks and couldn’t detect anything that shifted or any other damage. Scratched my head a little, had a bite to eat, and put up a couple more target spots. Fired one round that impacted in the same place as the previous two (labeled "Zero" below), so I adjusted the scope ½ minute down and ½ minute right and fired the next 9 (See below).
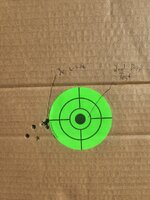
Called this re-zero good, and dropped the rifle 3x from 36” on the left side. Fired one round (Furthest left in the group below but slightly less than the last time). Fired 4 more to confirm, definitely outside the cone of fire. No shifts on any of the witness marks, no damage to anything I could see.
So I’m left wondering what’s going on and thought I would ask the group for opinions. I can think of 3 things it might be:
The rifle is a Remington 700 action that has had the receiver face, bolt lug recesses, and bolt lugs trued. It wears a Criterion Heavy Sporter 24” Remage Barrel in 223 Remington that has been a little picky for bullet selection, but it will shoot 60 grain vmax bullets reasonably well. The rifle is in an MC3 Tradition sporter style stock (Comes with pillars), and has had the recoil lug spot bedded. Barrel channel has been opened up to fit the proverbial cat. Triggertech special set to 1.75#s. More on the rifle later. Barrel has had at least 600 rounds through it. I also had 300 Starline 5.56 cases that needed fireformed, so I loaded them up over a fairly mild charge of varget. Basically equivalent to mid power factory ammo.
I followed form's scope mounting process to a T as best as I understand it. Everything was thoroughly degreased including all contact surfaces between the action, rail, rings, and scope. I have done a few scope/rail mounting sessions since I did this one and can’t remember if I bonded the rail on this rifle with Loctite 380, but I torqued the rail down with I think 20 in/lbs. Rings were torqued to the rail at 60 in/lbs, ring cap screws at 22 in/lbs. Actions screws were also degreased and torqued to 60 in/lbs. Every screw had nail polish applied to the threads and then to the head to seal it, and then I put witness marks on everything including the action screws, recoil lug to action, barrel nut to barrel, muzzle thread cap, the scope where it met the rings, the rings where they met the rail, and there is an outline around the rail on the action. Basically anything I thought could ever move has some sort of witness mark.
The scope was already pretty close to zeroed, so I clicked a minute up to keep from obliterating my aiming point and fired the 30 round group seen below. 5 rounds at a time as that’s what the internal box magazine holds and let the rifle cool a little while I worked on some other rifles, more for mirage than anything. I used a front rest I made a few years ago with a protector leather front rest bag secured to a flat plate welded on a car jack secured to a 12x12x2 paving stone. Rear rest was a protector leather bunny ear bag. Group was right around 1.5”, but in all honesty some of the shots around the edges were not my best work. Not excusing anything or calling “Flyers”, but this group is probably a better indicator of my ability to shoot 30 rounds with a lower magnification scope than I’m used to than a great test of the equipment. I used 3” target stickers, probably would have been better off with 1 ½”.

After the 30 round group I dialed the scope down one minute and ¼ minute right, and fired 2 more 5 round groups at a fresh dot to confirm zero (below).

Everything looked good so I went to the drop test. The place I was shooting doesn’t have any “soft” ground (it’s an old cinder pit), so I did the test in the softest part of it I could find. I put down two layers of harbor freight anti fatigue floor mat (So total just under an inch of foam probably) seen here: https://www.harborfreight.com/4-piece-anti-fatigue-foam-mat-set-94635.html
Then I laid a canvas shooting mat over that. 18” drops no problem, single drops from 36” Everything was going great until I got to the 3x 36” drop on the left side of the scope. Impacted 4” to the left and an inch high of the aiming point (Marked #7 below), well outside the cone of fire. I shifted to another target and fired again to confirm, impact was 3.5” left of the aiming point (I drew this impact on the original dot, labeled #8). I decided to move on and see what happened, made no adjustment to the scope, dropped 3x from 36” on the top of the scope and fired shot #9. Moved back towards center but slightly high and left of the previous cone. Dropped the scope 3x from 36” on the right side of the scope, shot impacted in basically the same place again (#10).

I checked all the witness marks and couldn’t detect anything that shifted or any other damage. Scratched my head a little, had a bite to eat, and put up a couple more target spots. Fired one round that impacted in the same place as the previous two (labeled "Zero" below), so I adjusted the scope ½ minute down and ½ minute right and fired the next 9 (See below).

Called this re-zero good, and dropped the rifle 3x from 36” on the left side. Fired one round (Furthest left in the group below but slightly less than the last time). Fired 4 more to confirm, definitely outside the cone of fire. No shifts on any of the witness marks, no damage to anything I could see.

So I’m left wondering what’s going on and thought I would ask the group for opinions. I can think of 3 things it might be:
- This is the first SWFA fixed power I’ve heard of that didn’t pass a drop test (I think this is probably unlikely);
- Something shifted in the rifle that I can’t detect from a visual inspection. I think I will tear everything apart watching as I go for something that shifted. I can’t remember two things that might be important, the first being if I bonded the rail to the action on this build. The second thing I can’t remember is the torque value I used on this barrel nut when I mounted it a few years ago. I used to follow the manufacturers suggestion of around 35 ft/lbs until I had one shoot loose and started cranking them down to 60-65 ft/lbs. I seem to remember Form suggesting upwards of 80-100 ft/lbs on one of the shoot to hunt podcasts.
- Perhaps with the hard ground there isn't enough padding to be fair to the system? Basically 1" of medium-hardish foam with a double layered canvas shooting mat over it.

