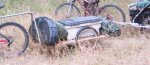
Homemade Meat/Camp Hauling Bicycle Trailer (No Welding Required)
Hopefully you all can see the pics okay as they're taken with my cell phone. It is snowing here above 2,500 ft so it looks like the bicycle trailer will be hanging in the garage until next year. I will probably be able to get out next weekend for a little muzzleloader action so I will probably be getting down the pulk at this point. Anyway, this trailer has a base of scrap 1/2" plywood, frame of ventilated angled metal from Home Depot, 1" thin walled stainless steel pipe for the trailer tongue (I got free and used because much lighter than conduit), eyebolts for gear and tote tie downs, U-bolts to attach stainless steel tubing to trailer base/bed, completely water tight tote from Cabelas, and hitch made from old snowmobile belts and tempered steel bolts. I used angled steel instead of aluminum for the frame because there was some concern that with rough roads the steel washers/bolts attaching the wheel to the trailer frame might wear at the softer aluminum decreasing durability...I am not sure if this concern was well founded however. I built the trailer about 7 years ago and I don't see where the washers/bolts securing the wheels have moved and rubbed on the steel frame anyway. An aluminum frame would be lighter, especially if using something lighter than plywood for the trailer bed.
Key trailer features in my opinion:
1) Wheels set 60% of the way back from the front of the trailer to allow for 10% tongue wt when loaded evenly.
2) Easy rolling super strong high spoke count aluminum wheels which I ended up buying new from bike shop for $25/each and by far the most expensive part of the trailer. I was told at the bike shop if I remember right that each wheel had something like 300-600 lbs capacity.
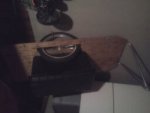
3) Waterproof lockable container lid that sheds snow and rain, and doesn't leak into the container when opened.
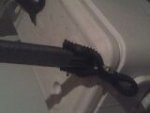
4) Thick walled steel pipe inserts placed into the first few inches of the stainless steel tubing for the hitch so there is no way that the tubing can be crushed when hitch bolts are tightened down. Oh, that's right, the stainless steel pipes of the tongue are secured together with duct tape.
5) Snowmobile belt hitch loop snug but still loose enough that it can be quickly placed on any bicycle with a quick release seatpost in just seconds. Also, belt is double layered giving the hitch some form but still flexible enough to give a smooth ride when pulling the trailer over bumps and allow one to easily lay the bicycle down on either side while trailer is attached.
6) Plywood bed is 28" wide x 60 " long allowing it to fit between brush growing onto the road outside the old tire tracks, but allows the wheels to be wide enough to straddle tire ruts. Size also allows 1 full military duffle bag to be secured behind container/tote and two infront of container.
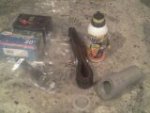
7) Hitch built to accomodate a 26" rear mountain bike wheel. After I built the trailer I moved to a 29er mountain bike so I had to make an adjustment by fashioning plastic pipes as seen with the repair kit below, that slide onto my seatpost below the hitch effectively raising it a few inches. This works great especially since the trailer was slightly lower in the front on my 26" mountain bike and is very close to level on the 29er.
8) With heavy loads plan for this flexible hitch like this to be pulled down some by the weight. Also, if using rim seated brake pads, have over 50% pad left when you take off on your hunting trip, if you plan on going downhill for more than a few miles on your way out with 150 lbs or more on the trailer. It is easy to bring some extra brake pads. I haven't carried out a heavy load with my newer bike with disc brakes, so I have no idea how long they would last in this situation...but in general riding for me they seem to wear far more slowly.
")