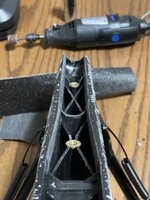
Just FYI: Take a deepwell socket from your tool box. (See picture below.) Wrap 60grit sandpaper around it. Sand out the barrel channel. It'll get your sides as uniform as possible.
Free-handing it with a dremel will work, but your lines will be wavy. This may or may not matter to you.
Just FYI: Take a deepwell socket from your tool box. (See picture below.) Wrap 60grit sandpaper around it. Sand out the barrel channel. It'll get your sides as uniform as possible.
Free-handing it with a dremel will work, but your lines will be wavy. This may or may not matter to you.
This is exactly what I did for the main barrel channel. It worked awesome and having numerous size sockets to choose from was ideal. I tried using a deep socket on the angled area near the shank, but couldn’t get it to work like I wanted so I resorted to the dremel in that area only, which I cleaned up using sandpaper on a popsicle stick.
Just FYI: Take a deepwell socket from your tool box. (See picture below.) Wrap 60grit sandpaper around it. Sand out the barrel channel. It'll get your sides as uniform as possible.
Free-handing it with a dremel will work, but your lines will be wavy. This may or may not matter to you.
Same as Harvey. Take your time. You don't have to have the dremel wide open. As long as you you very lite pressure it won't take out too much material. If you try to take too much at one time, it will gum up the bit because instead of removing material, your removing and melting it. Practice on a piece of 2x4 just lightly moving back and forth and you can't mess up as long as you have the stopping line like i mentioned.
You could be completely correct. I just figured that since I have everything apart right now and not sighted in (don't even have a scope mounted), it would be a good time to do this type of mod just in case it helps the accuracy. I can't think of any downside other than potentially making my stock a bit uglier if I screw something up.
Doing the main barrel channel was easy. I took a deep socket and wrapped sandpaper around it and moved it up and down the main barrel channel. It took me a couple tries to find the right size deep socket, but it was simple. No chance of screwing up the stock. Looks fantastic. The reason I created this post is because I'm not sure how to best do this in the barrel shank area where the barrel is angled. It sounds like most just use a dremel and go slow and careful.
I don’t remember, sorry. I just remember that I started small and worked my way up until I got the clearance I was looking for. I then used a dremel on the barrel shank area. I taped my lines and went slow. It was easier than I imagined and the results look great. Doesn’t look DIY. Good luck.
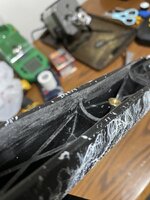
Can someone tell me what the 2 brass looking threaded nut looking things are in this photo? I've thought about trying to freefloat the barrel back to the shank on my t3x lite in 6.5 Creedmoor. Thanks!
My barrel seems floated all the way back to 3.5" from where the shank goes into the action. I guess that's probably the rear nub that needs material removed from it? Thanks!
My barrel seems floated all the way back to 3.5" from where the shank goes into the action. I guess that's probably the rear nub that needs material removed from it? Thanks!
This is the start to finish process I use on my tikka factory stocks to help them have a consistent POI and improve shootability. None of this is completely new information, but there are a few unique things I do, and this is a consolidation post. This is stuff that I'm capable of doing to my...
Just finished mine. Started with the 5/8 socket and 80 grit, which worked fine. I ended up putting some wrap on the barrel so had to remove more. Found the dremel was a lot faster and easier for me.
Just FYI: Take a deepwell socket from your tool box. (See picture below.) Wrap 60grit sandpaper around it. Sand out the barrel channel. It'll get your sides as uniform as possible.
Free-handing it with a dremel will work, but your lines will be wavy. This may or may not matter to you.