Found a sun-bleached 6pt this year and wanted to post about my "restoration" project. Saw a few videos online about different methods and decided on using drywall joint compound for cracks and coffee grounds for color. Most of the videos I found were restoring deer antlers, not elk, so I thought I would post some pictures and thoughts if it helps anyone down the road.
Here are my thoughts:
- The joint compound worked well to fill cracks but I used way too much starting out. I wanted to fill the big cracks for aesthetics but also "help" with durability. I was pretty generous in coating the entire shed in the compound, but this made it tedious when I went to sand the excess off. Used a fine grit sandpaper to start, then steel wool to make sure that I didn't cover over the natural texture. My advice would be to apply the joint compound sparingly.
- I saved coffee grounds for a week to get (what I thought was) the right quantity. Brew coffee, throw the grounds in a container and then throw them in the fridge. If you don't keep them in the fridge, they'll start to get moldy. Ended up needing to apply two "coats" of coffee grounds to get the color I wanted. It also helped to have some water handy to moisten the grounds a bit before rubbing them on. I threw a plastic bin under the rack to catch the grounds after I rubbed them on.
- After the first round of grounds, I let the rack dry for a few days and it wasn't dark enough for what I wanted. Saved grounds for another week and then re-applied. The rack got darker, but this amplified the color difference between the joint compound and the real antler. Some guys throw paint over the joint compound, or use potassium permanganate. Paint or PP would probably work better, but I was trying to use things I already had at the house without having to spend too much money on it. Coffee grounds were the ticket for me, but as noted, you can certainly see the joint compound, especially on the main beam.
- Final step was to apply a clear satin poly to the rack. The joint compound and coffee grounds really dulled it out, so I wanted to mimic some of the natural sheen you'd see on a fresh antler. Go easy on the poly if you use it, and use a clear satin.
Anyway - see the pics below. I think it came out pretty well, just need to brainstorm on a different crack filler for next time.
Before:

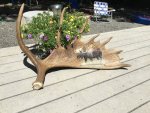
After first coat of coffee grounds:

Finished:

Here are my thoughts:
- The joint compound worked well to fill cracks but I used way too much starting out. I wanted to fill the big cracks for aesthetics but also "help" with durability. I was pretty generous in coating the entire shed in the compound, but this made it tedious when I went to sand the excess off. Used a fine grit sandpaper to start, then steel wool to make sure that I didn't cover over the natural texture. My advice would be to apply the joint compound sparingly.
- I saved coffee grounds for a week to get (what I thought was) the right quantity. Brew coffee, throw the grounds in a container and then throw them in the fridge. If you don't keep them in the fridge, they'll start to get moldy. Ended up needing to apply two "coats" of coffee grounds to get the color I wanted. It also helped to have some water handy to moisten the grounds a bit before rubbing them on. I threw a plastic bin under the rack to catch the grounds after I rubbed them on.
- After the first round of grounds, I let the rack dry for a few days and it wasn't dark enough for what I wanted. Saved grounds for another week and then re-applied. The rack got darker, but this amplified the color difference between the joint compound and the real antler. Some guys throw paint over the joint compound, or use potassium permanganate. Paint or PP would probably work better, but I was trying to use things I already had at the house without having to spend too much money on it. Coffee grounds were the ticket for me, but as noted, you can certainly see the joint compound, especially on the main beam.
- Final step was to apply a clear satin poly to the rack. The joint compound and coffee grounds really dulled it out, so I wanted to mimic some of the natural sheen you'd see on a fresh antler. Go easy on the poly if you use it, and use a clear satin.
Anyway - see the pics below. I think it came out pretty well, just need to brainstorm on a different crack filler for next time.
Before:
After first coat of coffee grounds:
Finished: