Hey guys. I want to share a project I completed a few years back to improve FOC on my Axis 340s. With this mod, I bumped up to a 16.5% FOC, 473 grain setup that are tough as nails, penetrate like no other, and still shoot at a respectable velocity.
It's best to read the entire thread over on ArcheryTalk below:
Axis Footer Build for >FOC | Archery Talk Forum
...But to save everyone's time, I summarized the important aspects in this thread. Hope this helps someone!
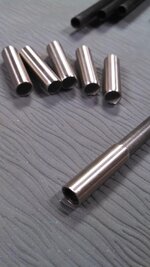
The metal I ordered is perfect for footing the axis 340 arrows at .3125" OD and a wall thickness of .02".
Therefore, the ID of the tube is .2725", creating an impressive .0025" tolerance between the shaft OD.
You can see how they turned out- Each footer weighs .085oz (37grains) and is 1 1/16" long.
I originally had the idea of spinning the piece with a drill and so acheive the bevel and cutoff, however I found that the chuck, even with the only a slight amount of pressure, would transform the cylindrical tube to more of a trivex shape. With a narrow .002 tolerance, I could not slip the steel onto the shaft like normal. SO, I cut a 1.5" thick piece from a 2" dowel, cut a 5/16" hole in the middle, cut a line from the outside to the new hole, and inserted the piece into my lathe. The wood piece, with the cut, would compress ever so slightly in the chuck to grip the steel from all sides, therefore eliminating any issues of concentric warping.
I then used a file to bevel the back edge, all the while maintaining a smooth transition to the new wall thickness. While the lathe was spinning, I also used deburring compound to make sure no sharp edges were created, and simply used a dremel with a cutoff wheel to cut the piece at my desired length. Each part required individual attention due to their detail and complexity, but I was able to make every one nearly identical!
After gluing them onto the arrow shaft, I can run my hand across the lip in the direction of the arrow with no issues- my main concern was tearing up targets on arrow retrieval.

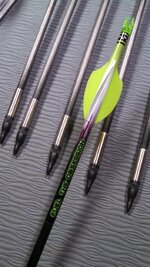
Completed arrow weight is 473grains, FOC @ 16.5%, total arrow length ctn = 27.25"
Fletched helical with lime green and white FF Sk200's, wrapped with 6" Onestringer customs and double doggs. (the pic doesn't quite show the true colors...)

It's best to read the entire thread over on ArcheryTalk below:
Axis Footer Build for >FOC | Archery Talk Forum
...But to save everyone's time, I summarized the important aspects in this thread. Hope this helps someone!
The metal I ordered is perfect for footing the axis 340 arrows at .3125" OD and a wall thickness of .02".
Therefore, the ID of the tube is .2725", creating an impressive .0025" tolerance between the shaft OD.
You can see how they turned out- Each footer weighs .085oz (37grains) and is 1 1/16" long.
I originally had the idea of spinning the piece with a drill and so acheive the bevel and cutoff, however I found that the chuck, even with the only a slight amount of pressure, would transform the cylindrical tube to more of a trivex shape. With a narrow .002 tolerance, I could not slip the steel onto the shaft like normal. SO, I cut a 1.5" thick piece from a 2" dowel, cut a 5/16" hole in the middle, cut a line from the outside to the new hole, and inserted the piece into my lathe. The wood piece, with the cut, would compress ever so slightly in the chuck to grip the steel from all sides, therefore eliminating any issues of concentric warping.
I then used a file to bevel the back edge, all the while maintaining a smooth transition to the new wall thickness. While the lathe was spinning, I also used deburring compound to make sure no sharp edges were created, and simply used a dremel with a cutoff wheel to cut the piece at my desired length. Each part required individual attention due to their detail and complexity, but I was able to make every one nearly identical!
After gluing them onto the arrow shaft, I can run my hand across the lip in the direction of the arrow with no issues- my main concern was tearing up targets on arrow retrieval.

Completed arrow weight is 473grains, FOC @ 16.5%, total arrow length ctn = 27.25"
Fletched helical with lime green and white FF Sk200's, wrapped with 6" Onestringer customs and double doggs. (the pic doesn't quite show the true colors...)


