mallard833
FNG
- Joined
- Mar 10, 2016
- Messages
- 88
Some photos of a project from a couple days ago. I've made a couple knives lately and needed some lightweight, utilitarian sheathes. I did a little research on thermoforming plastic and got some great temperature info here: THERMOFORMING: Determining the Right Temperature for Thermoforming: Plastic Distributor & Fabricator
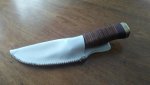
I had my eye on an empty hdpe #2 laundry soap container. I cut our a rough shape and heated it up in our kitchen oven at 290 degrees(hoping for a ~270 deg temp on the plastic) for a few minutes until it was pliable. Being that the temp was low, I used a sheet of glossy cardboard to hole the plastic. It seemed that it was best to keep the plastic at the lowest possible temperature, while still being pliable. Once pliable, I molded the plastic around the knife with a pair of gloves on and held it in place until it cooled. You have to be quick as it cools quickly. I trimmed the rough shape, then drilled 1/16" holes along the edge for stitching. I used artificial sinew for the stitching. Overall, I'm pleased with how it turned out. The friction fit worked just as I had hoped for.
The knife is a mid sized skinner was a re-ground from an old butchers knife. The handle is stacked birch bark, walnut, hickory and brass.