DIY Bino Harness

Joined
Jan 27, 2020
Messages
57
Location
Alberta, Canada
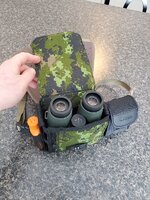
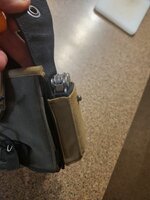
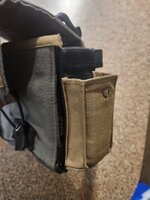
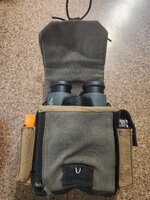
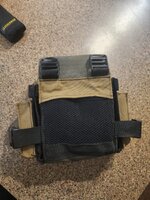
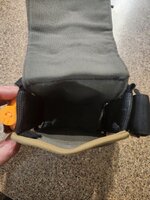
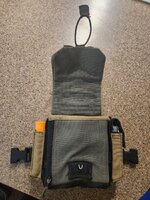
Been looking at the FHF gear harness for a while, but my inner cheapskate wouldn't let me pull the trigger on one.

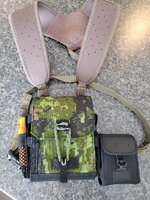
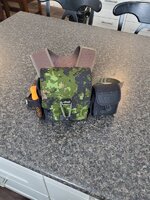
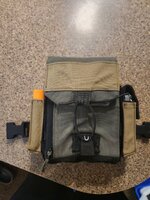
I cobbled this together mostly from scraps I had laying around already. Had to get a couple ladder locks from the local sewing shop. At some point I will make a new black webbing harness for it, but for now the donor harness from an older one will get me started.
 

Attachments

  • Resized_20220313_131120.jpeg
    Resized_20220313_131120.jpeg
    475 KB · Views: 230
  • Resized_20220313_131017.jpeg
    Resized_20220313_131017.jpeg
    476.7 KB · Views: 231
  • Resized_20220313_131110.jpeg
    Resized_20220313_131110.jpeg
    452.1 KB · Views: 229
OP
philintheblank
Joined
Jan 27, 2020
Messages
57
Location
Alberta, Canada
Should probably add a bit more description on this build.

The material was left over from another project.

The webbing and edging was mostly pieces cut off of retired kids stuff and other gear.

The clasp is made from 1/16" stainless welding wire.

The mesh pockets were cut from an old storage bag.

There is some 1/8" craft foam (EVA) from the kiddos craft bin between the fabric layers to give it some structure and padding.

Moral of the story is if you hoard enough junk, eventually there is something useful in the pile.... at least I tell the wife that.
 

madtinker

Lil-Rokslider
Joined
Jan 8, 2023
Messages
133
I know this is old, but I am thinking of something similar and I’d like to know how you feel about it a couple years in, and can you give any more details about your process and what pattern you cut out?
 
OP
philintheblank
Joined
Jan 27, 2020
Messages
57
Location
Alberta, Canada
I know this is old, but I am thinking of something similar and I’d like to know how you feel about it a couple years in, and can you give any more details about your process and what pattern you cut out?
So this pattern has been my full time bino harness since I made the prototype, I actually made a second one that I use now, and gave the original to a buddy who was in the market for a harness.

I don't have the pattern anymore, but all I did was trace out my binos from 2 different sides for a snug fit, then mocked it up with Bristol board to make sure it would end up the right size, don't forget to add your seam allowances.

The hardest thing about the build was just making sure you sew up the pieces in the right order. I have a touch of OCD like most guys who are into DIY gear, so extra seams that criss-cross each other drive me nuts.

making the patterns to final assembly probably took my close to 12hrs to complete.

You could probably make it a lot less complicated by making the sides out of material, instead of webbing like I did, but I was determined to make a close facsimile of the FHF harness, so that's what they used.

In all honesty, though, a bino harness is probably one of the easiest things to make, its a glorified pouch with a couple buckles to attach a harness to. The biggest thing it needs is some sort of padding to give it structure and to keep your binos safe.

The harness can be a little tricky to make just because you need to make sure the webbing comes off at the proper angle so it lays flat on your shoulders.

The good thing about DIY is you can make it any way you want, so there isn't any way to make it wrong!
 

madtinker

Lil-Rokslider
Joined
Jan 8, 2023
Messages
133
That all makes sense and sounds very doable. Could you post a few more pictures from a couple different angles, without the side accessories and the binos removed?
 
OP
philintheblank
Joined
Jan 27, 2020
Messages
57
Location
Alberta, Canada
That all makes sense and sounds very doable. Could you post a few more pictures from a couple different angles, without the side accessories and the binos removed?
The side pockets on this one are sewing directly onto the webbing. To be honest, if you go onto the FHF website and zoom in on the product photos, you will get a pretty good idea of what you need to make it happen. I made my side pockets to specifically carry what I take when I hunt, so they may be bit different what you want. Its all up to what your needs are, that's the beauty of DIY.
 

Attachments

  • IMG-20240619-WA0007.jpg
    IMG-20240619-WA0007.jpg
    363.2 KB · Views: 20
  • IMG-20240619-WA0006.jpg
    IMG-20240619-WA0006.jpg
    168 KB · Views: 20
  • IMG-20240619-WA0005.jpg
    IMG-20240619-WA0005.jpg
    204.4 KB · Views: 21
  • IMG-20240619-WA0004.jpg
    IMG-20240619-WA0004.jpg
    231 KB · Views: 19
  • IMG-20240619-WA0003.jpg
    IMG-20240619-WA0003.jpg
    459.4 KB · Views: 19
  • IMG-20240619-WA0002.jpg
    IMG-20240619-WA0002.jpg
    429.9 KB · Views: 19
  • IMG-20240619-WA0001.jpg
    IMG-20240619-WA0001.jpg
    375.7 KB · Views: 17
  • IMG-20240619-WA0008.jpg
    IMG-20240619-WA0008.jpg
    537.4 KB · Views: 20
Joined
Mar 6, 2024
Messages
32
Location
Alberta
Wow Phil, that looks amazing.

It looks like the flap, back, bottom, and front are all one piece, is that right?

For 2.0, was it also "hoarded" material? It looks like Cordura is that correct? What type of thread did you use?
 
OP
philintheblank
Joined
Jan 27, 2020
Messages
57
Location
Alberta, Canada
2.0 definitely had a more new material in it. I was due for resupply of the usual stuff so the Ranger green cordura was from Ripstopbytheroll. My Exo pack is ranger green, too, so of course I had to nerd out and make a matching bino harness

you are correct about the main body all being one peice.

The thread is just a lighter weight polyester thread. I only have a light duty sewing machine, which struggled with the thicker thread I used on the prototype.
Wow Phil, that looks amazing.

It looks like the flap, back, bottom, and front are all one piece, is that right?

For 2.0, was it also "hoarded" material? It looks like Cordura is that correct? What type of thread did you use
 
Joined
Mar 6, 2024
Messages
32
Location
Alberta
2.0 definitely had a more new material in it. I was due for resupply of the usual stuff so the Ranger green cordura was from Ripstopbytheroll. My Exo pack is ranger green, too, so of course I had to nerd out and make a matching bino harness

you are correct about the main body all being one peice.

The thread is just a lighter weight polyester thread. I only have a light duty sewing machine, which struggled with the thicker thread I used on the prototype.
How was it getting stuff from RSBTR? What did it end up costing you to get it up to us?
 
OP
philintheblank
Joined
Jan 27, 2020
Messages
57
Location
Alberta, Canada
How was it getting stuff from RSBTR? What did it end up costing you to get it up to us?
They ship fast, good customer service, they will ship USPS so we don't get hosed on the brokerage fee that FedEx likes to charge. They have a shipping calculator on their site, best to get a quote right from there
 
Last edited:
Top