Vedran_R
FNG
- Joined
- Sep 21, 2025
- Messages
- 29
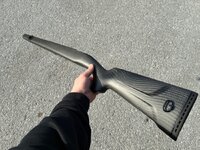
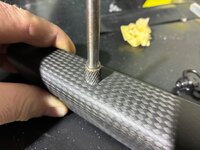
A little DIY project today... installing Halder Push&Go QD sockets on Sako 90 Peak stock. Was a bit hesitant drilling a carbon fiber stock but good and sharp tools go a long way.
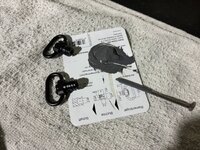
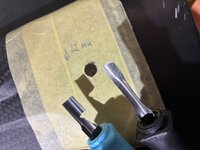
Reason I chose Halder is they're really good quality AND I'm in Europe so... either this or cheap PRC stuff. They come in few two different sizes (6mm and 9mm), have versions for wood or plastic stocks and can be rotating ones of no rotation. Went with no rotation 6mm sockets for plastic stocks to get a clean look.
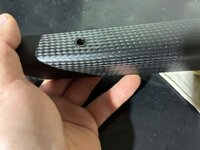
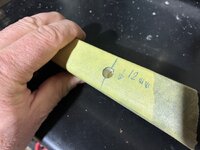
I started by marking hole locations and drilling two 8.5mm holes 12mm deep. Halder sockets are 9mm long and I wanted to have few more mm of space for epoxy.
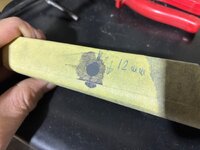
After that I made two "scrapers" and removed aditional 5mm of foam under the hole. Goal was to make a hockey puck shaped void under the carbon. Ended up being 12mm deep and 18mm in diameter. I filled the hole with epoxy metal. Trick to doing it cleanly and without air bubbles is to use a syringe and start filling from the bottom. I taped over the holes, put the stock upside down so if there are any air bubbles they float up (towards the middle of the stock) and let it cure for couple of hours. Didn't feel like waiting 24hrs for it to cure completely, after 4 hrs it was already hard as a rock.
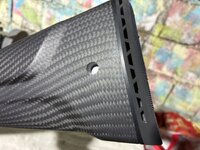
After epoxy cured i drilled a 9.5mm hole 9mm deep using a carbide reamer or whatever this thing's actually called. You can use a forstner bit, I just had this at hand. Applied a generous ammount of epoxy to the hole and screw in the socket. Clean everything including the hole and let epoxy cure.
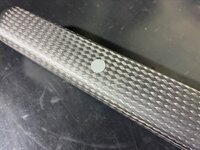
Turned out really clean looking and I'm betting a 18mm "hockey puck" under the carbon will hold the socket plenty strong.
Now I just need to install a spartan gunsmith adapter that's been stock at Croatian customs for two weeks now...
I'm thinking putting the gunsmith adapter in place of original sling stud, just not sure what it looks like under the carbon and if removing the threaded peace would be a problem. We'll see.
Reason I chose Halder is they're really good quality AND I'm in Europe so... either this or cheap PRC stuff. They come in few two different sizes (6mm and 9mm), have versions for wood or plastic stocks and can be rotating ones of no rotation. Went with no rotation 6mm sockets for plastic stocks to get a clean look.
I started by marking hole locations and drilling two 8.5mm holes 12mm deep. Halder sockets are 9mm long and I wanted to have few more mm of space for epoxy.
After that I made two "scrapers" and removed aditional 5mm of foam under the hole. Goal was to make a hockey puck shaped void under the carbon. Ended up being 12mm deep and 18mm in diameter. I filled the hole with epoxy metal. Trick to doing it cleanly and without air bubbles is to use a syringe and start filling from the bottom. I taped over the holes, put the stock upside down so if there are any air bubbles they float up (towards the middle of the stock) and let it cure for couple of hours. Didn't feel like waiting 24hrs for it to cure completely, after 4 hrs it was already hard as a rock.
After epoxy cured i drilled a 9.5mm hole 9mm deep using a carbide reamer or whatever this thing's actually called. You can use a forstner bit, I just had this at hand. Applied a generous ammount of epoxy to the hole and screw in the socket. Clean everything including the hole and let epoxy cure.
Turned out really clean looking and I'm betting a 18mm "hockey puck" under the carbon will hold the socket plenty strong.
Now I just need to install a spartan gunsmith adapter that's been stock at Croatian customs for two weeks now...
I'm thinking putting the gunsmith adapter in place of original sling stud, just not sure what it looks like under the carbon and if removing the threaded peace would be a problem. We'll see.
Attachments
-
 IMG_5342.jpeg484.5 KB · Views: 16
 -
 IMG_5366.jpeg317.8 KB · Views: 15
 -
 IMG_5364.jpeg712.9 KB · Views: 14
 -
 IMG_5363.jpeg439.7 KB · Views: 13
 -
 IMG_5359.jpeg355.8 KB · Views: 14
 -
 IMG_5354.jpeg434.8 KB · Views: 15
 -
 IMG_5353.jpeg347.7 KB · Views: 15
 -
 IMG_5351.jpeg326.5 KB · Views: 15
 -
 IMG_5349.jpeg353.1 KB · Views: 15
 -
 IMG_5346.jpeg370.7 KB · Views: 15