SHELTER OPTIONS
BY LUKE MOFFAT
I never quite appreciate the sight of a quality shelter like when my headlamp lights up the reflecting guy lines of my tent through the pouring rain as I trudge into camp well after dark with a heavy pack. Knowing I have a warm dry place to get out of the soggy, blowing, cold when I get back makes dealing with those elements while I am out just a little easier. Shelters come in all sizes, weights, shapes, strengths, and prices. There is everything from a simple 10-ounce tarp to a 4-season bomber tent weighing 10 pounds. When you look at all the options available in tents, (like free standing vs. non freestanding, floored vs. not floored, 3-season vs. 4-season, single wall vs. double wall) it can be easy to get lost. As lightweight backpack hunters, we are blessed to have more choices in picking out the right shelter than you can shake a stick at. The trick is finding out which tents will work best for your applications. Below, I’ll describe how and why I came to choose the tents I currently use for my backpack hunts.
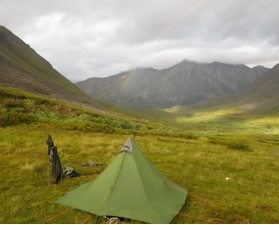
For nearly all my hunts I have grown to prefer a non-freestanding, floorless tent because as a backpack hunter, it is very hard to beat the space to weight ratio these types of shelters provide. When going solo, I use a 60 sq ft GoLite Shangri-La 3 tipi that weighs in at less than two pounds (with stakes and guyout lines if I use my trekking pole or spotting scope tripod as a center pole). I also prefer the tipi style of tent for its ability to shed wind well no matter what direction it is coming from. A tarp shelter on the other hand, has the potential to become a giant parachute if the wind swaps 180 degrees during the night. Being able to have 360 degrees of complete protection from the elements is worth the extra weight over a lighter tarp in my opinion.
In order to protect my sleeping bag and pad from wet ground, as well as provide protection from the swarms of mosquitoes Alaska is famous for, I use a simple 6-ounce bivy made by TI Goat. It has a waterproof bottom and a water-resistant, breathable top, which allows moisture to pass through your bag and not build up condensation between your bag and your bivy sack. Since I sleep in this bivy underneath my tipi, the fact that the top of the bivy is not waterproof isn’t an issue. This bivy is also large enough to allow my sleeping bag and my pad to fit inside so the whole setup stays dry. Another nice feature is that when I am ready to move camp, all I have to do is open the air valve on my sleeping pad and stuff the whole assembly into my dry bag. Then, when I get to where I want to camp that night, I’ll setup my tipi and just pull the bivy/bag/pad setup out, let it fluff up a bit, air up my pad and hit the hay.
When my wife Becca is along, I usually take the slightly larger GoLite Shangri-La 5. At 90 sq ft of space, it’s a backcountry palace for two. To keep our bags/pads dry and keep the bugs at bay, we sleep in a 13 oz nest inside the tipi. This nest is basically bug-netting with a floor and a zippered door. The nest is 30 sq ft of space inside the tipi that is always dry and bug free. The other 60 sq ft inside the Shangri-La 5 is where we hang out, play cards, cook, and store our gear. All up the Shangri-La 5 with stakes, guyout lines and nest come to just over 3.5 pounds (if you use trekking poles as your center pole), which is pretty minimal given that most 3-season backpack tents come in around 4 to 5 pounds for a tent with a third to half the square footage.

Lightweight tipi style tent used during a fall dall sheep hunt
I used to be a big fan of free-standing tents for all my backpacking needs, and I still believe they have their place in my tent arsenal. However, the more I backpack, the more I find that there really aren’t very many valid reasons for me to use a freestanding tent most of the time. One argument I hear often is you can’t setup a non-freestanding tent as well in a boulder field due to limited staking options. I do concede that a freestanding tent may be better suited for this application than a tipi, but in the unlikely event that I decide a boulder field is where I need to setup my camp, someone please examine my head! Generally, a little camp site scouting will allow me to find a place to set up and stake out my tipi and the sleeping is a lot better without all those rocks. Also, most freestanding tents on the market come with a vestibule that needs to be staked out anyway, so you’ll most likely want good staking ground regardless of whether the tent is freestanding or not.
Like non-freestanding tents, a floorless tent design takes some getting used to. When I purchased my first floorless tipi, I was concerned about both excessive bugs and a wet floor; either from rain running off and pooling inside or from setting it up on wet ground in the first place and it never drying out. After a couple months of using the tipi, it quickly became apparent that these concerns were unjustified. I have found that the few bugs that make it underneath the bottom edge of the shelter usually congregate toward the top center of the tipi, away from where I sleep. I also found that the tundra I usually set up my tents on is more than adequate for soaking up the rain that runs off the tipi, which means there isn’t any water running into the living area. Furthermore, when setting up the tipi on wet ground it doesn’t take too long before the ground underneath is dry and I can always use my closed cell foam pad as a seat until then.
One more perk of single wall, tipi style shelters is the option to sew a stove jack near the peak of the tipi and run a small lightweight wood stove inside the tent. The ability to warm up and dry out is a nice luxury to have, especially on late season trips or in very wet hunting conditions. Unlike those in the lower 48 that have alpine to nearly 10,000 feet, due to the northerly latitude that causes tree and brush lines to be much further down the mountain, most of my backpack hunts occur at elevations where wood is scarce, so it’s rare that I get to appreciate this feature.
While tipi style shelters do have excellent space to weight ratios, it takes some practice to know how to pitch them in varying conditions. For example, in humid and rainy conditions, it’s best to pitch the tipi with a gap of a few inches between the ground and the bottom edge of the fly. This allows for good airflow and prevents condensation on the underside of the tipi. However, in extreme winds, one would want to “batten down the hatches” and suck the edge of the tipi flush with the ground to prevent gusts inside the tent. It takes some practice and experience to get a feel for how to best pitch your tipi for the given conditions, but the guy outs are easily adjusted when the situation warrants.
I grew up using simple, 3-season, freestanding tents and feel that they are more “idiot proof” in the sense that it’s easier to get the pitches right and deal with varying conditions. While they are heavier, the double wall design generally helps prevent condensation issues inside the tent. While 3-season, freestanding tents are likely the most common backcountry shelter utilized by most hunters, I have gone away from them in favor of tipis in order to have more spacious living quarters on the mountain for less weight. Any issues with set-up or condensation have been easy to rectify with a little practice.

3 season freestanding tent used on a spring grizzly bear hunt
A single wall tent or a “tarptent”, (such as this one from Henry Shires), is an excellent compromise between a standard 3-season tent and a single wall floorless shelter. These tarptents come in at roughly half, to two-thirds, the weight of the average 3-season tent of similar dimensions, while still offering complete escapement from the bugs and a bathtub floor to protect from the ground. However, like any single wall tent shelter, condensation does have to be managed more closely with a tarptent than the heavier double-wall tents.
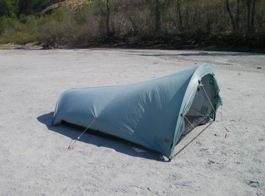
Henry Shires Cloudburst 2 Tarptent used on a silty sandbar in the interior of Alaska
For backpacking or hunting in true extreme conditions, a heavier 4-season tent is more than worth the extra weight. I would feel pretty silly trying to save a few pounds on a flyout hunt on Kodiak Island by taking a 3-season tent when a giant storm system comes rolling off the Pacific. On such occasions, the extra weight is added insurance. If your tent fails in the middle of a storm on a fly out hunt, chances are, the weather is far too dangerous for that plane to come back and rescue you. Having a tent you can count on no matter the conditions is paramount in such instances. For 4-season double-wall tents I really like the offerings from Hilleberg. They seemed to have mastered that balance between strength and weight in my opinion, thus making them a great choice as a 4-season backpack hunting tent.
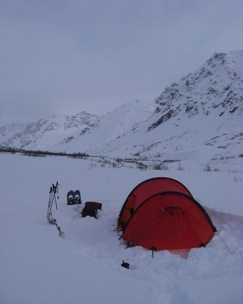
A Hilleberg 4-season tent in use during a February winter camping at -10F
The above list of shelters is what I have found works and doesn’t work, given my needs. As mentioned, I have an arsenal of tents in my gear closet that I use for different trips. No one single tent does everything well. It’s best to prioritize your needs, experience, and comfort level when looking for a tent. A shelter failure in the middle of a hunt isn’t anyone’s idea of a good time. Likewise, taking an eight-pound bomb proof shelter into the timber during early bow season would probably be overkill and irritate your buddy whom you talked into hauling it. Finding the correct balance in what shelter works for you is critical. It’s up to you to best evaluate which tent style will serve you best given your applications.

