Found some suggestions online, but thought I'd consolidate and share some things that worked for me and lessons learned from the past few weeks as this information hopefully is becoming pertinent to others.
Step 1, kill a Pronghorn.
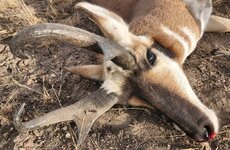
Step 2, cape out and remove either the skull plate or skull. This is mine as a carry on. Try to keep this rig refrigerated as much as possible during transport for reasons to be discussed in step 4.
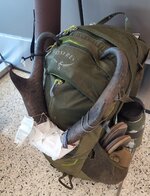
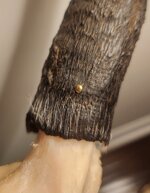
Step 3, drill a tiny hole (1/16th inch in diameter, about 1/2 inch deep) at the base of each sheath and insert a small roofing brad to ensure it fits. This will act as a marker for the natural position of the horn sheaths when you reattach them. Remove and retain the roofing brads once fit is confirmed.
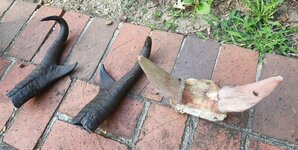
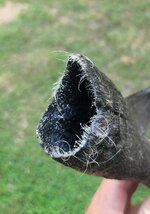
Step 4, remove the sheaths. For anyone who isn't schooled up on Antelope anatomy, bucks (and many does) have a core of bone surrounded by a horn sheath that is biologically somewhere between the antlers of deer and horns of sheep. This becomes immediately apparent when you're caping one out- there isn't really a defined border between the cape and the base of the antlers like exists on deer or elk- the fur just kind of becomes denser and denser until it forms the base of the horn. In any case, detaching the horn sheath from the skull plate is in your best interest, as they are held together with a layer of soft tissue that rots and smells really terrible. The best way to do this is by putting the entire skull plate rig into a plastic bag and letting it rot naturally in the sun for a few days outside. This will get pretty gross, but it avoids the potential of deforming the sheaths that can occur if microwaves or boiling is used to separate them from the skull/ skull plate. Keep trying it every day, and as the tissue gets softer it will eventually get to the point where you will be able to use a combination of twisting and pulling to get the sheaths off. They will look like this:
Step 5, boil the skull plate. This removes most of the soft tissue and "stops the stink" of the skull.
Step 6, clean and desiccate the sheaths. These are the hardest part to get to a neutral level of smell. I washed mine inside and out thoroughly with dish soap and the mechanical action of a toothbrush and then propped them up to drain the water and dry overnight. Once dry, I filled them with baking soda and let sit for about 48 hours. I then changed the baking soda and let them sit again. By this point, they were 90% better than when they came off. You may have to add another layer of scrubbing with soap and/ or baking soda depending on how yours end up.
Step 7, wash sheaths one more time to remove baking soda. Let dry again.
Step 8, reattach sheaths. I used JB weld and it worked great. I basically applied a liberal amount of epoxy to the tip of each bony interior cone, carefully slide the horn sheath back over it and the aligned the 1/16th inch holes using the roofing brads from step 3 and then used painter's tape to ensure the sheaths were sitting naturally as the epoxy dried.
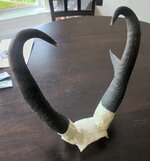
Once it's dry, remove your brads for the final time and you're good to go!
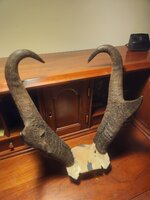
Hopefully this is helpful to anyone doing it their first time. I'm sure there are other ways to skin the cat, but this is what worked for me. Good luck to everyone with tags!
Step 1, kill a Pronghorn.

Step 2, cape out and remove either the skull plate or skull. This is mine as a carry on. Try to keep this rig refrigerated as much as possible during transport for reasons to be discussed in step 4.

Step 3, drill a tiny hole (1/16th inch in diameter, about 1/2 inch deep) at the base of each sheath and insert a small roofing brad to ensure it fits. This will act as a marker for the natural position of the horn sheaths when you reattach them. Remove and retain the roofing brads once fit is confirmed.

Step 4, remove the sheaths. For anyone who isn't schooled up on Antelope anatomy, bucks (and many does) have a core of bone surrounded by a horn sheath that is biologically somewhere between the antlers of deer and horns of sheep. This becomes immediately apparent when you're caping one out- there isn't really a defined border between the cape and the base of the antlers like exists on deer or elk- the fur just kind of becomes denser and denser until it forms the base of the horn. In any case, detaching the horn sheath from the skull plate is in your best interest, as they are held together with a layer of soft tissue that rots and smells really terrible. The best way to do this is by putting the entire skull plate rig into a plastic bag and letting it rot naturally in the sun for a few days outside. This will get pretty gross, but it avoids the potential of deforming the sheaths that can occur if microwaves or boiling is used to separate them from the skull/ skull plate. Keep trying it every day, and as the tissue gets softer it will eventually get to the point where you will be able to use a combination of twisting and pulling to get the sheaths off. They will look like this:


Step 5, boil the skull plate. This removes most of the soft tissue and "stops the stink" of the skull.
Step 6, clean and desiccate the sheaths. These are the hardest part to get to a neutral level of smell. I washed mine inside and out thoroughly with dish soap and the mechanical action of a toothbrush and then propped them up to drain the water and dry overnight. Once dry, I filled them with baking soda and let sit for about 48 hours. I then changed the baking soda and let them sit again. By this point, they were 90% better than when they came off. You may have to add another layer of scrubbing with soap and/ or baking soda depending on how yours end up.
Step 7, wash sheaths one more time to remove baking soda. Let dry again.
Step 8, reattach sheaths. I used JB weld and it worked great. I basically applied a liberal amount of epoxy to the tip of each bony interior cone, carefully slide the horn sheath back over it and the aligned the 1/16th inch holes using the roofing brads from step 3 and then used painter's tape to ensure the sheaths were sitting naturally as the epoxy dried.

Once it's dry, remove your brads for the final time and you're good to go!

Hopefully this is helpful to anyone doing it their first time. I'm sure there are other ways to skin the cat, but this is what worked for me. Good luck to everyone with tags!
Last edited:
