Hello all, I apologize for the lengthy post.
Longtime lurker here and one that has really gained a lot of good information on this site. Enough to assist in my brother and I on our first elk hunt – one that would end with a successful harvest. Coming from WI and not being exactly sure how our maiden voyage to the Rockies would go, we decided on bringing our truck camper and hunting out of that. It worked well but we both felt that if when we make it back out we would like to be able to spike out for at least a few nights. The issue was, we had nothing gear-wise to do a spike, and upon some price shock on shelters I pondered the DIY route. After reading most every post on Rokslide on DIY shelters I gained some courage to do it. I have to also say that I received a TON of help from William (Live2Hunt) here. A few messages back and forth and it is evident he is extremely knowledgeable on projects like these and while I have never seen any of his work I am sure it is done impeccably well.
Let me start this by saying the only experience I had with sewing prior to this project was the weeklong portion of a home economics type class in high school I probably ignored thinking I would never use. Upon return, being all amped up from our hunt, I decided on pulling the trigger to do a DIY tent (much to the wife’s surprise). I called up my mom and asked to borrow her trusty 1947 Sears Kenmore sewing machine. Dimensions were chosen to be able to fit two guys with a pack above their head or below their feet and not be too cramped in the tent. I bought materials either from JoAnns or off of Ripstop (never had an issue with their website, customer service, or materials). I turned our living room into a mini sewing shop over the winter and started the week the materials arrived.
To cut down on the amount of sewing I decided on a pyramid style tent with 2 identical triangular pieces making up each side. Laying everything out and measuring in limited space (we are living in an apartment for now) was truly a challenge. I took a lot of time marking out the dimensions knowing that poor measurements would just prolong the sewing portion. Next, I laid out all of the triangles and matched up the closest triangles together for side panels. I used flat felled seams (according to the video I watched, I know there are some variances) that required three passes over an area where two pieces are combined. After sewing the three side panels I sewed the zipper into the fourth wall (much easier than I had anticipated). I was able to use a zipper foot and that was a life saver. I have no idea how someone would install a zipper without one. After all four walls were completed I sewed them all together and installed guyout tie ons about 30 inches off the bottom right into each seam. This allowed for one on each corner and one on each seam in the middle of each panel – including one in the seam that holds on the zipper. I then hemmed up the bottom and sewed reinforcement patches on where the tie downs would be installed and installed the tie downs. I actually used some old straps off of a backpack for this – the price was right, but it is probably overkill. I then made the tentcap and installed that. In my opinion, getting this just right was the trickiest part of actually assembling the tent.
The most challenging and time-consuming portion of this project for me was envisioning exactly what I wanted and how things would come together. I would say I had 4 x the amount of time spent thinking, drawing, and visualizing the concept than actually assembling. If there is anyone out there who is thinking of doing a project like this but is holding off solely due to the fact they have a lack of sewing experience I say go for it. I do intend to make another and I am sure I could make the second one in 1/3 of the time and it would be stronger. My sewing skills enhanced 10fold from the beginning to the end. I know its not perfect but for my first project I am pretty happy how it turned out. I am sure I could improve just about every aspect of this so if you have any opinions please respectfully let me know! I will be seam sealing it hopefully next weekend if the forecast allows and am planning on taking it out camping soon. Most likely will be just at my mom’s house but I am excited to get it up and use it lol.
I wish I had more pictures of the tent in process but they were all on my wife’s phone and the phone no longer functions.
Thanks for reading.
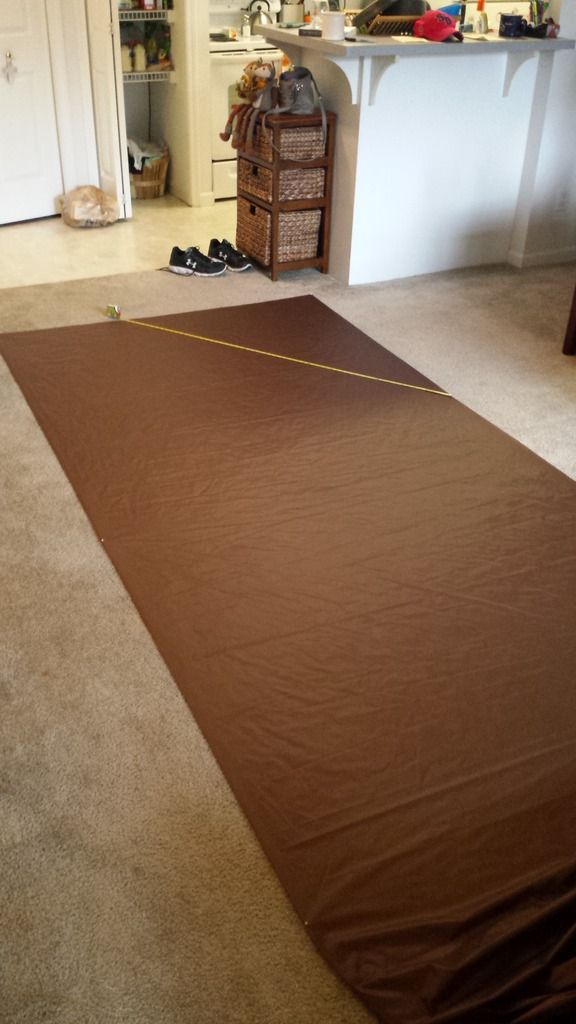
Laying out the fabric.
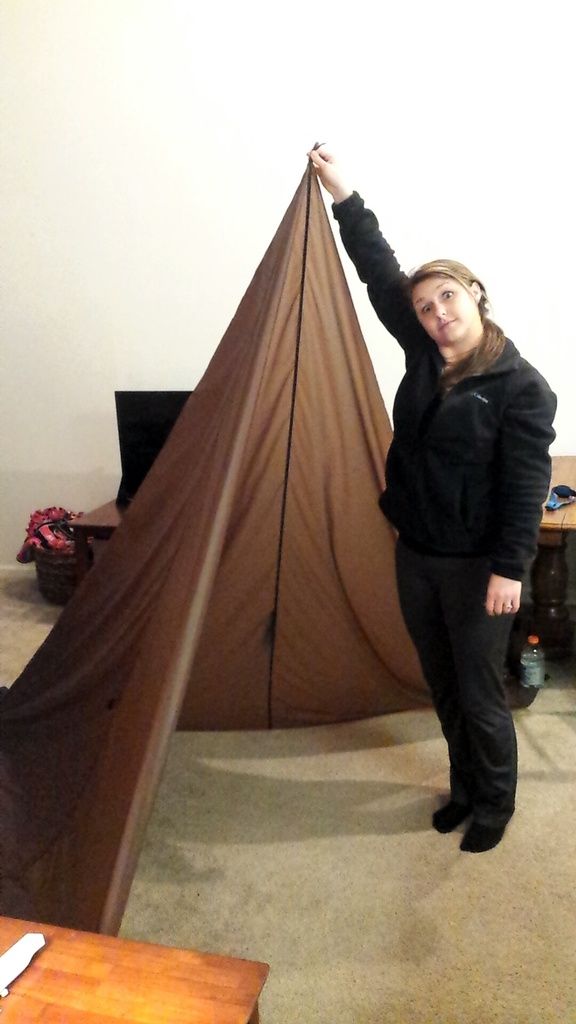
Right about the time my wife wanted to kill me for us not having a normal living room.
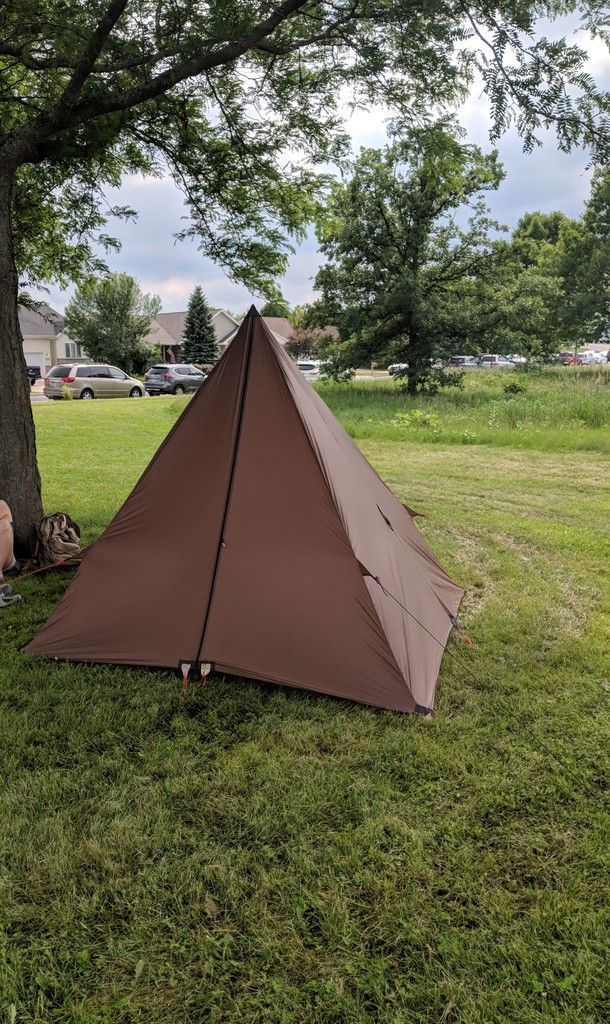
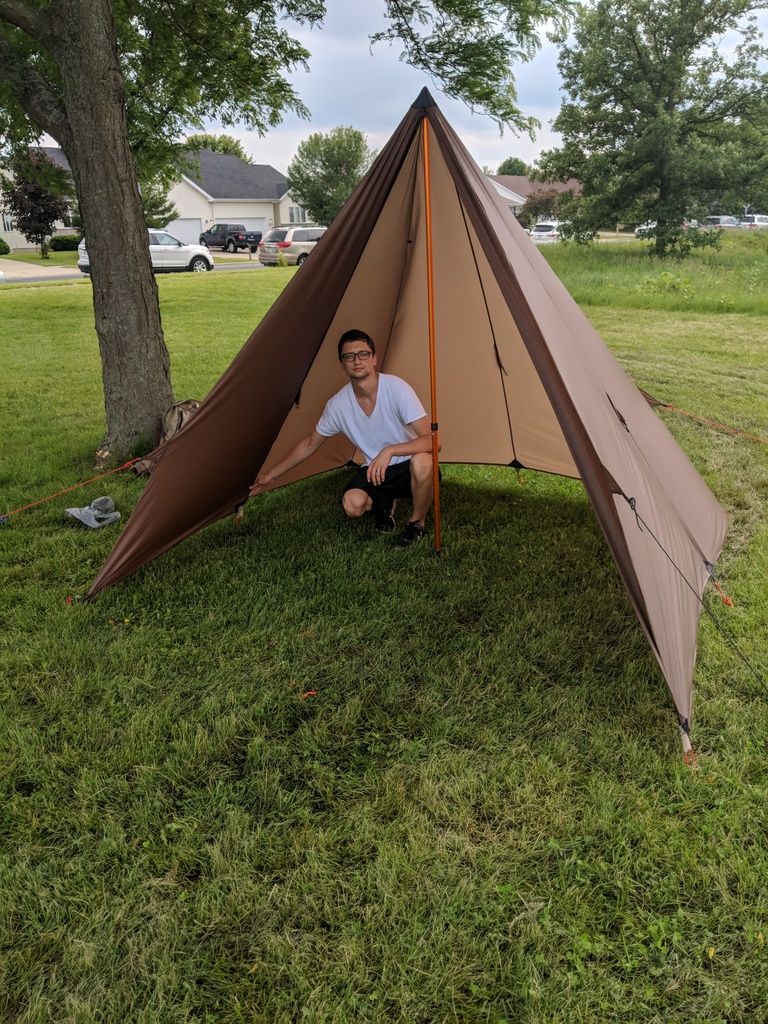
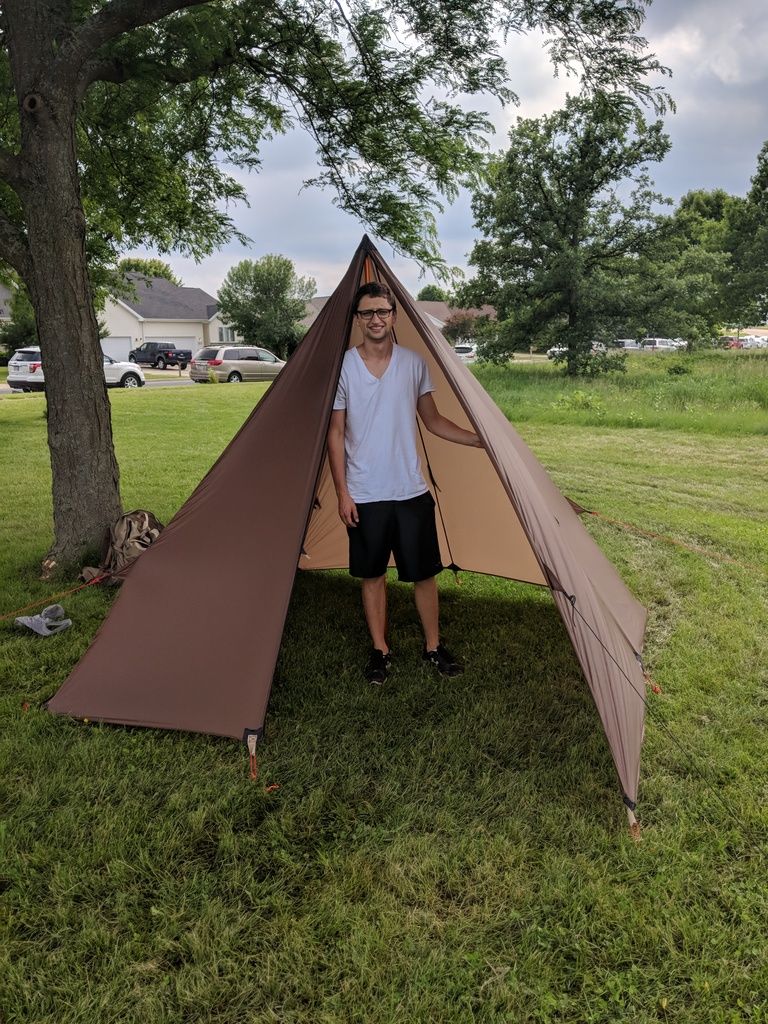
The first set up - I still don't have enough tie out lines so everything should tension up a bit when those are all tied out.
Longtime lurker here and one that has really gained a lot of good information on this site. Enough to assist in my brother and I on our first elk hunt – one that would end with a successful harvest. Coming from WI and not being exactly sure how our maiden voyage to the Rockies would go, we decided on bringing our truck camper and hunting out of that. It worked well but we both felt that if when we make it back out we would like to be able to spike out for at least a few nights. The issue was, we had nothing gear-wise to do a spike, and upon some price shock on shelters I pondered the DIY route. After reading most every post on Rokslide on DIY shelters I gained some courage to do it. I have to also say that I received a TON of help from William (Live2Hunt) here. A few messages back and forth and it is evident he is extremely knowledgeable on projects like these and while I have never seen any of his work I am sure it is done impeccably well.
Let me start this by saying the only experience I had with sewing prior to this project was the weeklong portion of a home economics type class in high school I probably ignored thinking I would never use. Upon return, being all amped up from our hunt, I decided on pulling the trigger to do a DIY tent (much to the wife’s surprise). I called up my mom and asked to borrow her trusty 1947 Sears Kenmore sewing machine. Dimensions were chosen to be able to fit two guys with a pack above their head or below their feet and not be too cramped in the tent. I bought materials either from JoAnns or off of Ripstop (never had an issue with their website, customer service, or materials). I turned our living room into a mini sewing shop over the winter and started the week the materials arrived.
To cut down on the amount of sewing I decided on a pyramid style tent with 2 identical triangular pieces making up each side. Laying everything out and measuring in limited space (we are living in an apartment for now) was truly a challenge. I took a lot of time marking out the dimensions knowing that poor measurements would just prolong the sewing portion. Next, I laid out all of the triangles and matched up the closest triangles together for side panels. I used flat felled seams (according to the video I watched, I know there are some variances) that required three passes over an area where two pieces are combined. After sewing the three side panels I sewed the zipper into the fourth wall (much easier than I had anticipated). I was able to use a zipper foot and that was a life saver. I have no idea how someone would install a zipper without one. After all four walls were completed I sewed them all together and installed guyout tie ons about 30 inches off the bottom right into each seam. This allowed for one on each corner and one on each seam in the middle of each panel – including one in the seam that holds on the zipper. I then hemmed up the bottom and sewed reinforcement patches on where the tie downs would be installed and installed the tie downs. I actually used some old straps off of a backpack for this – the price was right, but it is probably overkill. I then made the tentcap and installed that. In my opinion, getting this just right was the trickiest part of actually assembling the tent.
The most challenging and time-consuming portion of this project for me was envisioning exactly what I wanted and how things would come together. I would say I had 4 x the amount of time spent thinking, drawing, and visualizing the concept than actually assembling. If there is anyone out there who is thinking of doing a project like this but is holding off solely due to the fact they have a lack of sewing experience I say go for it. I do intend to make another and I am sure I could make the second one in 1/3 of the time and it would be stronger. My sewing skills enhanced 10fold from the beginning to the end. I know its not perfect but for my first project I am pretty happy how it turned out. I am sure I could improve just about every aspect of this so if you have any opinions please respectfully let me know! I will be seam sealing it hopefully next weekend if the forecast allows and am planning on taking it out camping soon. Most likely will be just at my mom’s house but I am excited to get it up and use it lol.
I wish I had more pictures of the tent in process but they were all on my wife’s phone and the phone no longer functions.
Thanks for reading.
Laying out the fabric.

Right about the time my wife wanted to kill me for us not having a normal living room.

The first set up - I still don't have enough tie out lines so everything should tension up a bit when those are all tied out.


