I appreciate the input. No offense taken. This is only my second stock build so I have a lot to learn. Sounds like I definitely need to cross pin the 300 PRC stock I am building with sassafras.With dense walnut, or maple, I wouldn't crossbolt it on anything .300 win mag or lower in recoil. It's good insurance, but not needed at that level in solid tight grain wood. In black walnut that is more open grain, I crossbolt everything, but I avoid black walnut unless the customer forces it on me or it's historically correct. Sassafras has that open grain banding, and that gives me pause in the recoil lug area.
You could easily mill a 1/4-3/8" slot across the inside, and epoxy all thread in there. That is what Weatherby does in their stocks and those rarely split. All hidden from the outside.
Please don't take any of my comments as criticism. I think you did nice work, and I'd like to see it last.
Jeremy
Navigation
Install the app
How to install the app on iOS
Follow along with the video below to see how to install our site as a web app on your home screen.
Note: This feature may not be available in some browsers.
More options
Style variation
You are using an out of date browser. It may not display this or other websites correctly.
You should upgrade or use an alternative browser.
You should upgrade or use an alternative browser.
DIY Sassafras Laminated Wood Stock
- Thread starter cbuck516
- Start date
Claybuster
Lil-Rokslider
- Joined
- Jan 15, 2024
- Messages
- 137
I'm afraid to paint a stock and you just go ahead and make one.
Looks like it's going to turn out really nice, I really like the Bravo chassis.
Looks like it's going to turn out really nice, I really like the Bravo chassis.
I have about $10 in JB Weld I bought for this project and the rest is recycled parts from other stocks so my willingness to take risks is pretty high on this one. If I had a really expensive piece of highly figured walnut, I would certainly be much more cautious and would probably be doing everything by hand.I'm afraid to paint a stock and you just go ahead and make one.
Looks like it's going to turn out really nice, I really like the Bravo chassis.
With the location set for the action screws, I began to map out the channel for the action. This involved taking measurements of the action itself and transfering those measurements to the stock. I didn’t get any pictures of this part of the process, but I used a 1/4” plunge router bit with bearing guide to make the majority of the cuts for the action. I built a router template in place using double sided tape and small pieces of 1/2” thick oak.
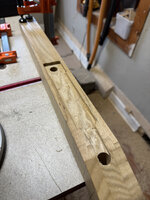
After the initial action outline was defined I routed the barrel channel.
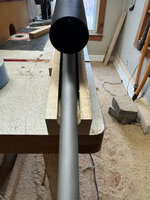
My biggest concern with this stock was reducing muzzle jump. To address this I felt that it was critical to raise the recoil pad so that it wasn’t so far below the centerline of the bore. I slowly removed material and lowered the action into the stock until I was able to get a perfect cheek weld without the need of an adjustable riser. This would save a decent amount of weight over my previous build that included an adjustable cheek riser.
With the final bore to cheek position chosen, I bedded the front of the action into the stock using JB Weld and bedded an aluminum block into the rear action screw hole.

After the initial action outline was defined I routed the barrel channel.

My biggest concern with this stock was reducing muzzle jump. To address this I felt that it was critical to raise the recoil pad so that it wasn’t so far below the centerline of the bore. I slowly removed material and lowered the action into the stock until I was able to get a perfect cheek weld without the need of an adjustable riser. This would save a decent amount of weight over my previous build that included an adjustable cheek riser.
With the final bore to cheek position chosen, I bedded the front of the action into the stock using JB Weld and bedded an aluminum block into the rear action screw hole.

@cbuck516 this looks great, I'm sure it'll shoot great. I was going to write the exact same as wapiti1 did above about the wrist--you dont see a lot of stocks this shape made from wood in general, becasue the wrist is a very weak point, and cumulative recoil just tears them apart along the grain. Your lamination will help, but I would for sure want to reinforce the grip area as he suggested. It's a very thin area that is mostly not supported by the grain, so I'd bet good money that stock will crack there before too long without reinforcement. I wasnt certain if you were doing that as well as the cross-bolt reinforcements so figured I would mention. It's real easy to drill a hole or three up into the wrist and epoxy in threaded rod(s) or a big hardwood dowel(s) where I indicated below. I would personally use a 1/2" or larger oak or other stong hardwood dowel from the grip-cap up almost to the bottom of the inlet, and epoxy that in, then plug it with sassafrass or some sort of decorative plug to hide the hole.
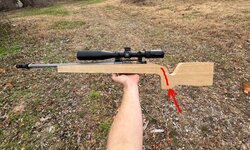

I will address the wrist at some point, definitely before I ever take it in the field. I’m already done with my hunting load development in this stock and will be sending the action off to have some work done to address some minor feeding issues. That will give me plenty of time to modify the stock.@cbuck516 this looks great, I'm sure it'll shoot great. I was going to write the exact same as wapiti1 did above about the wrist--you dont see a lot of stocks this shape made from wood in general, becasue the wrist is a very weak point, and cumulative recoil just tears them apart along the grain. Your lamination will help, but I would for sure want to reinforce the grip area as he suggested. It's a very thin area that is mostly not supported by the grain, so I'd bet good money that stock will crack there before too long without reinforcement. I wasnt certain if you were doing that as well as the cross-bolt reinforcements so figured I would mention. It's real easy to drill a hole or three up into the wrist and epoxy in threaded rod(s) or a big hardwood dowel(s) where I indicated below. I would personally use a 1/2" or larger oak or other stong hardwood dowel from the grip-cap up almost to the bottom of the inlet, and epoxy that in, then plug it with sassafrass or some sort of decorative plug to hide the hole.
View attachment 841945
thisguy
FNG
- Joined
- Mar 24, 2022
- Messages
- 61
I was just wondering the other day of anyone still hand builds wood stocks or if they're all just cnc routered these days. Glad to see it hasn't died out yet.
I won’t claim to be building this by hand as I am using a router for a LOT of the material removal. I used my hands to hold the router though, does that count?I was just wondering the other day of anyone still hand builds wood stocks or if they're all just cnc routered these days. Glad to see it hasn't died out yet.
flathead#2
WKR
There's some mad skillz here on Rokslide.
thisguy
FNG
- Joined
- Mar 24, 2022
- Messages
- 61
Absolutely! That's a lot different than laying in a cnc bed with the router running off a computer program. Human error is involved in running a router and I know how easy it is to mess something up. Chiseling it out by hand would be next level though I'll have to sayI won’t claim to be building this by hand as I am using a router for a LOT of the material removal. I used my hands to hold the router though, does that count?
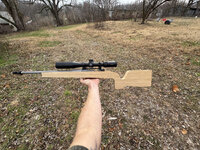
Apologies for the delay in the remaining stock build details. Once I had the action bedded, my next objective was to verify that I had an appropriate angle and height on comb so that I didn’t have to use an adjustable riser. I mounted and torqued the action and installed all hardware on the stock then test fired it to make sure I was happy with how things were feeling.
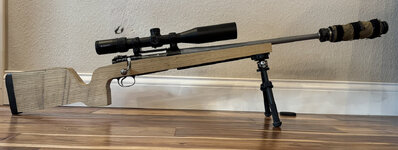
It looks pretty hilarious in this state, but this test firing proved that my design did help reduce muzzle jump a lot and the rifle was muzzle more comfortable for my shooting style.
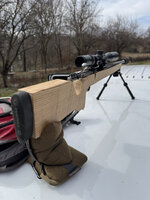
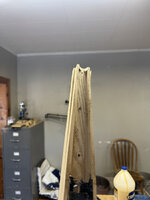
After removing the action from the stock, I moved on to final shaping which I don’t have very many pictures of other than this one showing how I re-shaped the forend from a squared shaped to a more pointed shape which followed the barrel profile.

It looks pretty hilarious in this state, but this test firing proved that my design did help reduce muzzle jump a lot and the rifle was muzzle more comfortable for my shooting style.

After removing the action from the stock, I moved on to final shaping which I don’t have very many pictures of other than this one showing how I re-shaped the forend from a squared shaped to a more pointed shape which followed the barrel profile.

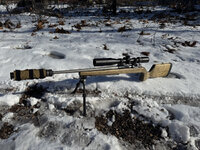
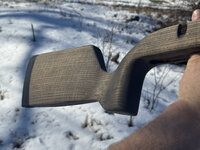
And finally the shaped and finished stock. I stained the sassafras with Minwax Aged Barrel which has a somewhat grey/brown tone to it. Over that I applied one coat of Natura Onecoat hard wax oil finish. I still haven’t added the wrist reinforcements yet, but I definitely will before this ever goes on a hunt. I have almost 300 rounds down this barrel now and am very pleased with how this stock build improved the shoot ability of this rifle for me.
I will have to recheck next time I have the action off, but I think the stock will all hardware installed weighed somewhere close to 2.5# so not too shabby.
I installed the SRS Hunter rail on this gun and absolutely love that thing. I ordered another one that went on my main hunting rifle as well.
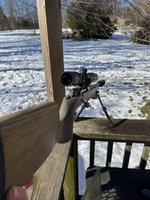
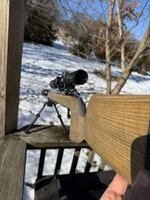
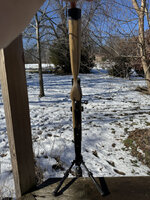
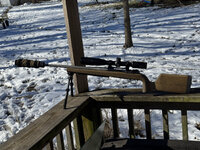
I will have to recheck next time I have the action off, but I think the stock will all hardware installed weighed somewhere close to 2.5# so not too shabby.
I installed the SRS Hunter rail on this gun and absolutely love that thing. I ordered another one that went on my main hunting rifle as well.


HighUintas
WKR
- Joined
- Feb 2, 2020
- Messages
- 4,109
And finally the shaped and finished stock. I stained the sassafras with Minwax Aged Barrel which has a somewhat grey/brown tone to it. Over that I applied one coat of Natura Onecoat hard wax oil finish. I still haven’t added the wrist reinforcements yet, but I definitely will before this ever goes on a hunt. I have almost 300 rounds down this barrel now and am very pleased with how this stock build improved the shoot ability of this rifle for me.
I will have to recheck next time I have the action off, but I think the stock will all hardware installed weighed somewhere close to 2.5# so not too shabby.
I installed the SRS Hunter rail on this gun and absolutely love that thing. I ordered another one that went on my main hunting rifle as well.
View attachment 892510
View attachment 892511
View attachment 892512
View attachment 892513
View attachment 892514
View attachment 892515
That is what I'd call "tits". Nice work
Similar threads
- Replies
- 25
- Views
- 1K
- Replies
- 3
- Views
- 509
Featured Video
Latest Articles
- TT#64 Josh Boyd Elk Hunting Strategies for Every Season
- Aaron Davidson of Gunwerks
- TT#63 Dirk Durham’s Art of Elk Calling
- BIG Buck Stories with the Dirty Giants Podcast
- TT#62 Brian Barney Hunting Bulls without Calling
- Hoyt Alpha AX-2 SD Review
- Kuiu Kenai vs Outdoor Vitals Vario Hooded Jacket Review
- Hoyt RX-9 Ultra Review
- Hunting Vampire Bucks & Building an Optics Kit
- Darton Sequel ST2 35 Review
