Jared Bloomgren was on the Rok Blog a few weeks ago with Spot & Stalk Tactics. Rejoice Spot & Stalk junkies because he’s back with Part II. Show us the money, Jared!
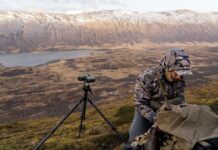
After I have glassed up a potential animal, I consider the following:
1) Are the winds/thermals right?
2) Is the terrain and/or concealment adequate and passable?
3) Is there enough time in the day to complete the stalk?
4) What is the animal’s behavior?
5) Is there a good shot location?
Wind/Thermals
Knowing the way thermals work in the area you are hunting is very important. This will determine which way you go about the stalk. Sometimes you may not be able to do the stalk because the winds aren’t right or the terrain doesn’t give you the concealment needed for the wind direction. The animal will have to move or conditions change before a stalk will be possible.
Terrain/Concealment
Think about an animal bedded on an open ridge with a gentle slope versus an animal bedded below a cut bank or cliff. It is obvious which one warrants a better stalk. Pick apart the terrain around the animal and find which route offers you the concealment and terrain features needed to get close. What is the ground like? Is it noisy? Will dry and crunchy twigs, branches, grass, or even snow make it difficult? Using something to cover up noise is very important. I like to slip on “Sneaky Pete Feet” or remove my boots altogether and slip on extra socks. Another thing to consider during this time is if you can approach the animal from above or below. Generally speaking, an animal will bed facing downhill and they usually expect danger to come from below. I will always try to complete my stalk by coming from above. If not, coming from below is not out of the question. It usually just takes more work.
It is also important to know what kind of terrain is between you and the animal. I often times study a topographic map so I know exactly what I’m doing. Before setting off, I also memorize some terrain features that will help me know where I am at during the stalk. It is mind blowing how much the look and lay of the land seems to change from what you remember when you were perched high on your vantage point.
Once you get to the cedars, it’s all too easy to lose track of your prey. Memorize the terrain and features before the stalk.
Enough Time?
Stalks can vary greatly on how much time they will take. I have had stalks that took only one hour and others that have taken over eight hours. I have run out of daylight before and was forced to back out of the stalk entirely. There are so many factors that come into play. Knowing if you have enough time will help you determine if you should pursue or wait until another day.
Animal Behavior
How is the animal acting? If the animal is calm and close to taking a nap that will greatly increase the odds of you helping him take a dirt nap! If he is very skittish, he will likely be on the lookout for any kind of danger. With coyotes, wolves, bears, lions, and humans, all ungulates are conditioned to be on high-alert. I always let an animal calm down before closing the final portion of the stalk, the “Red Zone.”
Shot location
Look for a location where you plan to make your shot from. Look for an area that allows you to get close enough while still remaining hidden. This will allow you to get away with the extra movement of drawing your bow or settling your rifle.
To this day I still learn something on each and every stalk.
There is one more topic I’d like to cover in this series: The final approach of the stalk or what I like to call “The Red Zone.” Watch for my next blog post. Thanks.
Jared Bloomgren


